WordPress Auto Update: Everything You Need to Know and the Best Practices

Keeping your WordPress website software up-to-date is essential for its maintenance. In addition to providing the latest features, software updates also increase the WordPress website’s security.
However, it can be time-consuming to keep up with new updates. Thankfully, you can enable automatic updates on WordPress.
In this article, we’ll go over everything you need to know about WordPress automatic updates. We’ll cover how automatic updates work, when and why you should update WordPress, and the types of updates you can install.
We’ll also explain multiple methods so you can enable automatic updates on a WordPress site.
How Do WordPress Automatic Updates Work?
If you enable WordPress automatic updates, your website’s software will be updated as soon as a new version is out. You don’t have to check for the latest updates and install them yourself – the WordPress back-end will take care of it for you.
Automatic updates can save a lot of time for site owners. You can focus on tasks other than maintaining your WordPress site, such as crafting top-notch content, designing your site, or executing marketing campaigns.
WordPress 3.7 introduced automatic background updates for minor releases. Major releases need to be installed manually.
When and Why Update WordPress?
In general, it’s always recommended to keep your WordPress site up-to-date. WordPress updates are vital for your site’s safety and functionality. So whenever there’s a new update available, make sure to install it.
Here are several benefits of WordPress updates:
- Security. Outdated software is one of the most common causes of cyberattacks. According to Sucuri, in 2019, 49% of all compromised WordPress sites had an obsolete version of the software. Software updates fix security loopholes that might emerge in older versions.
- Features. Updating WordPress will give you access to new helpful features, such as easier migration from HTTP to HTTPS.
- Bug fixes. A software bug is an error that results in a false result and they’re an unavoidable part of the software development process. Once identified, these bugs are usually fixed in future patches. Therefore, it’s always important to keep your plugins up to date.
- Performance. Some software updates introduce higher efficiency while handling certain processes. This can increase the loading speed of your website, which is essential for retaining visitors.
When you consider the importance and benefits of WordPress updates, setting up automatic updates becomes a much more apparent decision.
By automating WordPress updates, you don’t have to worry about missing security updates and exposing your website to vulnerabilities. Additionally, you get the latest features and, in some cases, faster performance.
Types of WordPress Automatic Updates
There are four types of WordPress updates:
- Core updates
- Plugin updates
- Theme updates
- Translation file updates
WordPress core updates are grouped into three categories:
- Core development updates (also known as the “bleeding edge”)
- Minor core release updates
- Major core release updates
Minor releases are automatically installed by default and include security patches, maintenance, and translation updates. Major core updates are upgrades containing new features and bug fixes.
Themes and plugins are sometimes updated by default, but in most cases, you’ll have to install them manually or by setting up automatic updates first.
Since the release of WordPress 5.5, you can enable automatic updates for themes and plugins right from the WordPress dashboard.

How to Prepare For Automatic WordPress Updates
Before updating WordPress, the most critical step is to backup your site first.
Updates are essential, but there’s always a possibility that something might go wrong during the process. If your update fails, you can break your WordPress site and lose your data.
Having a backup of your site will make it easier to recover your site’s last working version. There are many WordPress plugins – both free and paid – that allow you to backup your website easily:
Once you’ve backed up your site files to your computer or a cloud storage solution, you can proceed to enable automatic updates for WordPress.
Avoid updating core WordPress files, plugins, and themes all at once. Instead, focus on one piece at a time. That way you’ll ensure that everything works as intended.
Managing Automatic Updates Using WordPress Dashboard
Automatic minor updates have been present since WordPress 3.7. Up until WordPress 5.4, you could only enable automatic updates by tweaking your site files’ code.
This manual method should be manageable for developers, but it can seem a bit tricky if you’re a complete beginner.
Thankfully, WordPress 5.5 and later versions make the process of automatically updating major releases, plugins, and themes a whole lot easier.
WordPress developers added a feature that allows you to enable/disable automatic updates from the WordPress dashboard.
Let’s take a look at how to enable automatic WordPress updates for major releases:
- On the WordPress dashboard, click Updates.
- If you haven’t enabled major releases auto-update, under Current Version, you’ll see This site is automatically kept up to date with maintenance and security releases of WordPress only. Click Enable automatic updates for all new versions of WordPress.
- The message will read This site is automatically kept up to date with each new version of WordPress.
If you prefer to automate minor and security updates only, here’s how you can revert the settings:
- On the WordPress dashboard, go to Updates.
- Select Switch to automatic updates for maintenance and security releases only.
Here’s how to enable automatic updates for your WordPress themes:
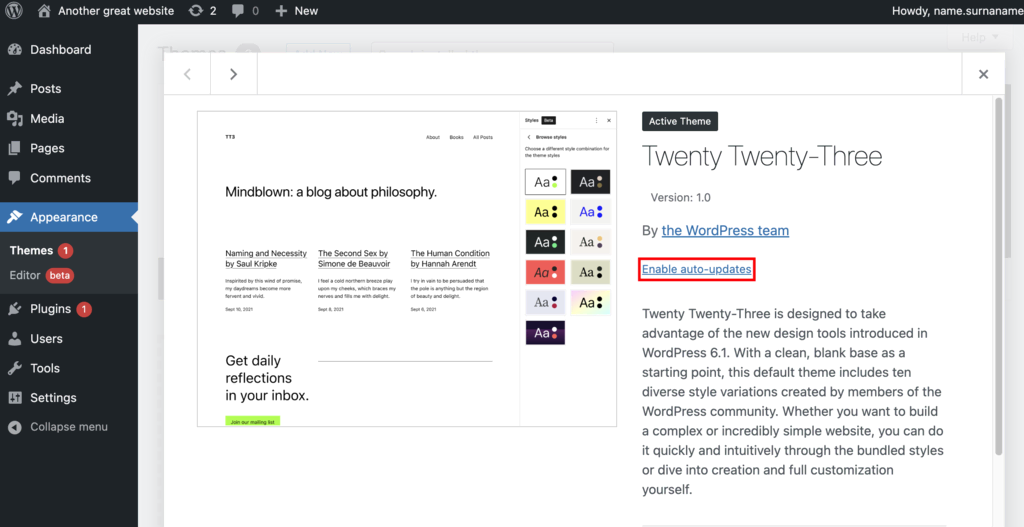
- Navigate to Appearance → Themes.
- Select a theme you want to update automatically.
- Under the title and author of the theme, select Enable auto-updates.
Finally, here’s how to update WordPress plugins from the dashboard automatically:
1. Navigate to Plugins → Installed Plugins.
2. To set auto-updates individually, click Enable auto-updates.
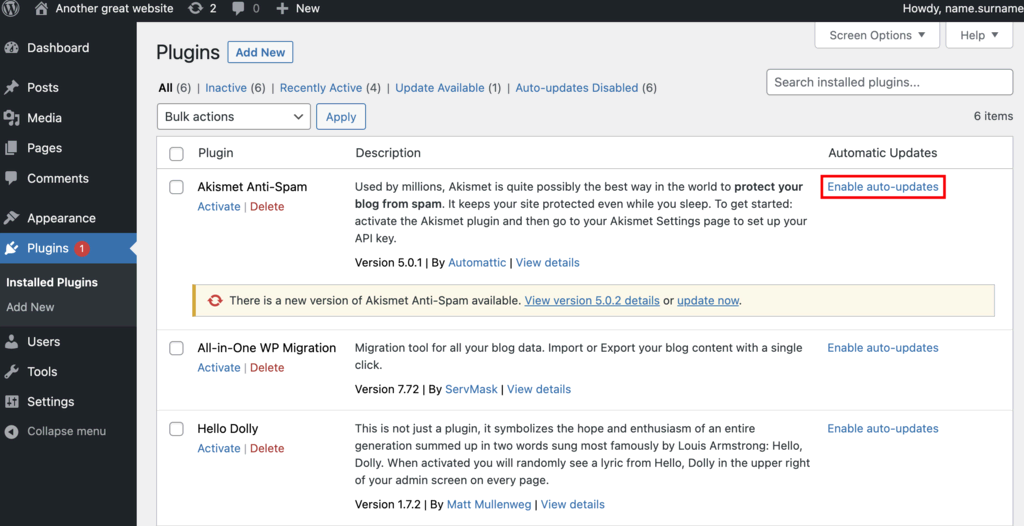
3. To set auto-updates for multiple WordPress plugins in bulk, tick the plugins you want and select Enable auto-updates from the Bulk actions drop-down menu. Click Apply.
Managing Background Updates Using the wp-config.php File
By editing the code of the wp-config file of your WordPress site and adding constants, you can enable and disable WordPress automatic updates, as well as choose what type of automatic updates you wish to allow.
Keep in mind that editing your website code can be risky, so proceed with caution and ensure that you have a backup file ready.
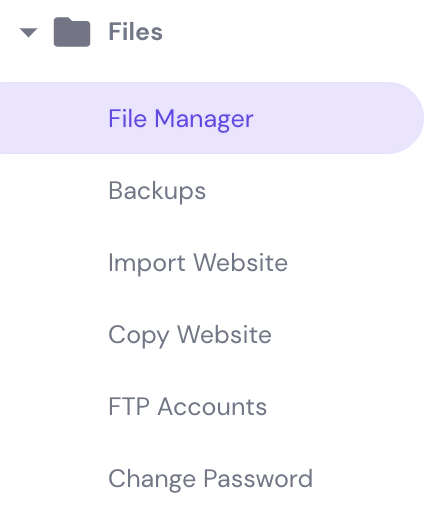
To access wp-config.php, use the file manager feature of your hosting control panel or connect to FTP client like FileZilla. As an example, we’ll use the hPanel’s File Manager.
- Log into the hPanel and select File Manager under the Files section.
2. Find the wp-config.php file within the public_html folder.
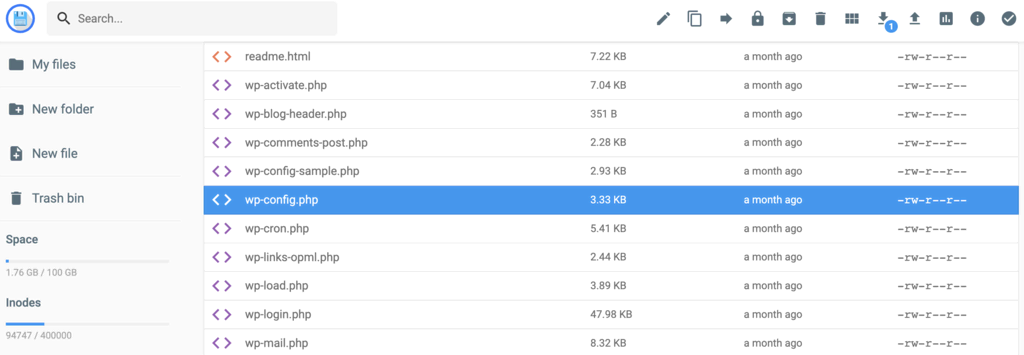
3. Back up the original file by saving a copy on your computer or by duplicating and renaming it.
4. Open wp-config.php and add the following line of code to disable automatic WordPress updates:
define( 'AUTOMATIC_UPDATER_DISABLED', true );5. Add the following code to modify the settings of your WordPress core updates:
define( 'WP_AUTO_UPDATE_CORE', true ); Feel free to change true to another value according to your needs, like false and minor. Here’s what each value represents:
- true means development, minor and major updates are enabled.
- false means development, minor and major updates are disabled.
- minor means minor updates are enabled, while major and development installations are disabled.
6. Finalize the changes by clicking Save.
Managing Background Updates Using API Filters
If you would like more flexibility with how you manage automatic updates for WordPress, add API filters. API filters allow you to manipulate variables in a specific command to fine-tune the details on how you want to execute the automatic updates.
API filters should be added to must-use plugins as they’re automatically enabled on a WordPress site upon installation.
Must-use plugins don’t appear in the WordPress dashboard and are stored in a different directory than other plugins. By default, they are located in wp-content/mu-plugins.
For example, if you want to disable all automatic updates, you can use:
add_filter( 'automatic_updater_disabled', '__return_true' );Or, if you want to update all core types only, add the following filter:
add_filter( 'auto_update_core', '__return_true' );You can also set individual changes:
- To allow minor updates:
add_filter( 'allow_minor_auto_core_updates', '__return_true' );- To allow major updates:
add_filter( 'allow_major_auto_core_updates', '__return_true' );- To allow development updates:
add_filter( 'allow_dev_auto_core_updates', '__return_true' );If you want to disable the updates, replace true with false.
To update WordPress themes and plugins automatically, simply use the following filters:
- For plugins:
add_filter( 'auto_update_plugin', '__return_true' );- For themes:
add_filter( 'auto_update_theme', '__return_true' );Managing Automatic Updates Using Plugins
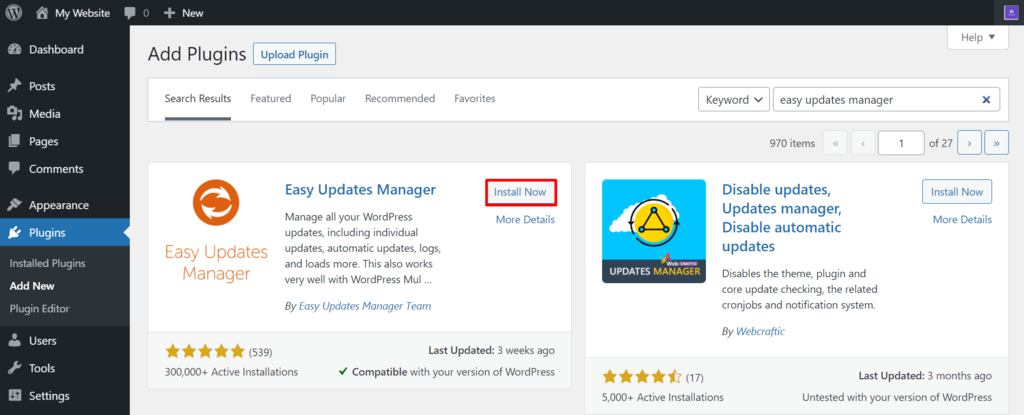
Easy Updates Manager is one of the most popular WordPress auto-update plugins. It’s easy-to-use, powerful, and has a free version that covers all the basics.
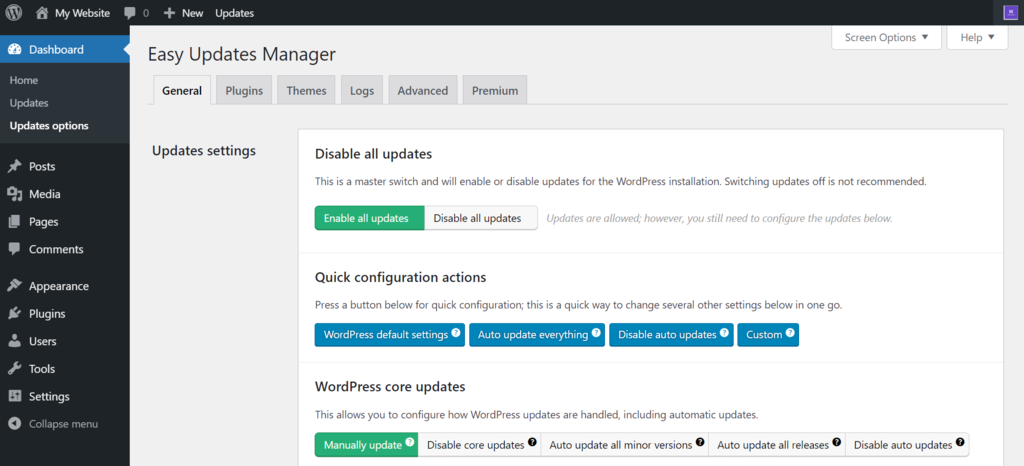
It comes with a long list of settings, including disabling and enabling WordPress core, theme, and plugin updates.
If you upgrade to its premium version, you’ll be able to access advanced features like update scheduling, delayed updates, auto-update protection, and dedicated support. The premium licenses start at $29/year.
Installing and configuring the Easy Updates Manager plugin is easy:
- Access your WordPress Dashboard and go to Plugins.
- Use the search bar to find Easy Updates Manager.
- Install and Activate the plugin.

- Go to Update settings and configure your preferred settings.

Set the Correct WordPress Automatic Update Settings via hPanel
If you use Hostinger’s standard, cloud server, or WordPress-optimized hosting, you can set up your automatic updates preference during the WordPress installation process on hPanel. Here’s how to configure it:
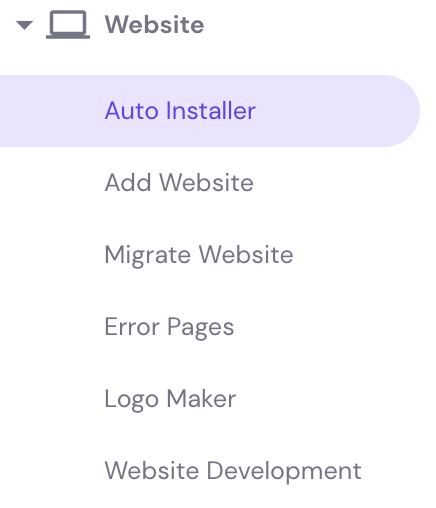
- On the hPanel, go to Website → Auto Installer.
- Select WordPress.
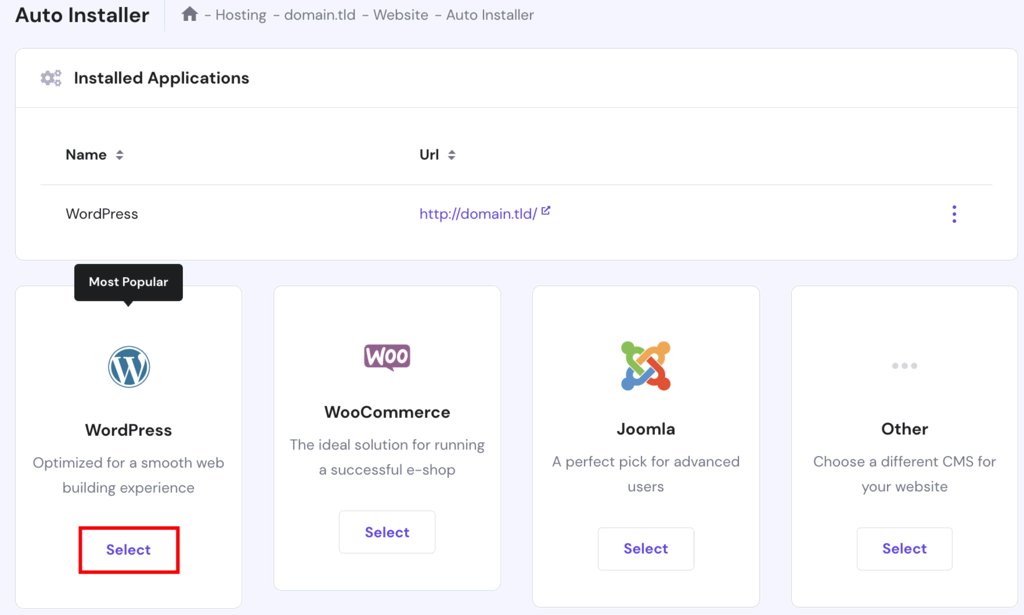
- Fill in all the necessary information, such as your domain name and the administrator login details.
- You’ll find three automatic update options at the bottom of the settings page: Turn off automatic application updates, Update only to minor version, or Always update to latest available version. Select the option you prefer.

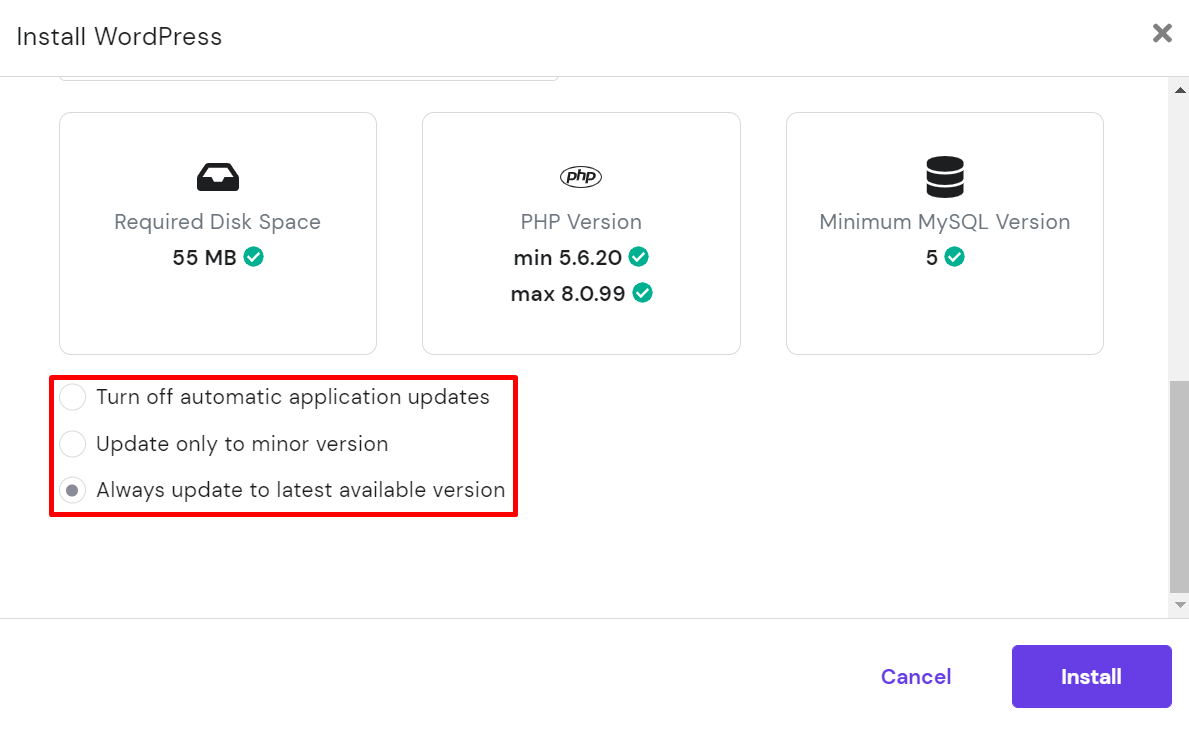
- Click Install.
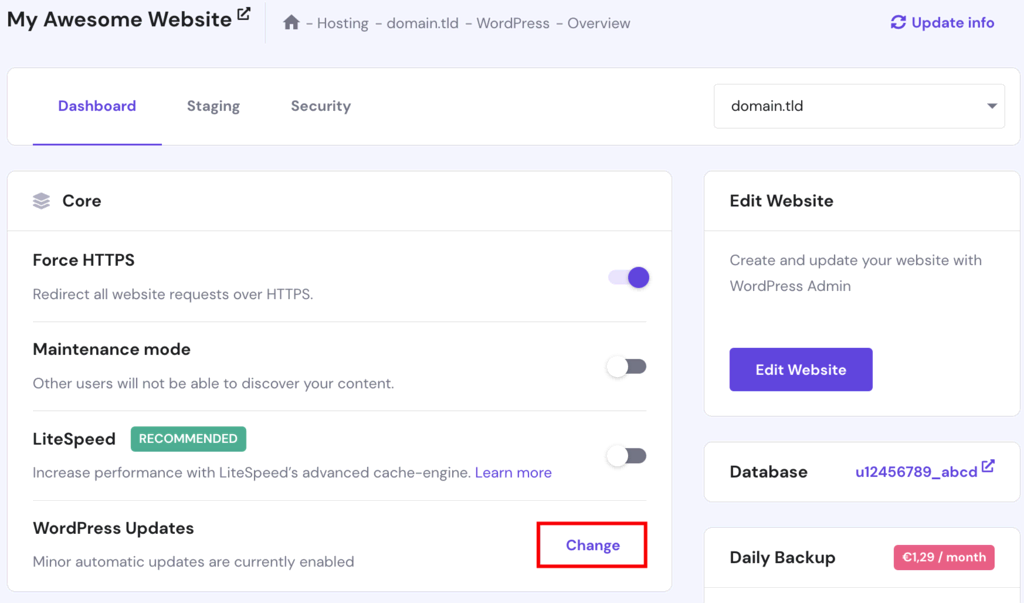
If you ever want to adjust the update settings again, open the WordPress → Overview page and select the Change button near WordPress Updates:
Hostinger users can also leverage WordPress Enhanced Automatic Updates in hPanel. This feature lets you enable automatic updates, log past updates, and roll back to a specific update using a backup.
When an automatic updates alert fails, it notifies you in hPanel and via email. This alert system keeps you informed about your website’s updates, allowing you to take action when necessary.
Keep in mind that activating WordPress Enhanced Automatic Updates disables native WordPress automatic updates.
Here’s how to enable WordPress Enhanced Automatic Updates:
- Navigate to WordPress → Security from the hPanel dashboard.
- Click on the Enable Automatic Updates toggle within the Automatic updates configuration section.
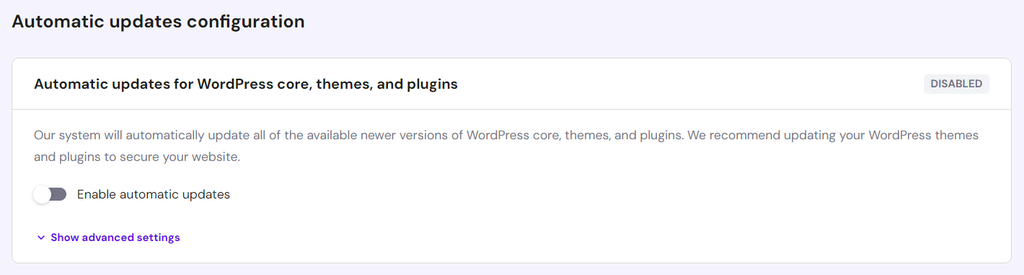
- A popup window will appear, explaining how the feature works and how to benefit from it. Select Enable auto-updates to confirm.

Users on Business and Cloud hosting plans can select Show advanced settings to configure updates for WordPress core, plugins, and themes individually. Premium users can upgrade their hosting plans to access theme and plugin update settings.
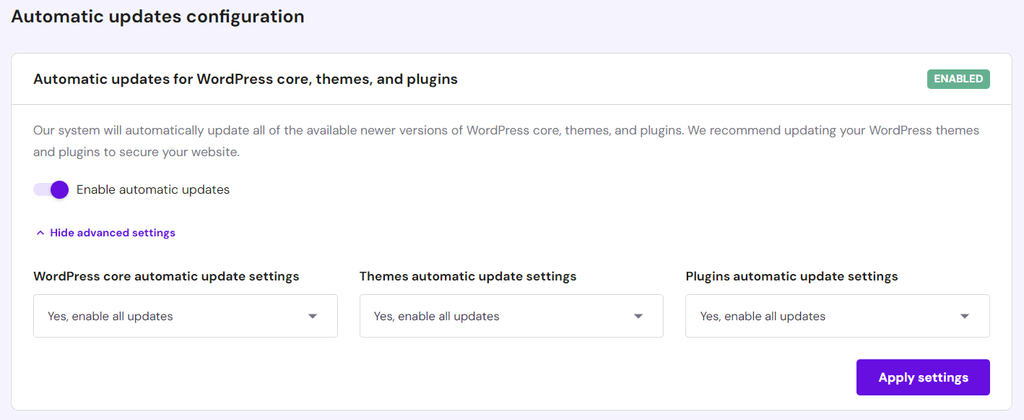
Here are the available options for WordPress core updates:
- Don’t update ‒ disable automatic updates.
- Yes, but only security updates ‒ apply only minor version updates, such as from 6.2.1 to 6.2.2.
- Yes, enable all updates ‒ apply major and minor updates, such as from 6.2.1 to 6.3.
Available options for WordPress theme and plugin updates include:
- Don’t update ‒ disable automatic updates.
- Yes, but only security updates ‒ apply updates to fix known vulnerabilities from the Patchstack vulnerability database.
- Yes, enable all updates ‒ apply all updates.
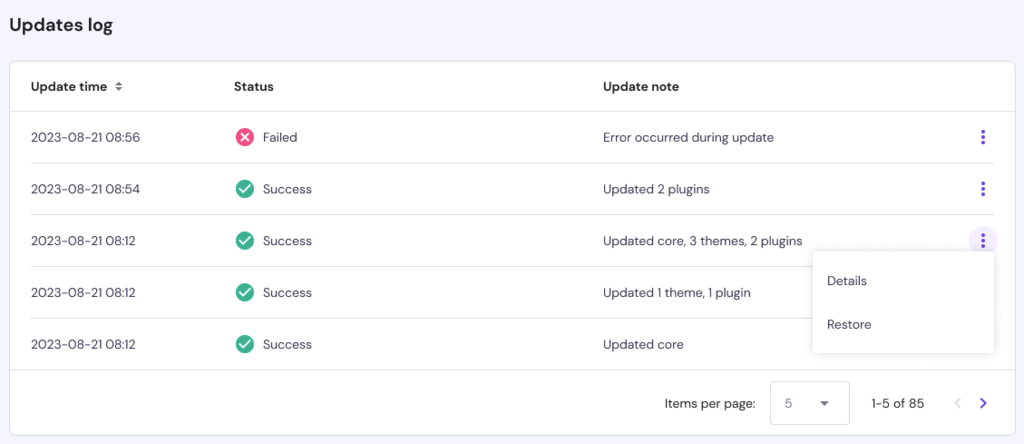
To view recent automatic update logs, scroll to the Updates log section and click the three-dot menu next to a specific update. Select Details to see more information about the update. Click Restore to roll back to that version.
Notification Emails
As a WordPress site owner, you’ll often receive notification emails from WordPress when there’s a new update available or when changes are made to your site.
Expect to receive three types of notification emails from WordPress:
- A result email. This type of notification email gives information about successful updates like “Your site has updated to WordPress (version number.)” This message informs you that the auto-updates are working as intended.
These emails don’t require a response or action from your end.
- A notification email. Usually, these are emails that inform you whenever there’s a new version of WordPress available. They typically include the “WordPress (version number) is available. Please update.” message. This might mean that WordPress experienced an error, and you have to update it manually.
- A debugging email. You will receive this type of notification email if development versions or critical cases occur.
Even though these notification emails can be helpful, they can also clog up your inbox. To disable them, you can apply API filters.
You can create custom rules to receive emails for some instances but prevent incoming emails for the ones you don’t need.
- To disable receiving result emails:
apply_filters( 'auto_core_update_send_email', '__return_false' );- To disable receiving notification emails:
apply_filters( 'send_core_update_notification_email', '__return_false' );- To disable receiving debugging emails:
apply_filters( 'automatic_updates_send_debug_email', '__return_true' );Conclusion
As a site owner, keeping your WordPress site up-to-date is vital to maintain its security.
Fortunately, you can automate updates for WordPress core, plugins, themes, and translation files. Automatic updates can also save a lot of time in your website maintenance routine.
Before you proceed with updating your WordPress site, having a backup system in place is essential. Then, choose a method to set up the automatic updates. In this article, we explored four methods to set up WordPress automatic updates:
- Using WordPress 5.5 Dashboard. If you have WordPress 5.5 or above, you can enable auto-updates for core WordPress files, plugins, and themes straight from the dashboard.
- Using wp-config.php file. This involves accessing your website configuration file using a file manager or an FTP client, and then editing the code.
- Using API filters. This allows you to be more specific when setting up the auto-updates. It involves accessing wp-content/mu-plugins in your site directory and adding API filters.
- Using plugins. Some plugins such as Easy Update Manager are an easy solution for managing WordPress auto-updates.
No matter which method you go for, we hope that this article will help you manage your WordPress website a bit more easily.
Learn More About WordPress
What is WordPress
How to Login to WordPress
How to Install WordPress
How to Duplicate Pages and Posts on WordPress
How to Delete WordPress
WordPress Taxonomy Guide
Guide to WordPress Revisions

Hasna is passionate about tech, culture, and the written word. She hopes to create content that helps people succeed on the web. When not writing, rearranging, or polishing sentences, she enjoys live music and overanalyzing movies.
