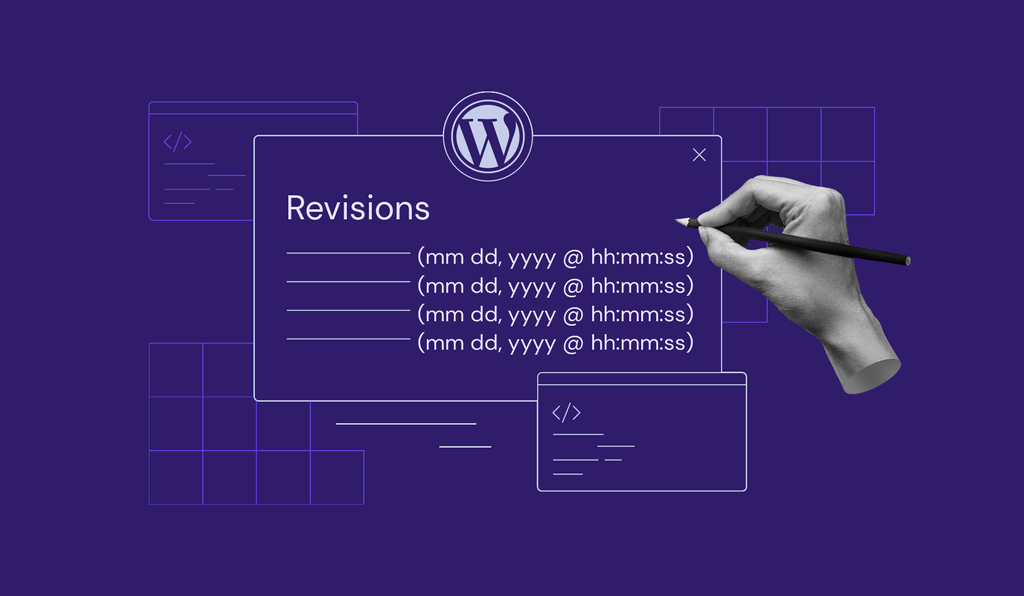
WordPress Revisions: Different Options and How to Manage Them
Losing work in the middle of editing or publishing is an irritating problem. Luckily, WordPress can prevent this with its built-in revisions feature.
However, revisions can add up over time and occupy a large amount of space on your WordPress database, slowing the website down.
This tutorial will discuss what revisions in WordPress are and how to use them. We will also guide you through the steps of deleting, limiting, and disabling revisions to free up some space and improve the WordPress website performance.
What Are WordPress Revisions?
Revisions are a feature that lets users view records and undo any changes to a post or a page on a WordPress site. The WordPress revisions system creates new versions whenever you hit the Save Draft, Update, or Publish button. This autosave feature also stores a special type of revision every 60 seconds, which overwrites the old autosaves rather than making a new row in the database.
What Can You Do With WordPress Post Revisions
This section will explain how to view, compare, and restore old post revisions in WordPress. Note that there must be at least two edits before the revisions menu can appear.
View Different Revisions
Click a page or a post whose revisions you want to check, and the WordPress text editor will appear.
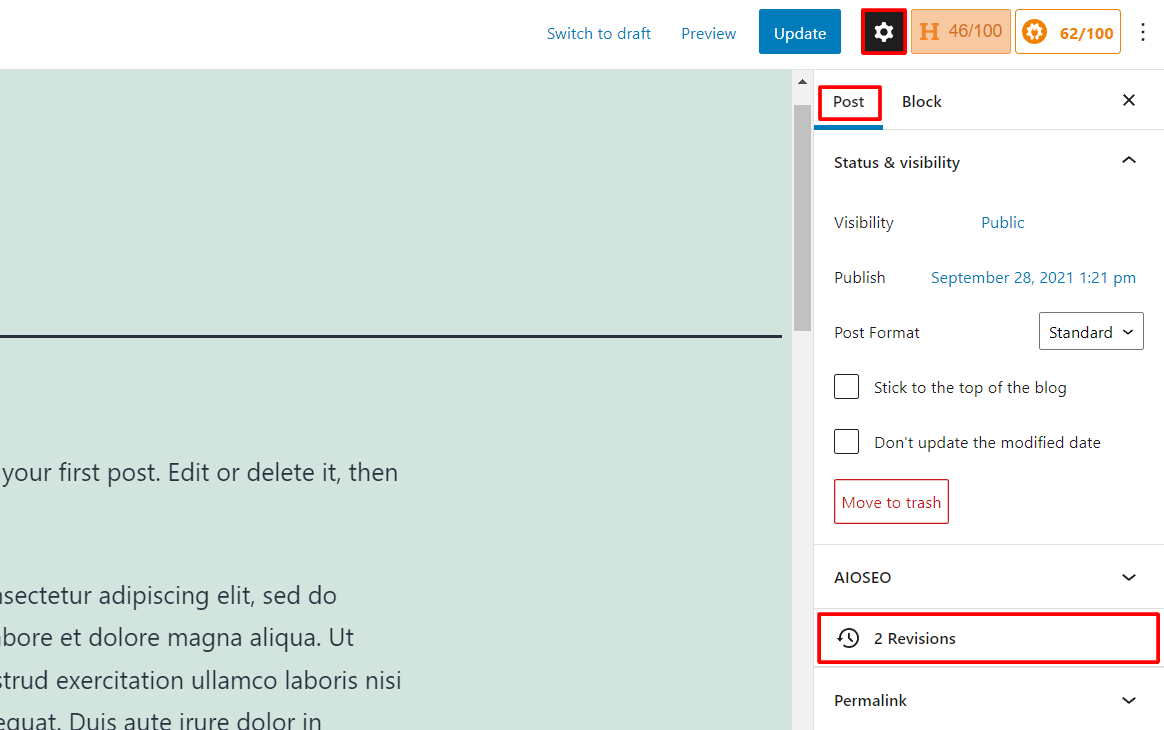
In the Gutenberg WordPress block editor, the revisions feature is located on the right setting panel under the Page or Post tab.
Meanwhile, classic editor users can access the revisions under the Publish box on the right sidebar.

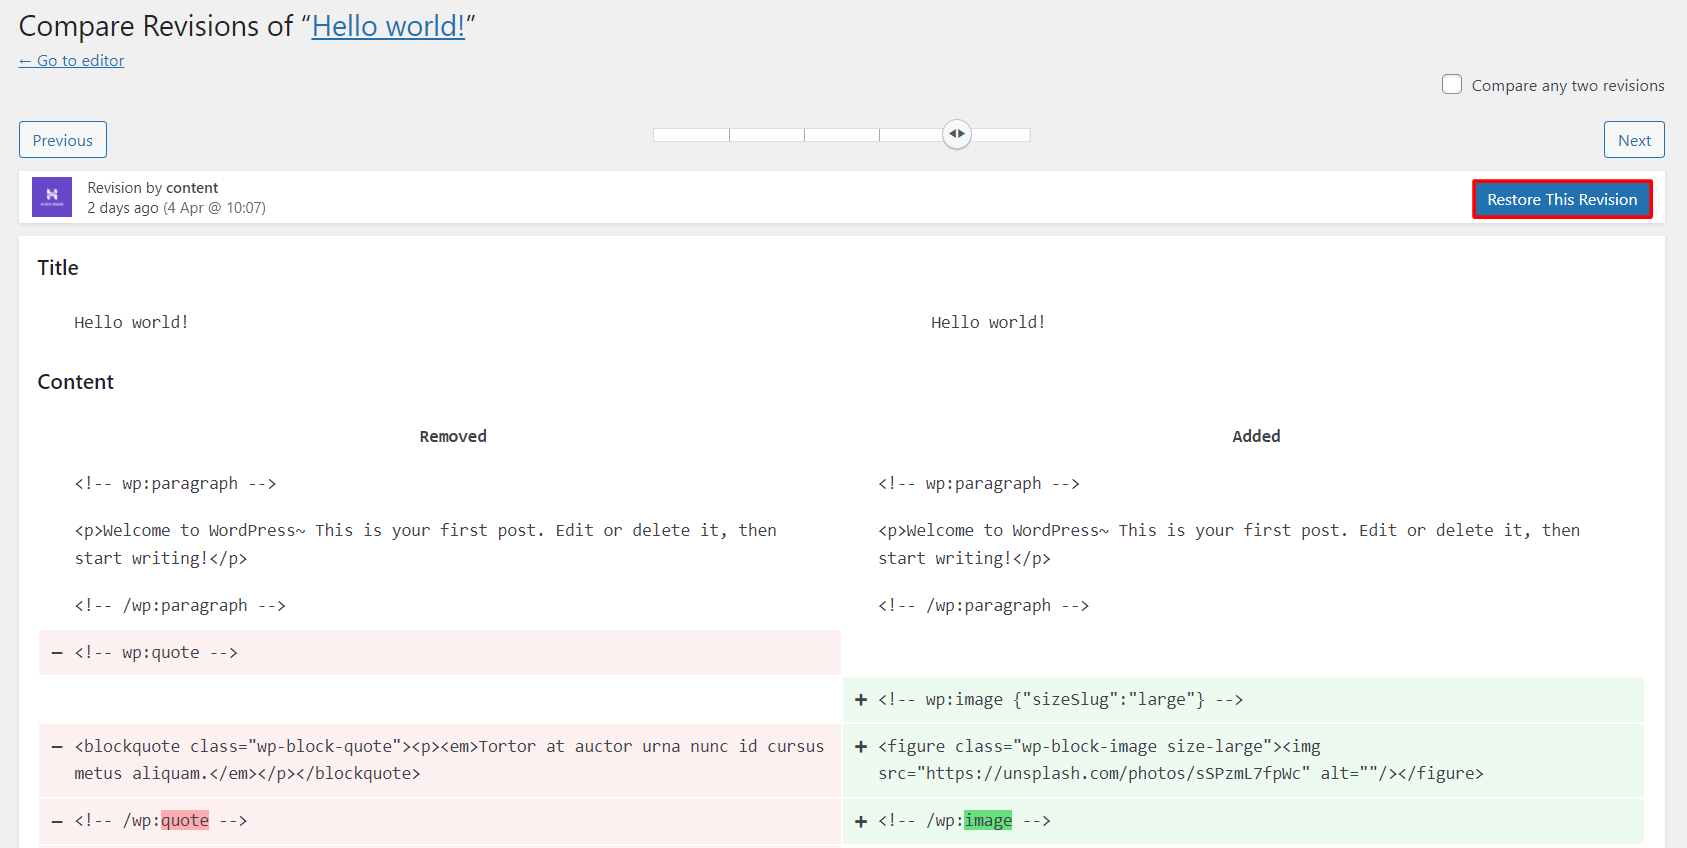
Click the revisions menu on the Gutenberg block editor or the Browse link on the classic editor, and you will see the revisions page. Scroll through all the revisions using a slider at the top. Below that, you can see who made the changes and when.
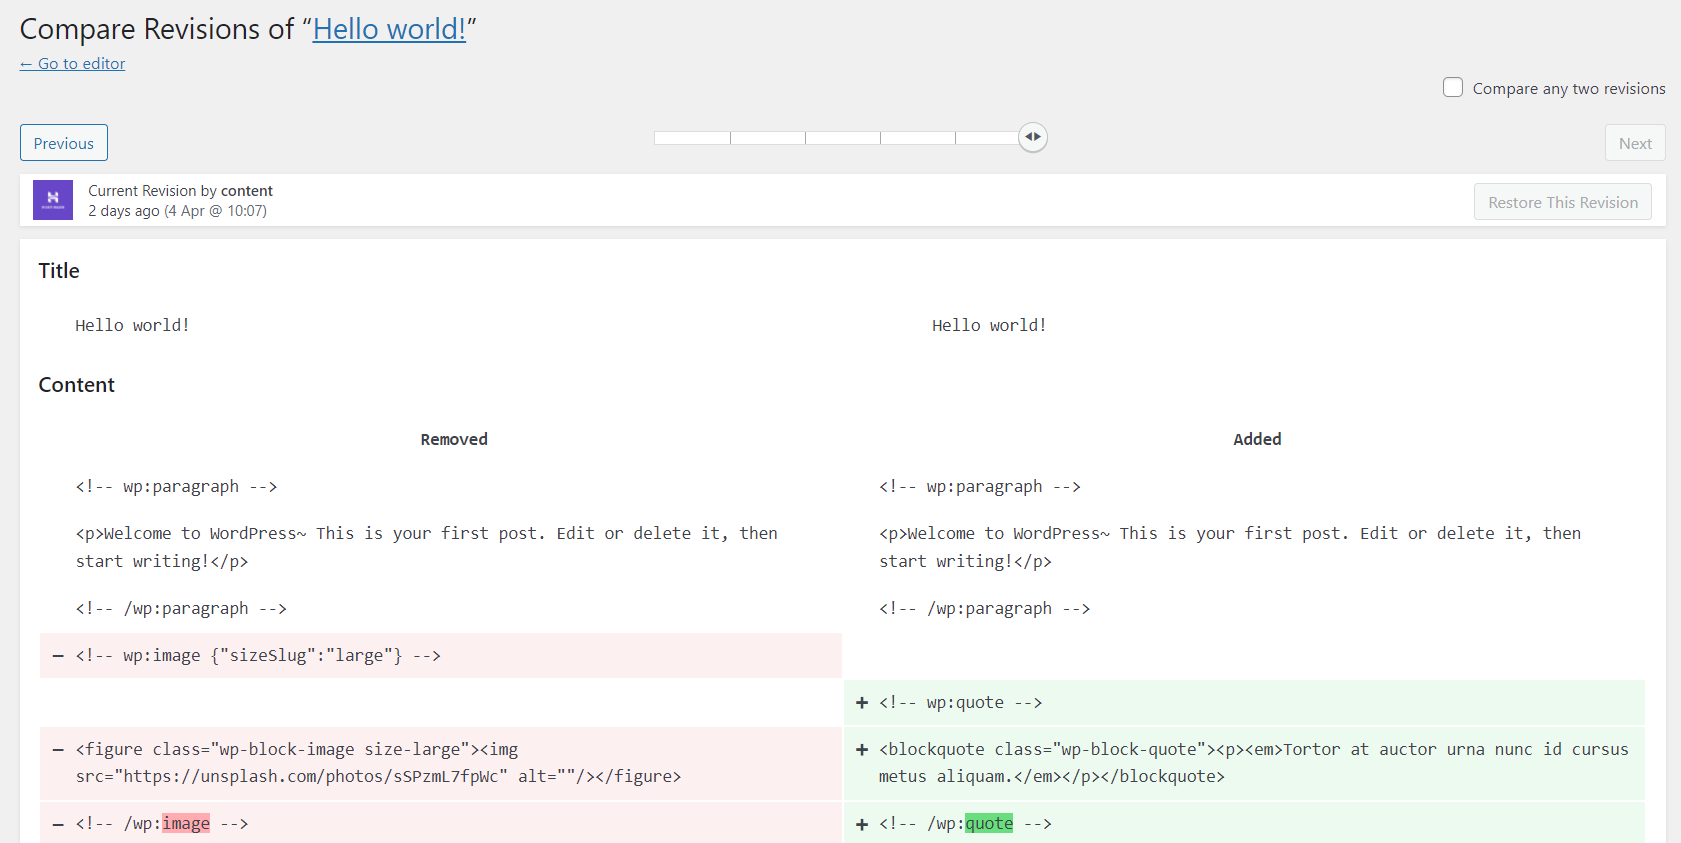
On this page, WordPress shows two columns – the right is the selected revision of your content, and the left is the previous version. Meanwhile, the two background colors indicate particular changes – green shows new items, and red suggests deleted elements.
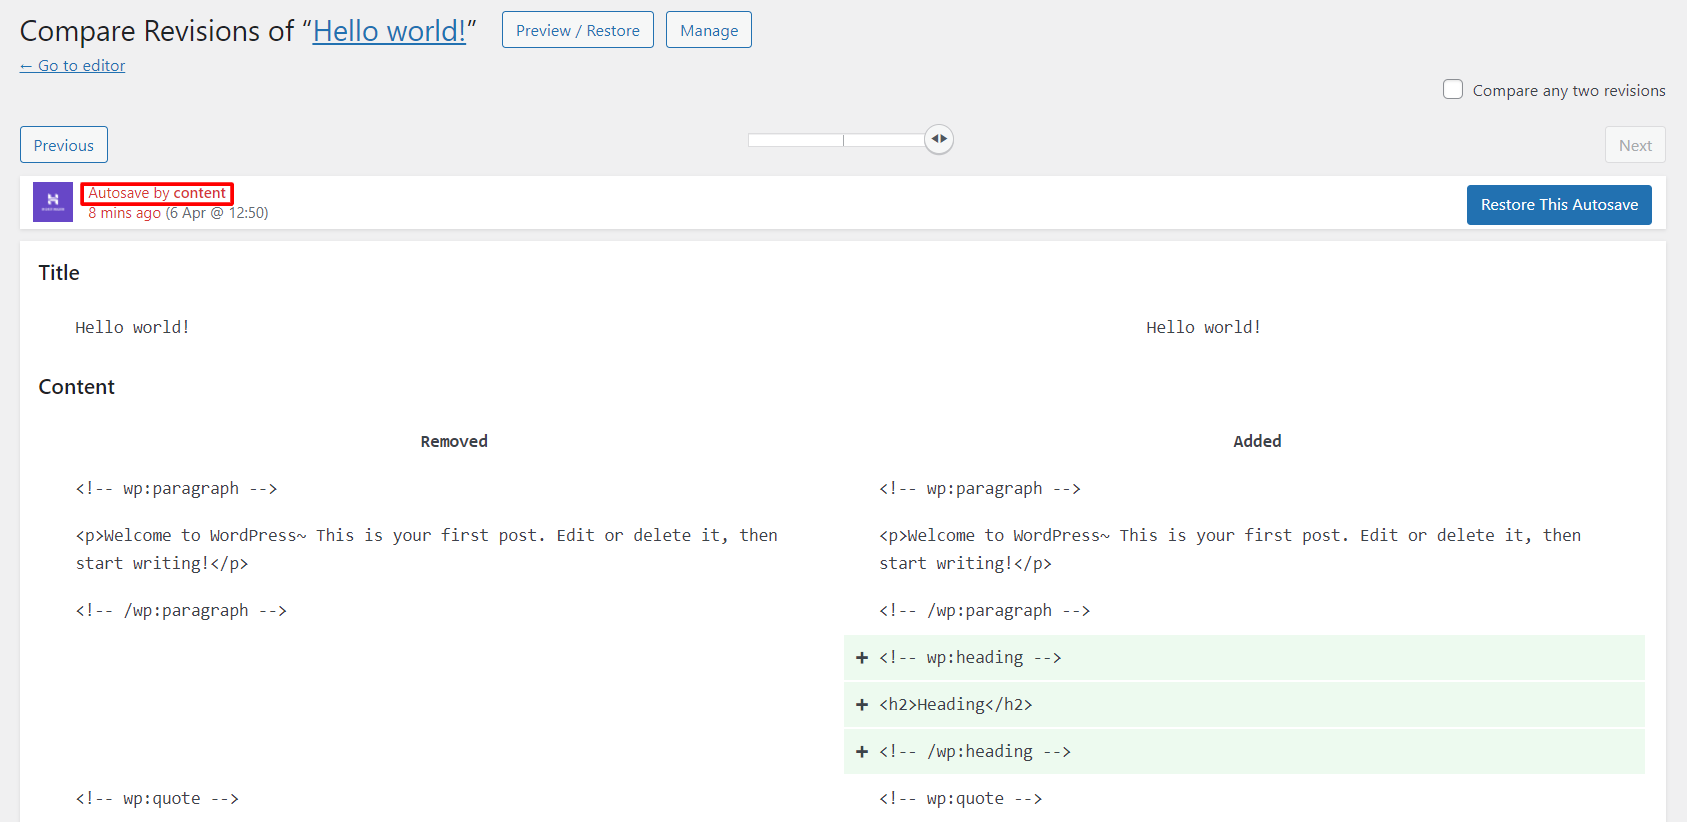
It is also possible to access an Autosave in the revisions interface. WordPress displays these in red text, making the autosave logs stand out from regular post revisions.
Note that the ability to see post revisions will depend on the user roles and permissions:
- Editors and administrators – can view all WordPress post revisions.
- Authors – can only see modifications for their posts.
- Contributors – have access only to the post revisions on their drafts.
Compare Different Old Post Revisions
Users may compare two revisions in sequential order by dragging the slider.
To put two non-sequential versions side by side, tick the Compare Any Two Revisions box at the top right and use the slider to point out which modifications you want to see. This function also displays the respective users who edited each WordPress revision.

Restore the Past Revision
After viewing and comparing the WordPress revisions page, you can also go back to the previous versions by dragging the slider to the intended point, and clicking Restore This Revision. It will replace the existing content with the specified version.
Once you hit the button, WordPress will take you back to the post editing screen. There is no need to click Update since the restored version will appear automatically.
Click the post title at the top of the page to return to the post edit screen without restoring a revision.
By default, post revisions have the same permissions as the content, so users who can publish posts and pages can update the modifications too.
Manage WordPress Revisions
Revisions are a default feature in WordPress, which has predefined settings. WordPress stores them in the posts table of its database as the children of a specific post. The more revisions you create, the more cluttered your database will be.
Therefore, managing the post revisions by deleting, limiting, or disabling them is crucial. We will explain each of these, starting with deleting old revisions in WordPress.
Delete Revisions
You can remove revisions from a WordPress website using a plugin or via phpMyAdmin.
Delete old post revisions manually using a plugin like PublishPress Revisions.
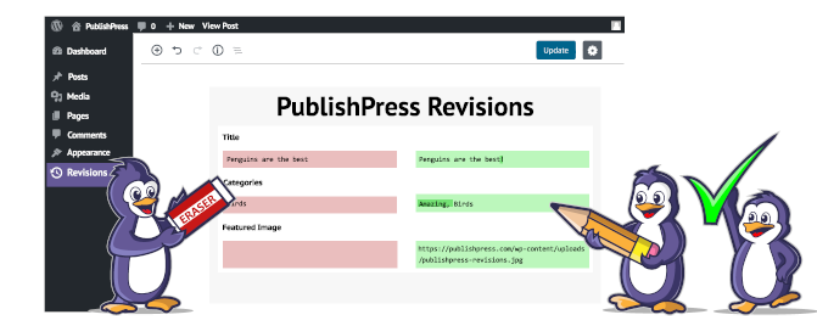
After the installation, this free plugin will add the Manage button at the top of the revisions screen.
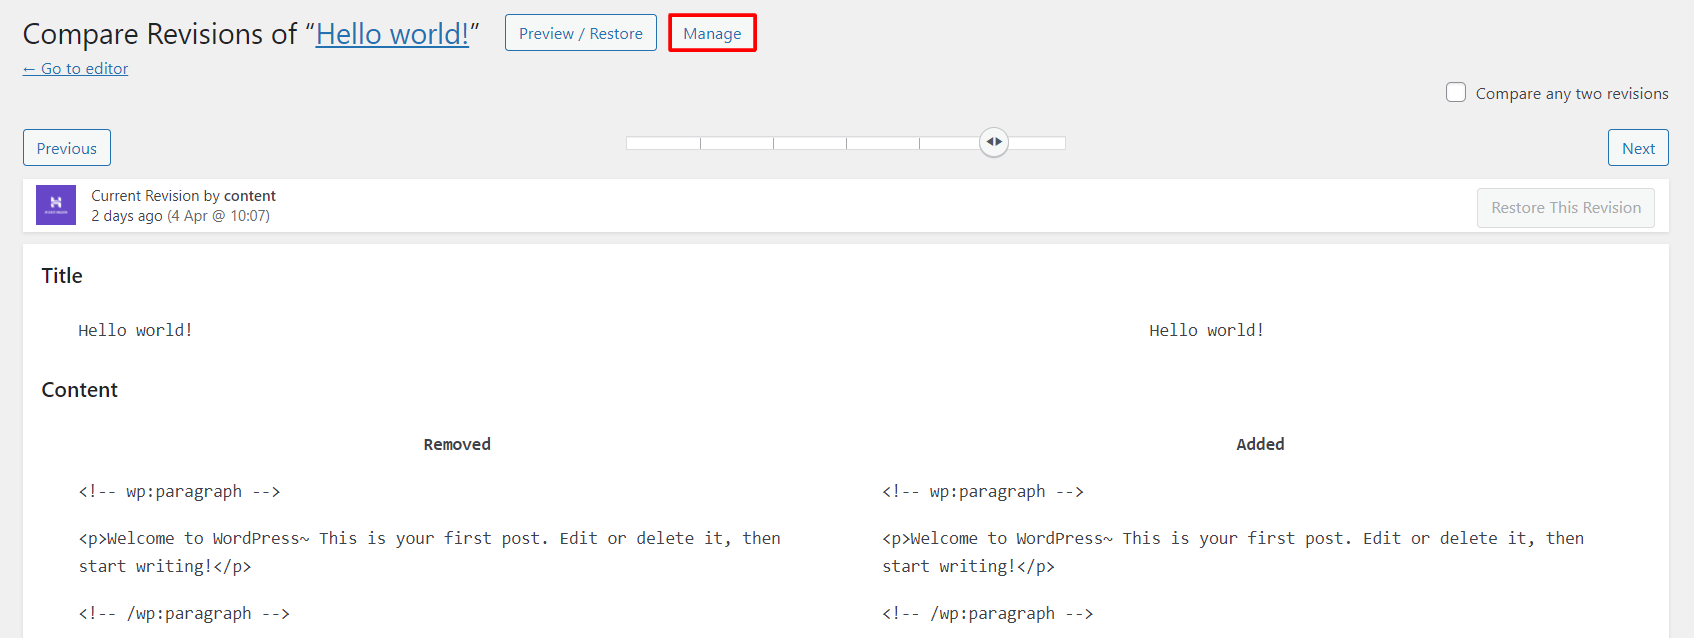
Hit the button to see all versions for a specific post and select the Delete link to remove a revision. Otherwise, use the Bulk Actions feature to delete some old revisions at once.
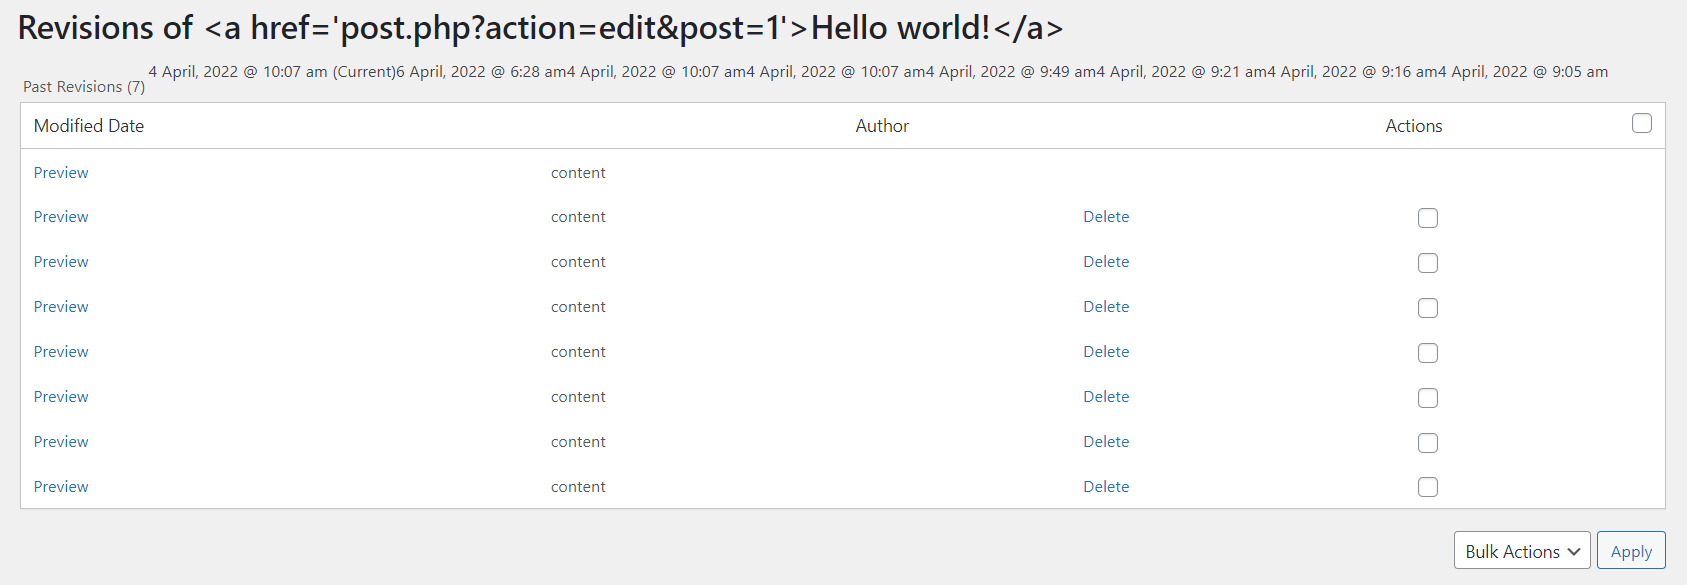
This method is excellent for those who are not familiar with coding or want to check each version before removing certain modifications.
Alternatively, use a WordPress plugin like WP-Sweep or WP-Optimize to delete all post revisions.

Here are the steps to delete old revisions if you use WP-Optimize:
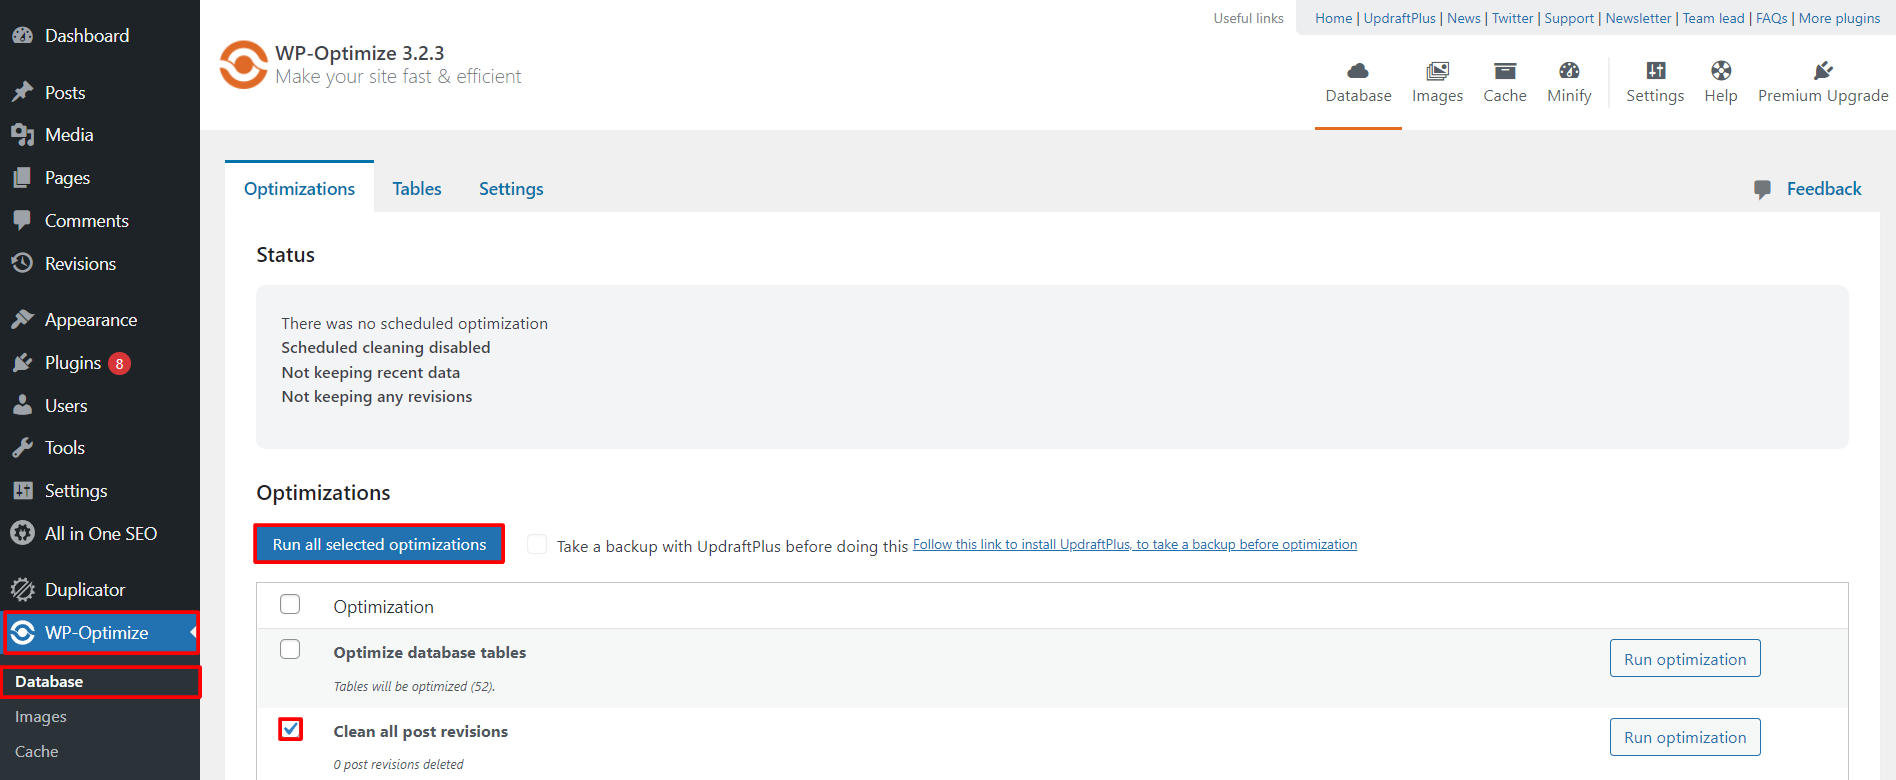
- After installing the WordPress plugin, click WP-Optimize on your dashboard and select Database → Optimizations. In the checklist, tick the Clean all post revisions box.
- Click the Run all selected optimizations button to complete the process.
Users may also delete revisions by removing entries in the WordPress database. If you want to do this, log in to your phpMyAdmin account via the web host’s control panel and run an SQL query.
Hostinger users can access phpMyAdmin via hPanel, and choose the WordPress database. Once you enter phpMyAdmin, press the SQL tab and run the following line in the provided box:
DELETE FROM wp_posts WHERE post_type=”revision”;
Replace the wp_ with your own WordPress database prefix and hit the Go button at the bottom to run the command. Old revisions you had in the database will be automatically deleted.
Note that removing old post revisions from the database will not stop WordPress from making them for future posts. Therefore, consider keeping fewer number of revisions or disabling the revisions feature completely.
Limit Post Revisions
Limiting the number of revisions can cut down on having to delete them or clean up the database as often. Much like removing revisions option, you can do so manually or with a plugin.
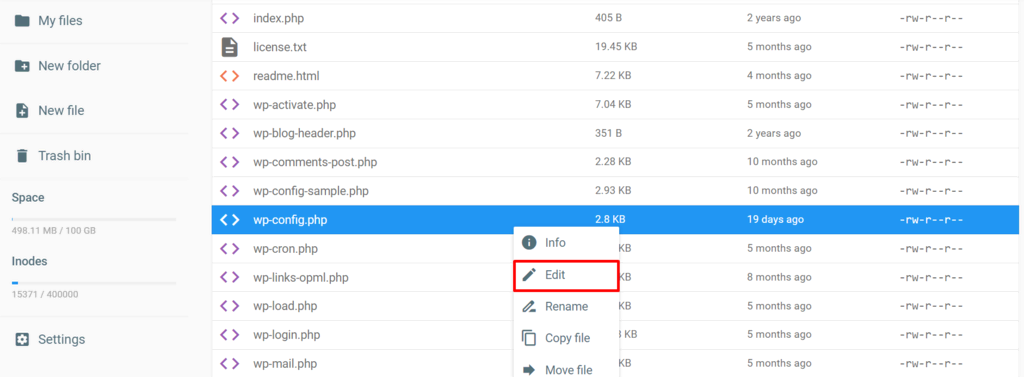
The first method is to modify the wp-config.php file to control how many revisions you want to keep. Access the file via cPanel, an FTP client like FileZilla, or the File Manager in your hosting provider’s control panel.
Once you locate the wp-config.php file, right-click on it and select Edit. In this example, we show how Hostinger’s users can do it, but the process is the same for all hosting providers.
Next, add this following line in the box:
define( 'WP_POST_REVISIONS', 5 );
Pro Tip
Replace 5 with any number of saved revisions you want for each post or page.
Another way to control revisions is by installing a plugin like WP Revisions Control. For this article, we will use WP Revisions Control.
After the activation, visit Settings → Writing on your WordPress dashboard and scroll down to see the WP Revisions Control menu.
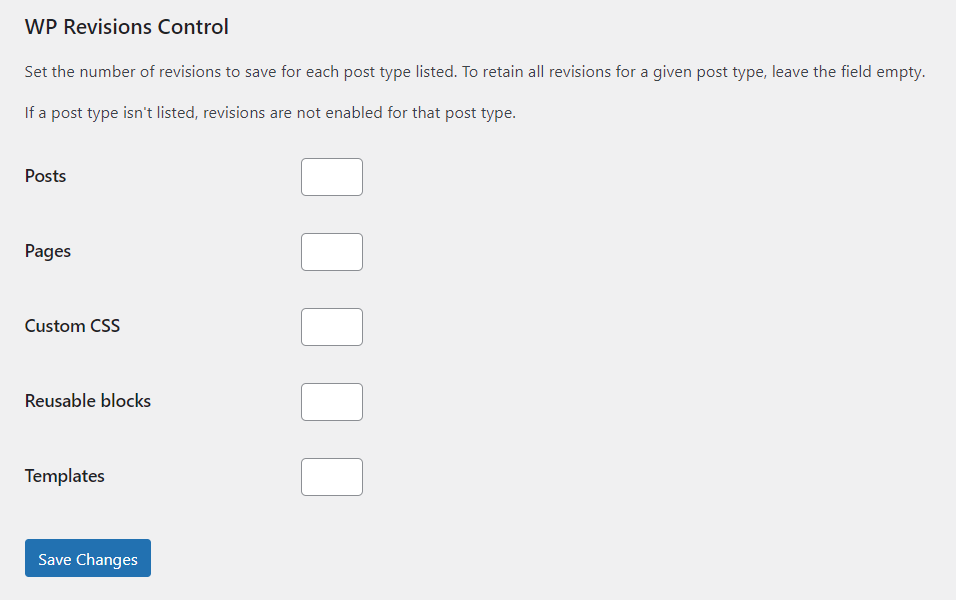
Then, specify the number of WordPress revisions you want to store for each page and post type. Finally, press the Save Changes button to store the settings.
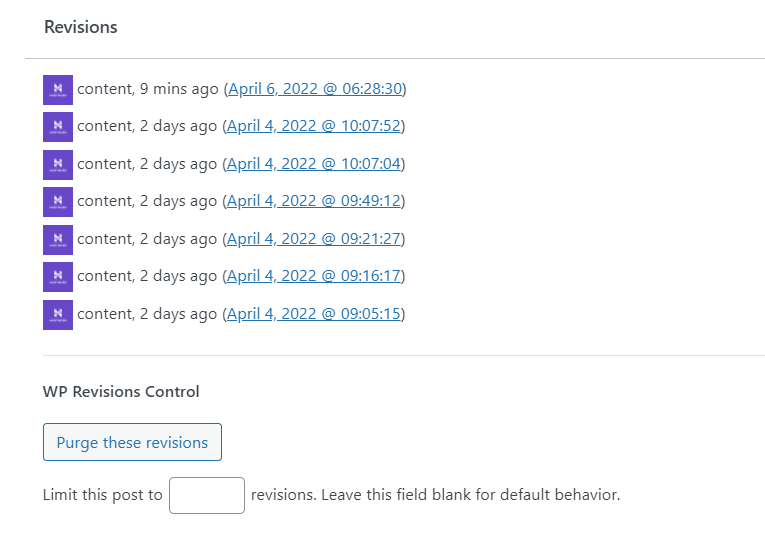
This WordPress plugin also enables you to limit post revisions for an individual post. Simply scroll down the editor and enter the number you want, or click the Purge these revisions button to delete them.
Disable Revisions
Some website owners might not be satisfied with just setting a limit. If you’d rather disable post revisions in WordPress altogether, locate your wp-config.php file, open it with a text editor, and enter the following line at the bottom of the file:
define('WP_POST_REVISIONS', false);
The changes should work after you run this command, but WordPress will still enable the autosave feature and store one revision.
An easier way to disable WordPress revisions is using the Disable Post Revision plugin. After the installation, navigate to Settings → Writing, select the post types within which you want to disable the feature, and hit the Save Changes button.

If you change your mind, enable revisions again by changing the value for revisions from false to true or overwriting this code on the existing one in the wp-config.php file:
define( 'WP_POST_REVISIONS', true);
Optimize Revisions in the WordPress Database
If you choose not to limit or disable post revisions, they can build up quickly and clutter your WordPress database. Therefore, regularly managing them is crucial.

Plugins like WP-Optimize and Optimize Database after Deleting Revisions can help in this process. These can schedule WordPress post revisions removals and perform various database optimizations, such as cleaning all post revisions and removing unapproved comments.
If you use WP-Optimize, follow these steps to schedule the optimization:
- On the dashboard, go to WP-Optimize → Database → Settings.

- Scroll down to see the Scheduled clean-up settings section.
- Tick the Enable scheduled clean-up optimization box.
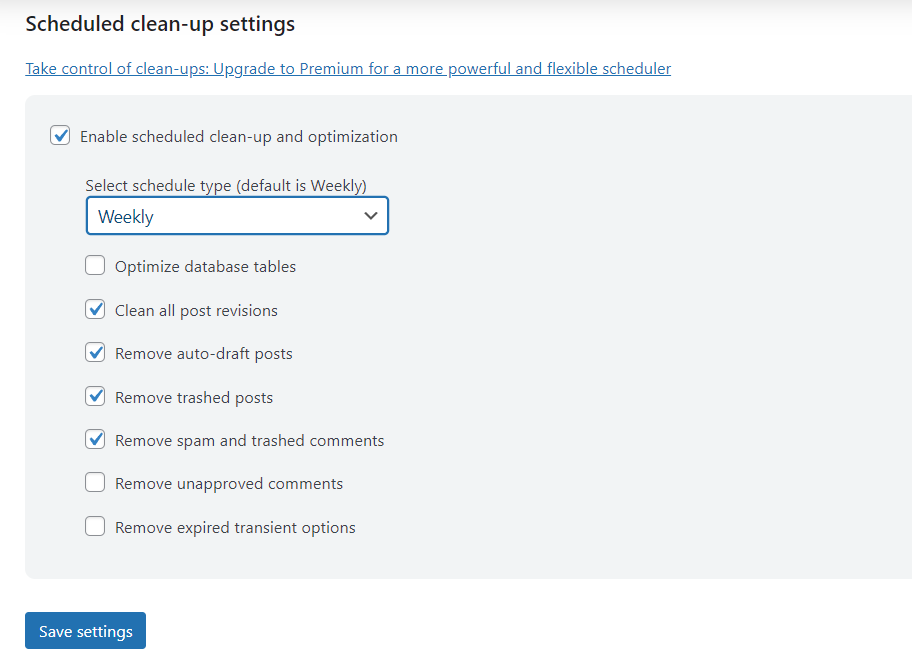
- Select your preferred optimization options.
- Choose the schedule type – daily, weekly, or monthly.
- Click on the Save Settings button.
Advantages and Disadvantages of WordPress Revisions
Below are the pros and cons of post revisions in WordPress.
Pros
The WordPress revisions feature is especially helpful under the following circumstances:
- Working with multiple authors. This WordPress feature can track who and when made any changes, making collaboration easier and more transparent.
- Reverting content. Go back to the earlier version if you think it performs better or if a contributor makes mistakes in the newest modification.
- Experiencing an unexpected event. The revisions and autosave features can save your content in case of a browser crash, power outage, or lost internet connection as it is automatically saved every 60 seconds.
Cons
Despite the multiple advantages, WordPress revisions can cause a serious problem if users do not manage them properly.
Too many revisions can result in unnecessary WordPress database bloat. It will take up storage and influence the site’s performance, hampering the user experience and search engine optimization (SEO). Therefore, limit WordPress revisions and avoid overdoing them.
Conclusion
WordPress revisions are a built-in feature to help users revert to a page or post’s old revision and undo the changes.
This feature is available on the right navigation panel in the classic or Gutenberg block editor. Click on the menu to see or compare any two versions of a post or page and revert the content.
The revisions feature helps you collaborate with multiple authors, restore an older version, and save your work in the case of an unexpected event like a power outage.
However, revisions in WordPress can take up space in the database and impact the website’s performance. To avoid this from happening, manage the post revisions by following these methods:
- Delete WordPress revisions manually using a plugin such as PublishPress Revisions or bulk delete them via phpMyAdmin or with a plugin like WP-Optimize.
- Limit the number of revisions WordPress can store by editing the site’s wp-config.php file or using the WP Revisions Control plugin.
- Disable post revisions by modifying the wp-config.php file or using the Disable Post Revision plugin.
We hope this tutorial has helped you manage WordPress revisions. Feel free to check our newest WordPress tutorials if you want to learn more about this open-source software. Should you have any questions, leave them in the comments section below.
Learn More About WordPress
What is WordPress
How to Schedule Posts in WordPress
How to Manage User Roles and Permissions in WordPress
How to Reinstall WordPress
How to Add Facebook Like Button to WordPress
How to Install WordPress on a Subdomain
Guide to WordPress Favicons

Irfan believes that technology and the internet can help improve our lives significantly. That's why he shares his experience as a WordPress blogger to educate others. In his free time, Irfan enjoys good films and books.

Lidin is passionate about online business and marketing. She believes that these topics should be accessible to everyone, so she is determined to help people unlock their digital potential through written pieces. Outside her working hours, Lidin enjoys exploring new cities and editing videos.
