How to Restore WordPress From a Backup: 4 Effective Methods + Best Practices
Creating a WordPress backup is essential for safeguarding your website from unforeseen circumstances like errors or malicious attacks. However, the crucial follow-up action you need to take is restoring it.
Whether you’re facing data loss, a site crash, or want to revert to a previous version, knowing how to properly conduct a backup restoration will keep your online presence intact. Fortunately, the process is relatively straightforward.
This tutorial will show you how to restore a WordPress site from a backup using four methods and explain some best practices.
How to Restore WordPress From a Backup
Restoring WordPress is possible in many ways, depending on your preferred tools and methods.
This section will cover the step-by-step guides to restore your WordPress site using Hostinger’s automatic backup tool, the UpdraftPlus backup plugin, hPanel’s File Manager, and a WordPress staging area.
How to Restore WordPress From a Backup Using Hostinger Backups
Utilizing hPanel’s Restore Website feature is the simplest way for Hostinger users to revert a WordPress site to a previous date.
This automatic WordPress backup restore option complements Hostinger’s built-in backup solution, which creates regular automatic backups of all your WordPress files and databases.
Follow these five simple steps to restore WordPress from a backup via hPanel:
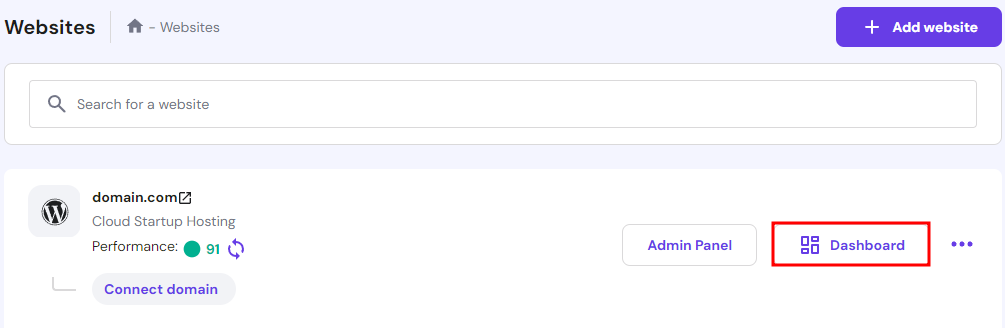
- Navigate to Websites after logging in to your hosting account.
- Find the website you want to restore and click on Dashboard.
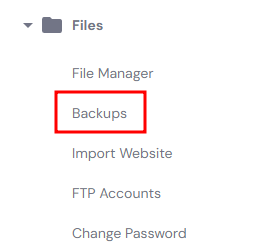
- Search for Backups in the left sidebar, then choose the menu that appears.
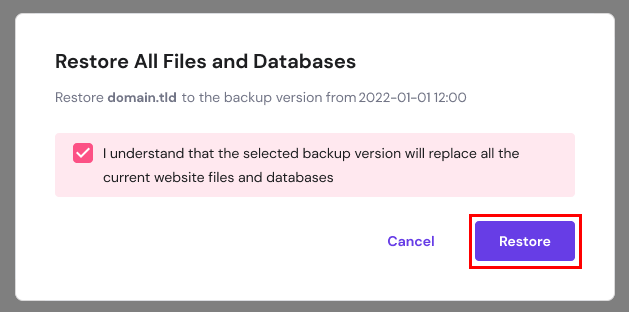
- Select Restore Website. You’ll see the seven most recent backup dates from the drop-down menu. Now, pick a website backup version to restore. You can also see a preview screenshot of the site if it’s available.

- Click the Restore button. You will see a pop-up warning about the website data overwrite. Once you’re sure to proceed, check the box and hit Restore again.
Wait for the WordPress restore process to finish. It will take a few minutes, depending on the size of your WordPress website and its media files.

How to Restore WordPress From a Backup Using a Backup Plugin
Many WordPress backup plugins let you create a partial or complete website backup directly from the WordPress dashboard.
The differences between them mainly depend on the features included. For instance, some plugins provide incremental backups as a free feature, while others offer it at a premium.
Several popular plugins for backups are Jetpack, UpdraftPlus, and Duplicator. While each WordPress plugin has a different interface, the steps to back up and restore sites are relatively similar.
In this tutorial, we will use the free version of UpdraftPlus as one of the best WordPress site backup solutions. Follow these steps after installing the WordPress plugin:
- Navigate to Settings → UpdraftPlus Backups from your WordPress dashboard.
- There will be a list of your website’s complete backup versions under the Existing backups section. Choose your desired version, and click the Restore button next to it.
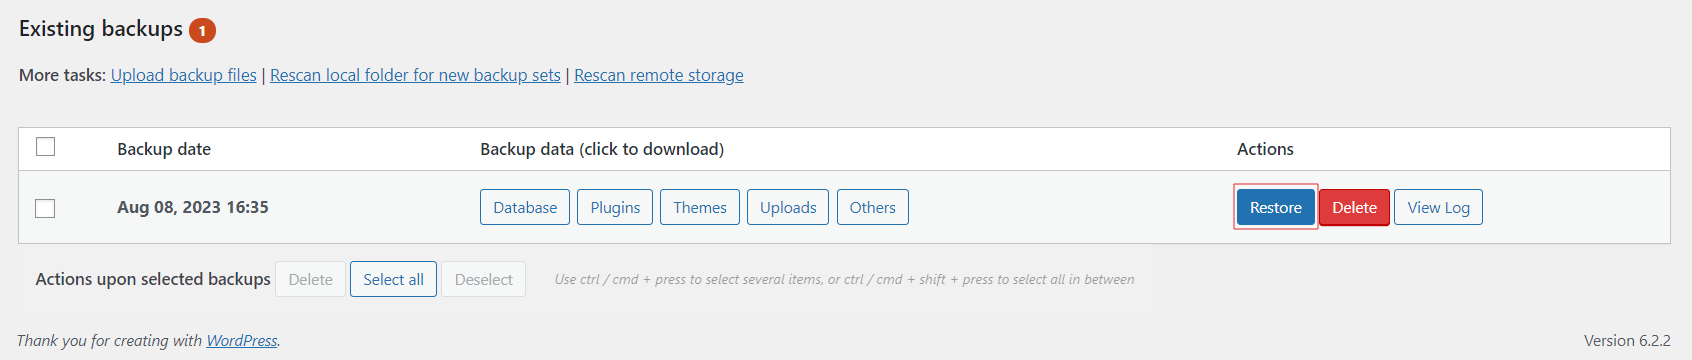
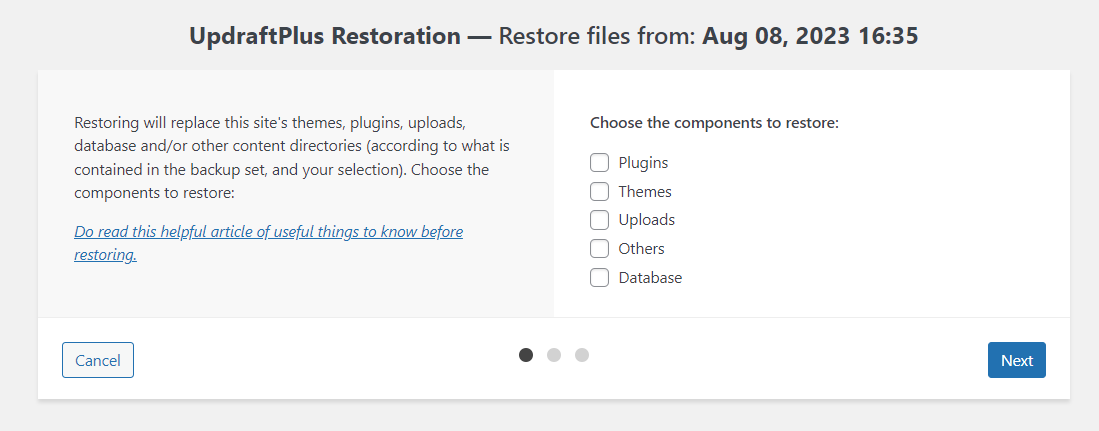
- Tick all the backup components to restore the entire site. Alternatively, you can restore WordPress from a partial backup by ticking several elements only. Then, click Next.
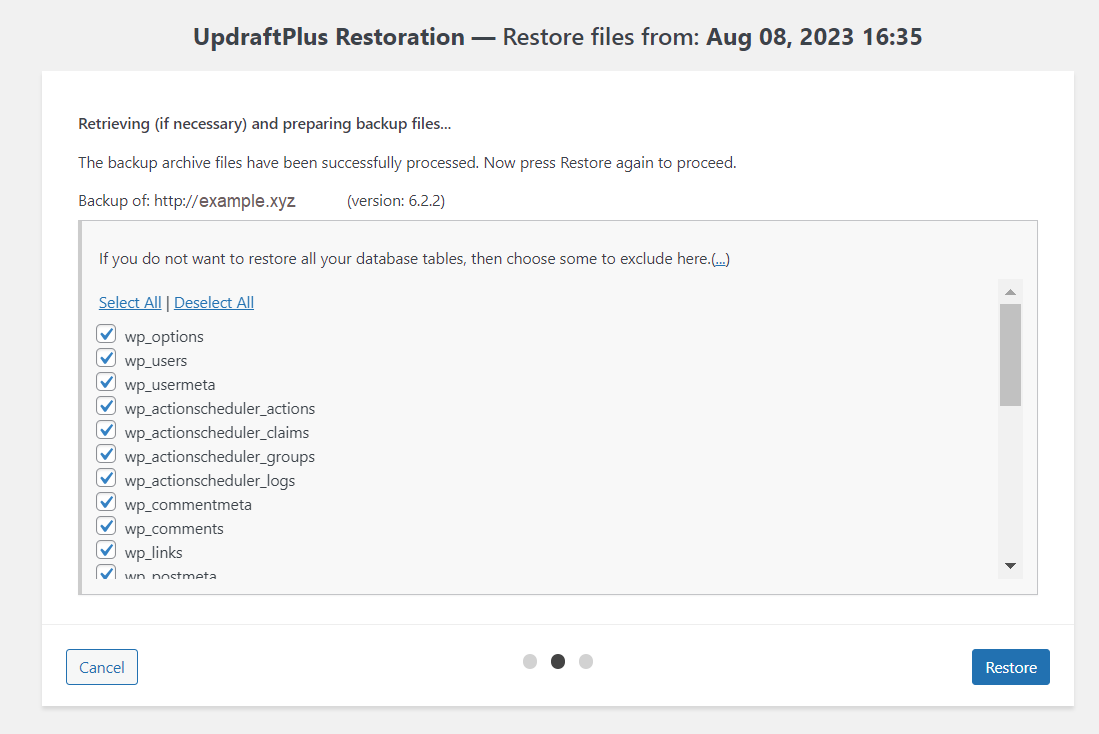
- If you want to exclude any of your WordPress backup database tables, click the three dots inside the parentheses. If not, simply hit the Restore button to proceed.
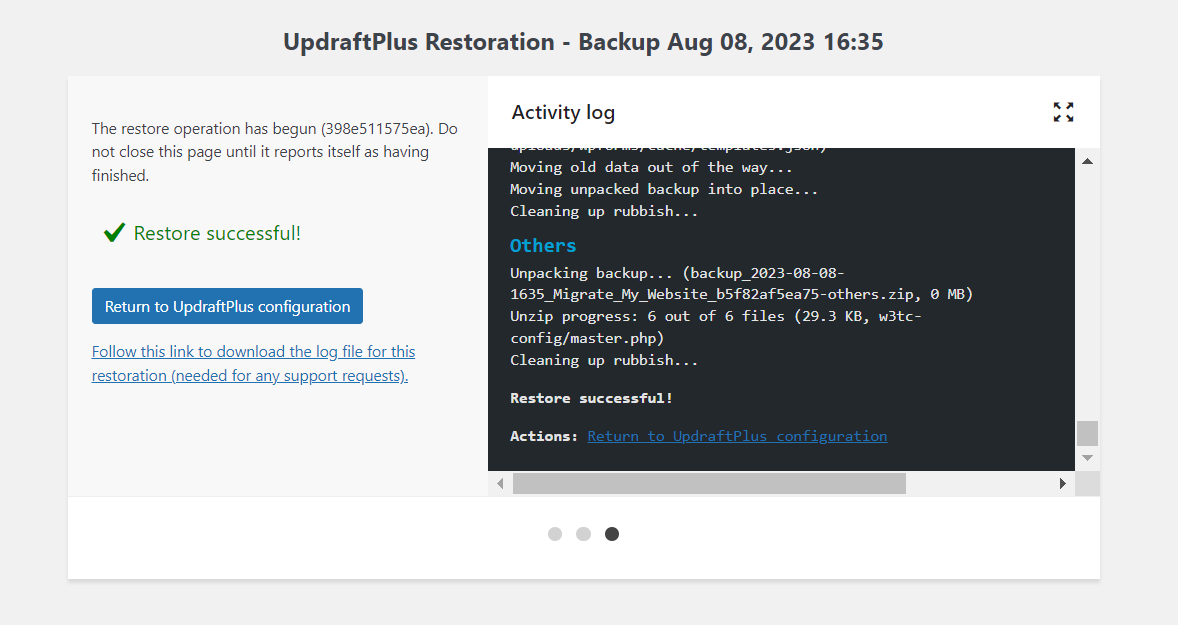
- Wait until it shows a Restore successful! notification to verify that your backup is complete.
How to Manually Restore a WordPress Backup
If you prefer not to use a backup plugin, you can also restore WordPress from a backup manually.
With this method, you’ll need access to your WordPress databases and content files, which you can download from your hosting provider’s control panel. This step is similar to creating a manual backup.
Each hosting control panel has a different interface, but the steps to manually restore WordPress sites are mainly similar.
If your hosting provider doesn’t grant access to the WordPress root directory or root folder using a File Manager tool, you can use an FTP client like FileZilla to back up and restore WordPress files.
At Hostinger, you can manage all your WordPress website files via hPanel’s File Manager. Follow these steps to restore WordPress from a backup manually:
- Open the file location of your WordPress backup file. Both the ZIP file format and the extracted version will work.
- Log in to your hosting account, then navigate to Websites.
- Click Manage on the website you want to restore.
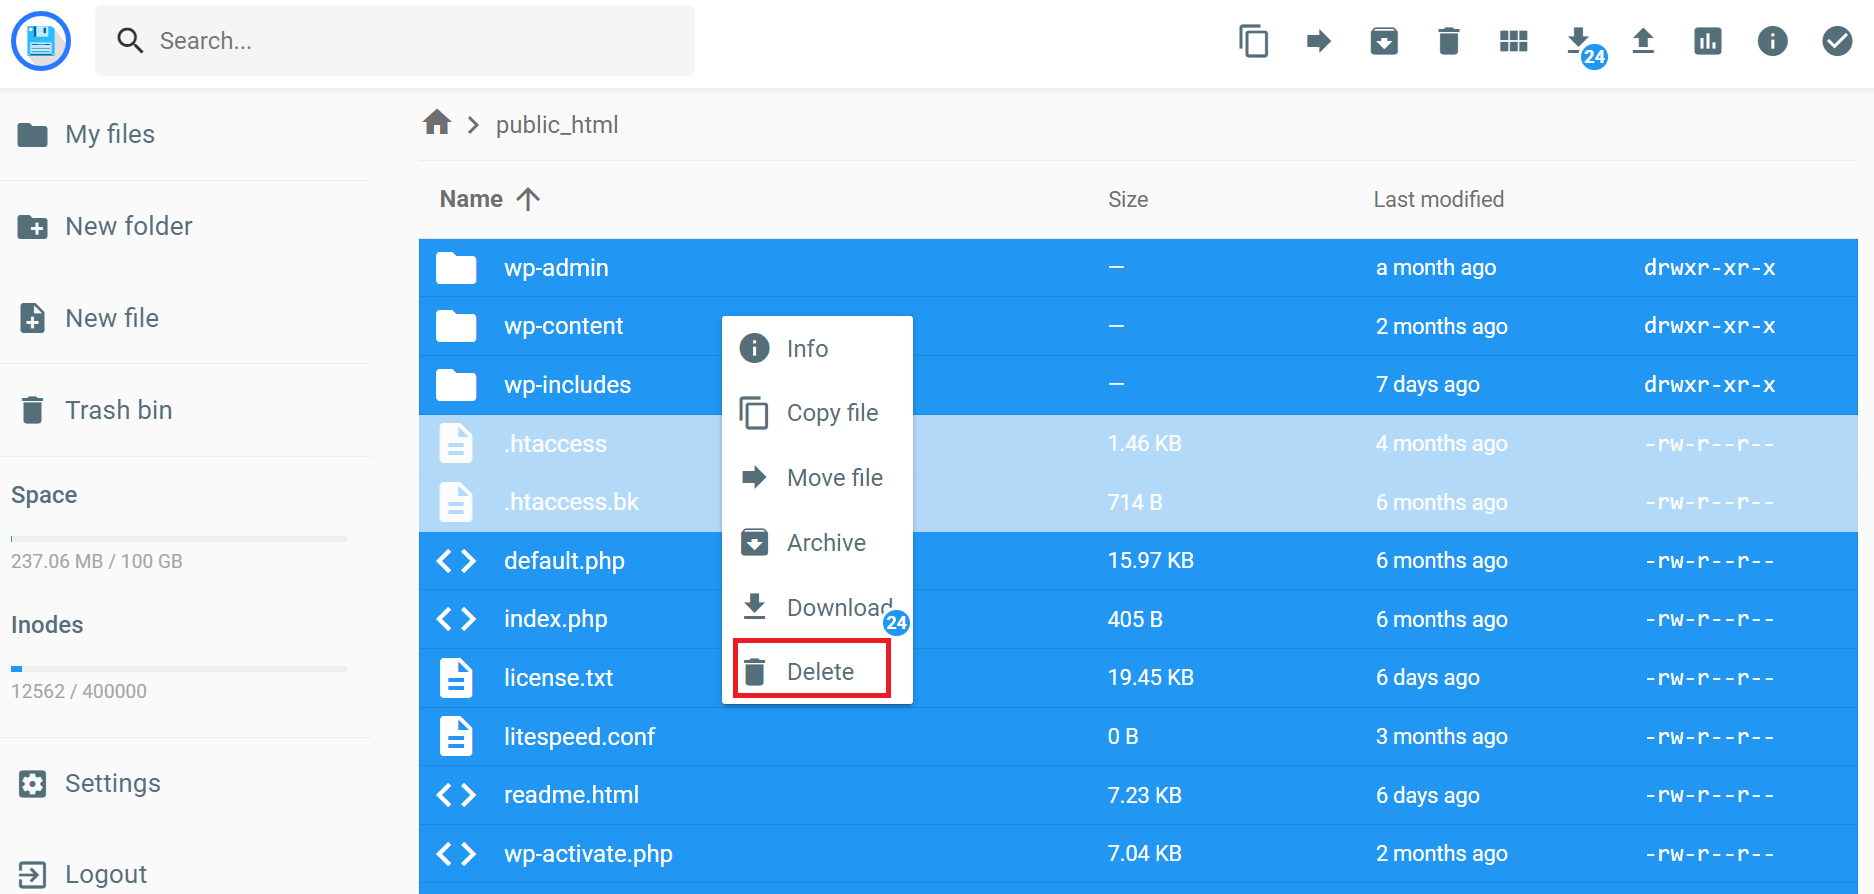
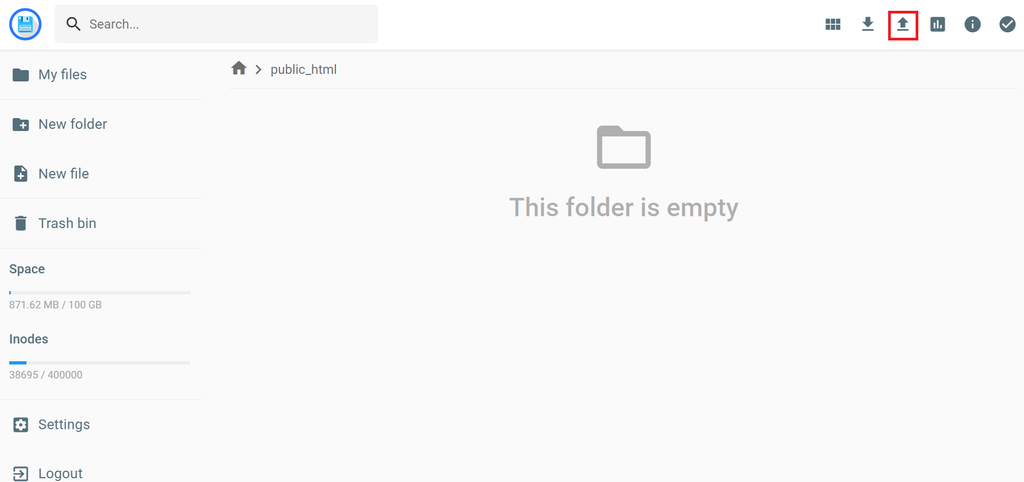
- Go to File Manager, then open the public_html folder.
- Select all files in the folder, right-click on them, and choose Delete.
- Drag and drop the backup version of your WordPress core files to the folder. Alternatively, you can upload the content by clicking on the upload files button.
Pro Tip
You can extract ZIP files directly within hPanel’s File Manager. Moreover, it has a trash bin feature in case you want to revert deleted files during the process.
Restoring a WordPress backup manually also requires rewriting the WordPress database backup file. Note that this section only covers restoring your MySQL database backup file, assuming you’ve already exported the .sql file beforehand.
Follow these steps to do so:
- Enter the Websites tab on hPanel and click Manage on the website you want to restore.
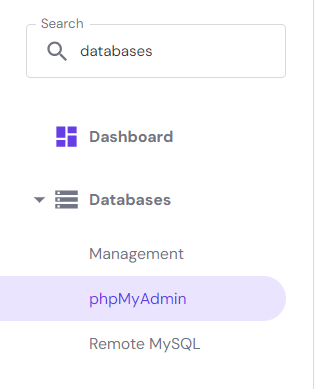
- Search for Databases in the left sidebar menu, then click on phpMyAdmin.
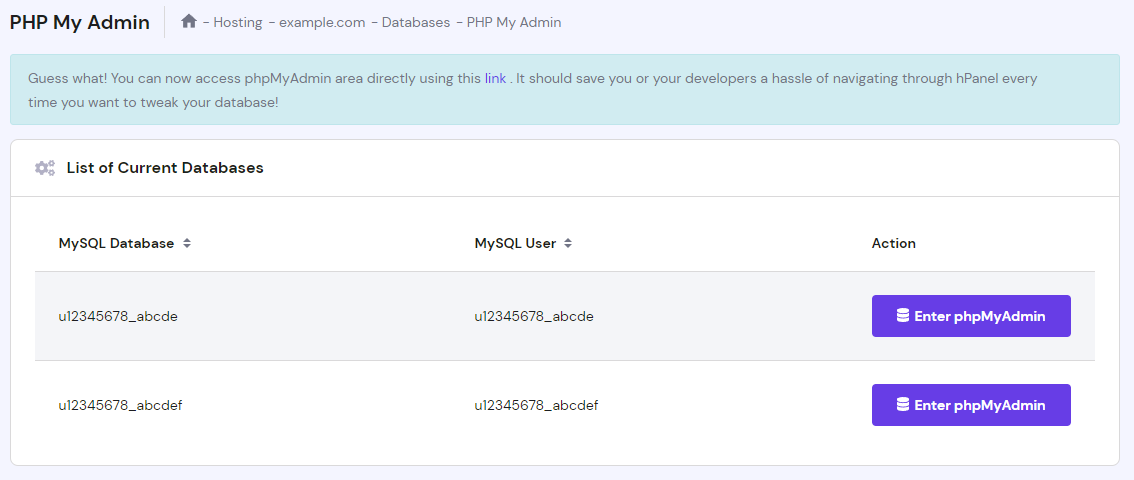
- Find your WordPress database name in the list, then select Enter phpMyAdmin to access the WordPress database file.
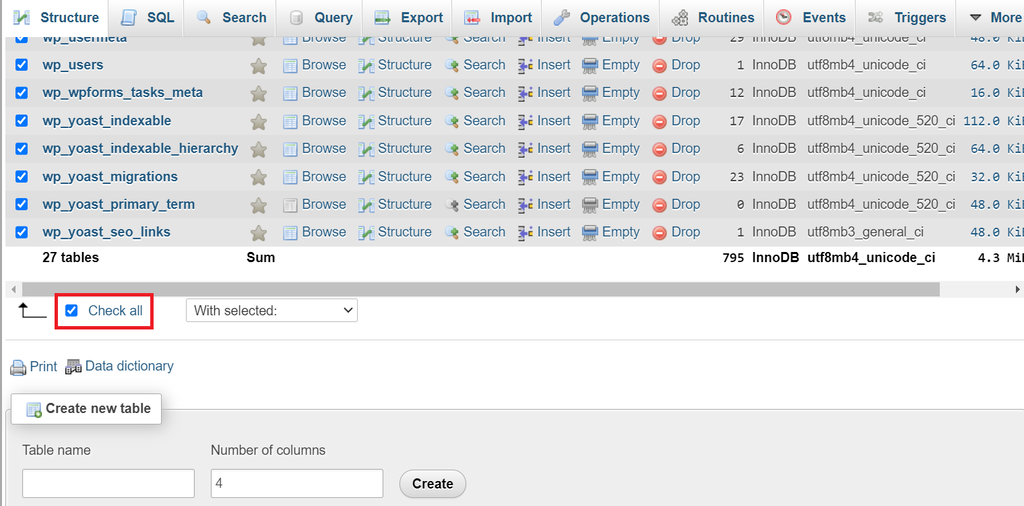
- Delete all the database tables by ticking the Check all box and choosing Drop from the drop-down menu next to it.
- Go to the Import tab. Click the Choose File button to upload your MySQL database backup file.
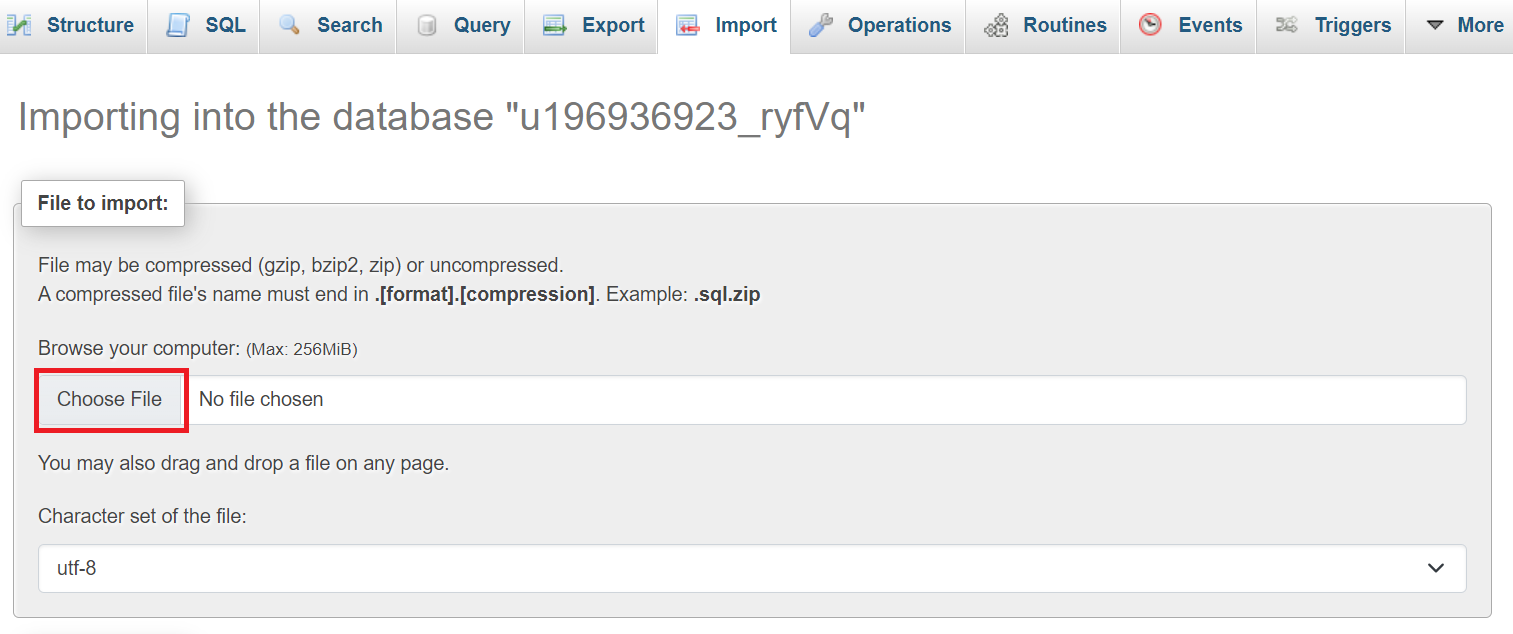
- Leave the rest of the configurations as they are, then click Import.
Important! Your database backup file should be less than 256 MB. It’s the maximum size for file uploads in phpMyAdmin.
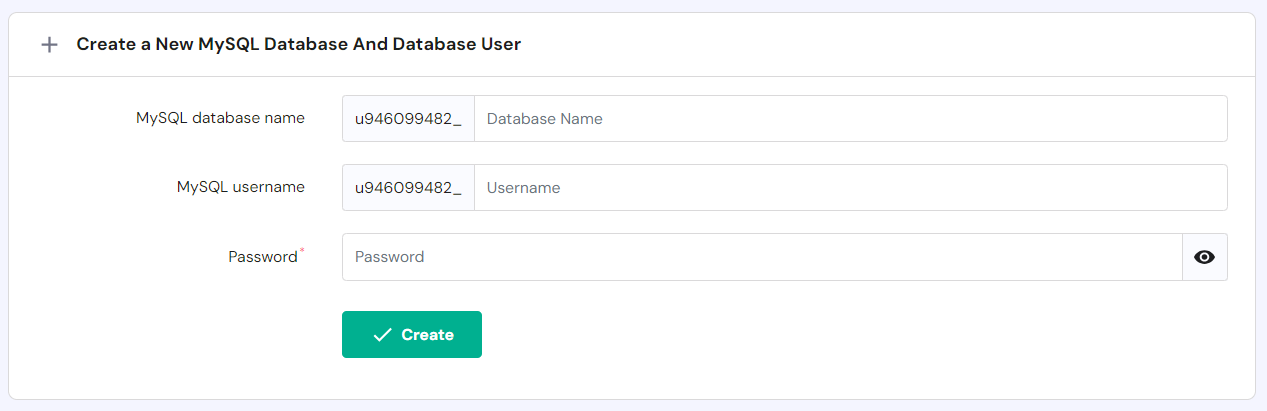
Alternatively, you can import the database file into a new MySQL database. Both methods will work the same with slightly different steps:
- Enter the Websites dashboard on hPanel, then hit Manage on the WordPress website you want to restore.
- Navigate to Databases.

- Create a new MySQL database by filling in the new username, database name, and password in the appropriate boxes.
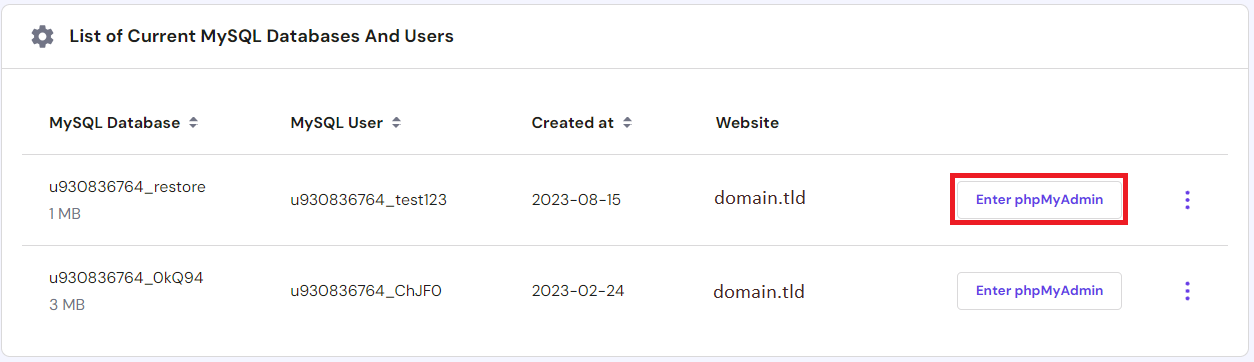
- Once finished, scroll down to the database list to see the newly created one. Click Enter phpMyAdmin next to it.
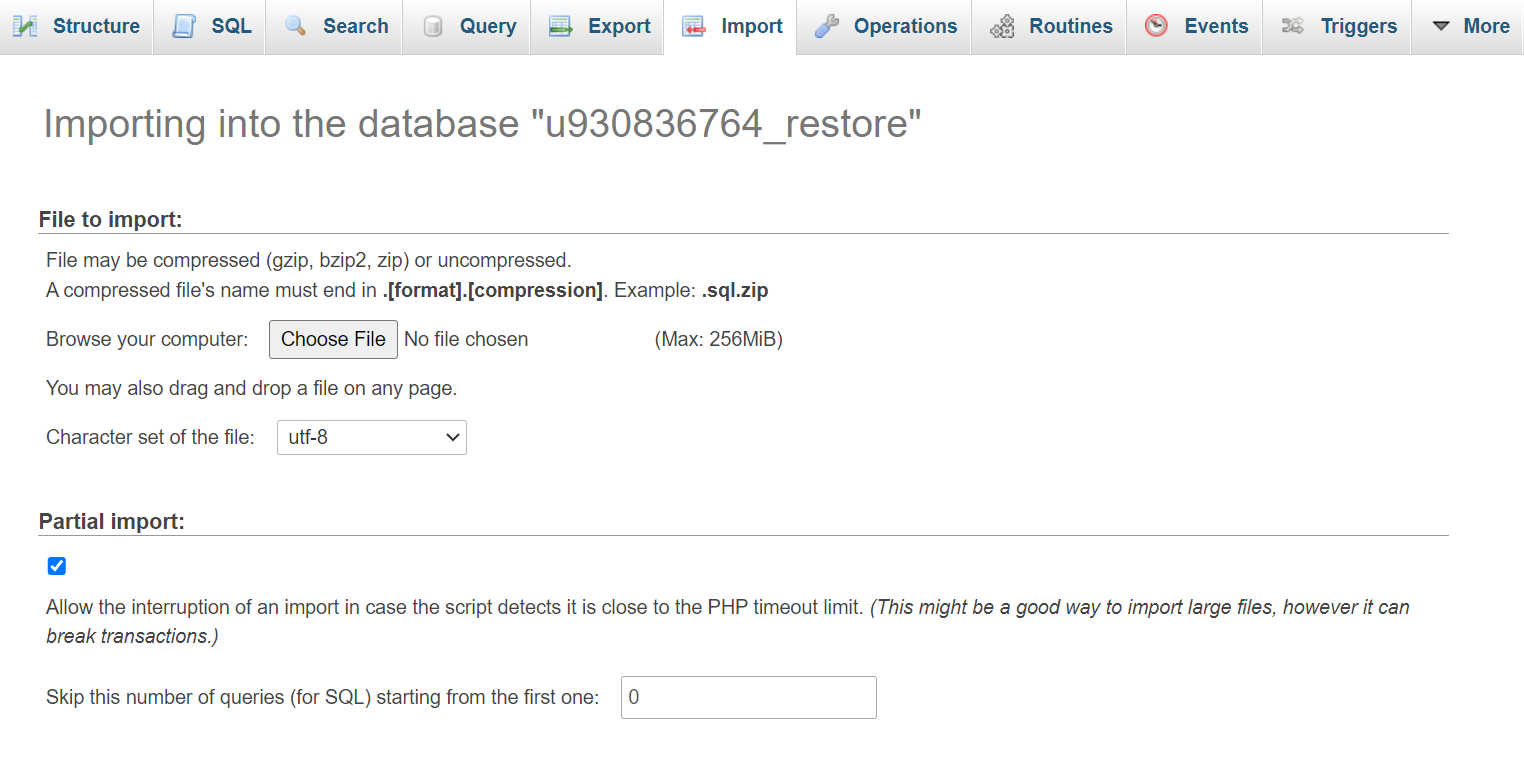
- Upload your database backup .sql file in the Import tab. Leave all configurations as they are, then hit the Go button at the bottom of the page.
- Return to hPanel’s Hosting dashboard and open File Manager.
- Find the wp-config.php file within the public_html folder.
- Change your database name, username, and password to those you’ve just created.
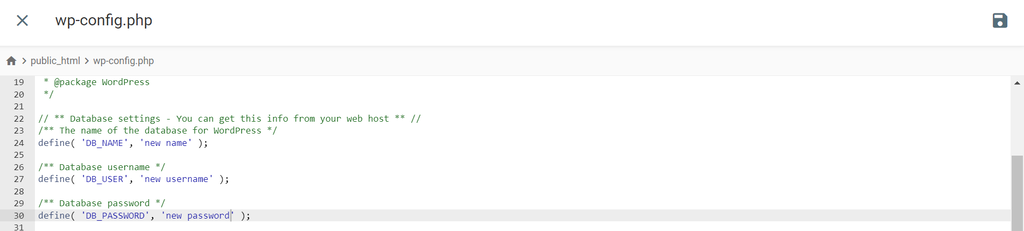
- Hit the Save button in the top-right corner.
How to Restore a WordPress Backup Using a Staging Website
Most web hosts provide a WordPress staging environment in their website hosting plans. At Hostinger, you can get this feature with the Business plan and above for both web hosting and managed WordPress hosting packages.
The staging area is a testing ground for WordPress users to apply major changes or updates before implementing them on the live site. By setting up a staging environment, you’ll have an identical copy of your website. In other words, the staging area you’ve set can act as your site’s backup.
So, you can simply restore a website version using a staging site by following these steps:
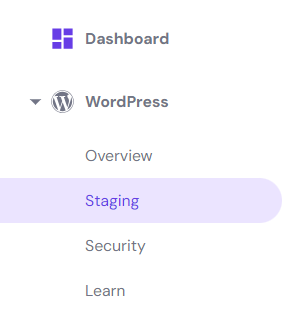
- Navigate to WordPress → Staging from your hPanel Hosting dashboard.
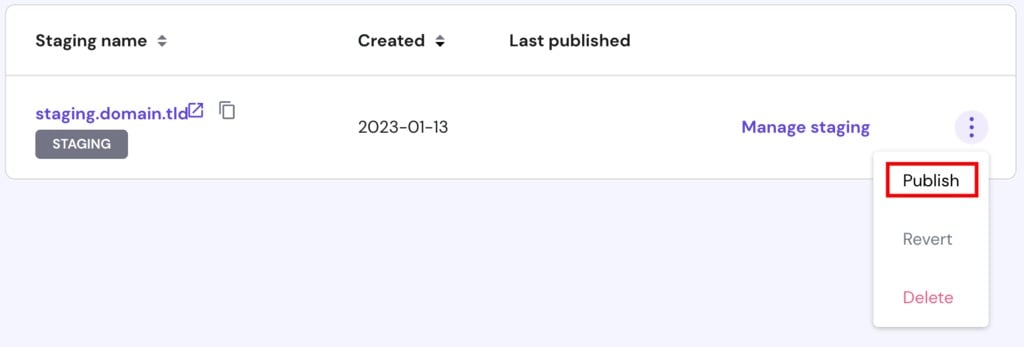
- Find the staging version you want to restore. Click the three-dot menu and choose Publish.
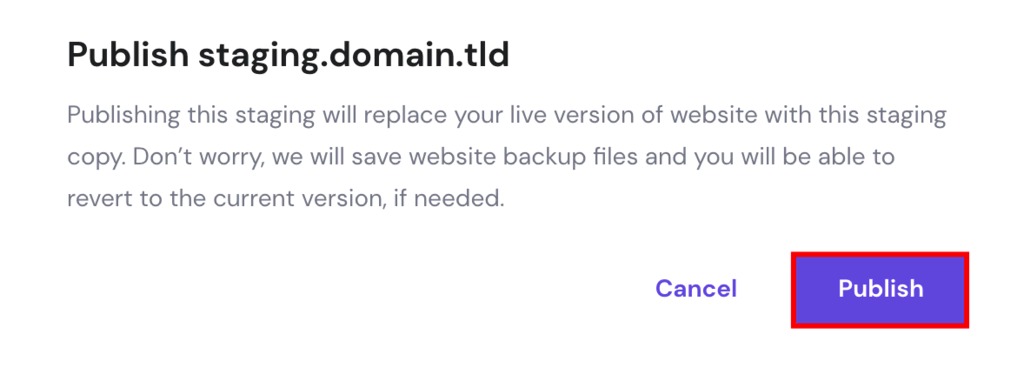
- You’ll get a pop-up message to confirm the website rewrite. Hit Publish again to complete the process.
Pro Tip
A WordPress site’s permalink structure may be broken after a restoration process. Therefore, check it from your WordPress dashboard as an additional step after performing any restoration method. If you find it damaged, follow our guide to fix broken permalinks.
Why Restore a WordPress Website From a Backup
Knowing how to restore a WordPress site from a backup will be beneficial in the following instances.
Accidental File and Data Deletion or Modification
One of the most common scenarios requiring a WordPress website recovery is unintended file or database deletion. Particularly for sites with several administrators, there is a higher chance of experiencing this kind of accident.
In minor cases, you can undo changes in WordPress without restoring a full backup. However, this WordPress feature only works for some specific pieces of content like posts or pages – meaning it can’t cover all modification scenarios.
For instance, plugins and theme settings are stored in the database without versioning, so you must restore them from a backup in case of any accidental deletion or modification.
No matter the size or type of the impacted file, it can lead to site malfunctions. Without recent website backups, recovering lost WordPress content can be a time-consuming and complex process.
Therefore, restoring your website from a backup quickly reverts it to a working version and minimizes downtime.
Website Recovery After a Hacking Incident
Hackers and malicious actors constantly target websites, seeking vulnerabilities to exploit. In the worst case of a hacking incident, your website’s data and content could be compromised or irreversibly damaged.
In this case, restoring core WordPress files from a backup is a crucial step in regaining control and ensuring data integrity. A backup of your existing WordPress files will eliminate any malicious code or unauthorized changes, restoring your site to a safe and secure state.
After such cases, we strongly recommend auditing and improving your WordPress security. Immediately change your WordPress admin password, and if there are other site administrators, ask them to update theirs as well. Also, change your WordPress database password after restoring it.
To add more protection layers, apply two-factor authentication by activating a security plugin like WordFence. Additionally, you can install a WordPress website firewall.
Theme or Plugin Compatibility Issues
WordPress themes and plugins are continuously updated to enhance functionality, security, and compatibility.
However, these updates can sometimes lead to compatibility issues, resulting in broken features or site crashes. If that happens, restoring WordPress from a backup can be a quick fix.
This way, you can ensure that your site remains operational while investigating and addressing compatibility concerns.
Best Practices for WordPress Backup Restoration
There are several best practices for restoring a WordPress backup version. We encourage you to consider the aspects below for a smooth website restoration process.
Schedule Backups on a Regular Basis
The initial and most crucial step in a WordPress backup restoration plan is regularly scheduling site backups.
Determine an appropriate backup schedule depending on the frequency of changes to your website’s content, theme, and plugins. If your WordPress website experiences frequent updates, it’s best to create daily backups. Meanwhile, scheduling weekly or monthly backups may suffice for less dynamic WordPress sites.
A web host normally provides a default backup tool that you can benefit from. For example, Hostinger users on our Premium plan get weekly backups, while Business plan users and higher can enjoy daily backups.
Alternatively, you can use a backup solution like Jetpack, UpdraftPlus, or VaultPress.
Whichever method you choose, ensure to create regular backups to safeguard your WordPress installation and the website’s latest changes. This reduces the risk of data loss and simplifies the restore process.
Store Backups in Secure Locations
Having backups is ineffective if you store them in the same location as your website files. Instead, save them in secure off-site locations to protect them from server failures, hardware malfunctions, or hacking attempts.
Cloud storage services like Dropbox, Google Drive, Amazon S3, or dedicated backup services from your web host are the best options for secure storage. These services encrypt your data and employ multiple servers, ensuring site integrity during WordPress data restoration.
Test Restoration Processes Periodically
Performing restoration tests regularly is essential to verify the integrity and effectiveness of your backup files. Remember that a website backup file is only useful if it can be successfully restored.
Testing the restoration process in a controlled environment like a staging area helps identify any potential issues before you actually restore WordPress from a backup for your live site.
With Hostinger’s Business plan and above, you can benefit from a built-in staging environment to practice restoring your website from time to time. This will give you valuable insights into the reliability of your backups and the restoration process.
Alternatively, you can use a plugin like WP Staging to conduct testing.
Document the Restoration Process for Future Reference
Having a well-documented restoration process is beneficial for task delegation. Create a detailed step-by-step guide on recovering the WordPress site, including accessing backup files, verifying file integrity, and initiating the restoration.
Also, include backup locations and any specific configurations required for successful restoration. To share relevant login credentials, we recommend utilizing a secure password manager. This documentation will be invaluable to enlist the help of another site admin if you can’t restore the backups immediately.
Ensure to update the document periodically as you change your backup strategy or hosting environment.
How to Restore WordPress From a Backup – Video Tutorial
Do you prefer following a step-by-step walkthrough video? Watch this video tutorial.

Conclusion
Restoring WordPress from a backup means reverting your website to a previous version. It can get your website up and running again after any unforeseen circumstances like errors, data loss, or security issues.
To restore a WordPress site properly and efficiently, backing up both the site files and database tables is necessary. How frequently you should create regular backups depends on how often you apply significant website updates or changes.
There are several ways to restore a WordPress site from a backup. In this article, we’ve covered four alternatives with different tools – using Hostinger’s built-in backup tool, a WordPress backup plugin, hPanel’s File Manager, and a staging website.
We hope this article has helped you restore WordPress from a backup. If you have other questions, don’t hesitate to write them in the comments section below.
Restore WordPress From a Backup FAQ
Let’s take a look at some common questions about restoring WordPress from a backup.
Does WordPress Save Backups?
No. WordPress doesn’t create any backups by default. Website owners are responsible for this and should implement backup solutions like plugins or automatic backups from hosting services to regularly save and store backups.
Where Are WordPress Backups Stored?
You can store WordPress backup files in various directories, depending on the backup method used. Common WordPress backup storage types are local and cloud.
Local storage includes hard disk drives, whereas cloud storage solutions like Dropbox, Google Drive, or iCloud may require regular subscriptions. Whichever storage method you choose, ensure that it’s secure and offsite for maximum protection.
How Do I Recover My WordPress Site Without Backup?
Restoring a WordPress site without a backup is nearly impossible, as you lose all your data, content, and configurations. Therefore, regularly back up your WordPress site to ensure you have a restore point in case of unforeseen circumstances.

Larassatti Dharma is a Content Writer with 2+ years of experience in the web hosting industry. She’s also a WordPress contributor who loves to share helpful content with others. When she's not writing, Laras enjoys learning foreign languages and traveling. Follow her on LinkedIn
