How to use Hostinger for your success online
Hostinger provides secure and reliable web hosting services tailored for various website types and online applications. In this tutorial, we’ll explain how Hostinger’s products and technologies can help your online project thrive.
We’ll go over all the different tools and features Hostinger offers. Additionally, you’ll gain insights into our hosting plans and other products, helping you determine the best option for your website’s needs.
Download guide to using Hostinger
Why Hostinger?
Hostinger offers premium web hosting services at affordable rates and a dependable 99.9% uptime guarantee.
User-friendly control panel

Our custom-made hPanel is intuitive and features a wide range of tools for easy website management and optimization. Manage everything from your websites and domain names to virtual private servers and emails from a single dashboard.
24/7 customer support
We pride ourselves on our responsive and knowledgeable Customer Success team, which is available around the clock to assist with any website or hosting issues. If you are not comfortable communicating in English, we’ll happily assist you in 10 other languages.
Enhanced security
We protect users’ websites and applications with multiple fail-safes. Our servers run on the CloudLinux system, which we continually update to maintain security. Read this blog post on how we keep your websites secure for more information.
Scalability
As your website grows, upgrading your plan to accommodate increased traffic and resource demands is easily done through hPanel. Whether you start with web hosting or Managed WordPress and later upgrade to VPS or cloud hosting, the transition is smooth and straightforward.
Money-back guarantee
Hostinger offers a 30-day money-back guarantee, letting you try our services risk-free. If you’re not satisfied, you can get a full refund within the first month of your subscription.
Learning resources
We provide an extensive library of tutorials, quick guides, and Hostinger Academy videos to help you get the most out of your online project. Whether you’re a beginner or an experienced user, you’ll find valuable information to improve your website’s performance and functionality.
The technology
Learn more about the web hosting technology we use to power, optimize, and protect your website:
LiteSpeed web server
LiteSpeed enhances your website’s performance by minimizing resource usage. Hostinger employs LiteSpeed Web Servers (LSWS) as the primary web server software, favoring it over Nginx or Apache for several reasons:
- Advanced cache engine. Edge Side Includes (ESI) reduces data travel distance and volume, delivering web pages more efficiently.
- Built-in security features. LSWS includes stringent HTTP request validation and brute force protection for WordPress login pages.
- Event-driven architecture. LSWS conserves resources by managing all connections with minimal processes.
In our comparative tests, LiteSpeed consistently outperformed Apache and Nginx, showcasing superior processing times, request handling, and data throughput. All Hostinger servers come pre-configured with LiteSpeed 6.0.8 (stable version).

DDoS protection with cloudflare
Cloudflare is a content delivery network (CDN) and DDoS mitigation service designed to boost the performance, security, and reliability of websites. Its extensive global network of servers enhances website loading times, shields websites from various attacks, and offers additional security features.
All our hosting plans include the following Cloudflare services:
- Cloudflare DNS. Manage your domain’s DNS records efficiently.
- Cloudflare CDN. Improve website performance through fast content delivery.
- Cloudflare Firewall. Protect your site from malicious attacks.
- Universal SSL. Get free SSL/TLS protection with premium encryption options.
The following services are only available on VPS plans:
- Cloudflare Workers. Serverless functions running on Cloudflare’s edge network.
- Cloudflare Pages. Static site hosting utilizing Cloudflare Workers.
- Cloudflare Tunnel. Tunnels traffic from local machines to Cloudflare’s edge network.
- Cloudflare Access. Controls website access based on user identity.
SSD servers
Hostinger’s NVMe SSD servers enhance performance by utilizing flash-memory chips for faster data storage and retrieval. This ensures quick load times, providing your visitors with a smooth browsing experience.
SSDs outperform traditional Hard Disk Drives (HDDs) in speed and reliability, making them a superior choice for modern web hosting.
Multiple server locations
Choosing a data center close to your target audience can significantly improve your website’s speed and user experience.
Hostinger has strategically placed data centers across the globe, including the USA, France, the UK, India, Indonesia, and Brazil.
You can select a server location that best suits your audience and easily transfer between server locations if needed.

Hardened PHP
Hypertext Preprocessor (PHP) powers most websites, and unprotected PHP files can pose security risks.
Hostinger employs Suhosin PHP hardening to secure PHP files, identifying and patching vulnerabilities in older versions to prevent security breaches.
Read more about the security measures we take to keep your website safe.
AI tools
Incorporating AI tools into your website can enhance user experience and streamline various maintenance tasks. Hostinger provides several AI-driven features to help you optimize and manage your website more effectively:
- AI Website Builder. Use AI to design and build your website quickly. The AI builder suggests layouts, styles, and content based on the description of your brand and website, saving you time and effort.
- AI Writer. Create high-quality and SEO-friendly content for your website using AI. This tool can help write blog posts, product descriptions, and more, ensuring your site remains fresh and engaging.
- WordPress AI Troubleshooter. Automatically detect and fix website errors, preventing downtime and lost revenue by ensuring continuous online accessibility.
- WordPress AI Content Creator. Launch your website faster with AI-generated content and images. This tool seamlessly integrates with WordPress and WooCommerce, creating ready-to-publish content that enhances your site’s reliability and appeal.
- VPS AI Assistant. Harness the power of AI to answer VPS-related questions and provide guidance for various server management tasks.
Which plan is the best fit for me?
Selecting the right Hostinger web hosting plan starts with understanding your website’s specific needs and goals. We offer a variety of plans tailored to different types of websites and levels of traffic. Here’s an overview to help you make an informed decision:
Web hosting
Ideal for personal websites, blogs, and small businesses, web hosting is an affordable hosting solution where users share resources with others. This makes it perfect for those starting out, providing a budget-friendly option without compromising on essential features.
Key features
- Affordable pricing, starting from RM3.99/month
- Up to 200 GB of storage
- Unlimited bandwidth
- Free SSL certificates
- Weekly or daily automated backups

Cloud hosting
Cloud hosting combines the simplicity of shared hosting with the performance of a virtual private server, making it perfect for resource-intensive sites that require high uptime and reliability. If one server fails, another takes over, ensuring your website remains available.
Cloud hosting plans starts from RM49.00/month.
Key features
- Host up to 300 websites
- Up to 300 GB of storage
- Unlimited bandwidth
- Daily backups
- Free CDN for improved speed
Managed WordPress hosting
Tailored for WordPress sites, Managed WordPress hosting plans optimize performance and simplify website management, enhancing your WordPress experience. It’s ideal for those looking to focus on content without worrying about the backend management of their WordPress site.
Recommended by WordPress.org, our Managed WordPress hosting plans start from RM7.99/month.
Key features
- Easy WordPress installation
- Host up to 300 websites
- Up to 200 GB of storage
- Free domain and SSL certificates
- Weekly or daily backups

VPS hosting
Virtual Private Server (VPS) hosting offers dedicated resources on a virtual server, ideal for high-performance needs and sites that require more control and customization.
This option is suitable for businesses or developers needing robust resources and flexibility. VPS plans start from RM24.99/month.
Key features
- Up to 8 vCPU cores, 32 GB RAM, and 400 GB storage
- 4 TB to 32 TB bandwidth per month
- Dedicated IP address
- Server snapshot and weekly backups

Game server hosting
Game server hosting is perfect for hosting multiplayer game servers, offering enhanced control and stability. This ensures a smooth gaming experience with low latency and high uptime, making it ideal for avid gamers and gaming communities.
Our game server hosting plans start from $8.99/month.
Key features
- Intuitive Game Panel
- Advanced CPU and RAM allocations
- Generous bandwidth
- Dedicated gaming IPs
- Snapshot and automatic backups

Hostinger website builder
Hostinger Website Builder is an easy-to-use tool for creating a professional-looking website without coding skills. With plans starting from RM7.99/month, it’s perfect for beginners or anyone who wants a quick and efficient way to get online.
Key features
- Drag-and-drop editor
- Wide variety of customizable templates
- SEO tools
- Integrated eCommerce features for online stores
- Free domain and SSL with annual plans
How to switch to Hostinger
For those who already have a website with another provider and want to switch to Hostinger, follow these three simple steps to migrate your website:
Fill in a migration request
First, purchase a web hosting plan and access hPanel. Then, follow these steps to fill out the migration request form:
- In the Websites page, in, click + Add website.
- Select Migrate Website.

Choose from three migration options:
Migrating WordPress websites
Provide your WordPress site details, including the domain, user information, and previous hosting provider. You can also link to existing backup files. Submit the form to start the migration.
Migrating cPanel and WebHost Manager (WHM) websites
Choose the cPanel and WHM option, complete the required fields, and submit. Note that cPanel migrations do not include emails.
Migrating other websites
Select the Other control panel option for non-WordPress or cPanel sites. This option is suitable for files stored on Google Drive, Dropbox, or other cloud services. In the Additional information section, enter the link to your site files.
If you need more support, follow this guide on how to migrate your website to Hostinger.
Point your domain
After receiving a migration completion notification, point your domain to Hostinger. You can do it in two ways:
Changing domain nameservers (recommended)
Update your domain’s nameservers to Hostinger’s:
ns1.dns-parking.com

ns2.dns-parking.com
Replace current nameservers in your domain registrar’s DNS editor. Note that DNS propagation might take 24 hours.
Pointing a domain name via A records
If you prefer to maintain DNS control, update the A records with Hostinger’s IP address. Adjust the fields for the www and non-www subdomains, set TTL to 14400 seconds, and keep the record type as A.
Migrate email accounts
To migrate custom email accounts from your previous hosting provider, do this:
- Ensure you have the source email account, password, and IMAP server name noted down.
- In hPanel, go to Emails and select your domain name.
- Click New email import request in the Email Import section.
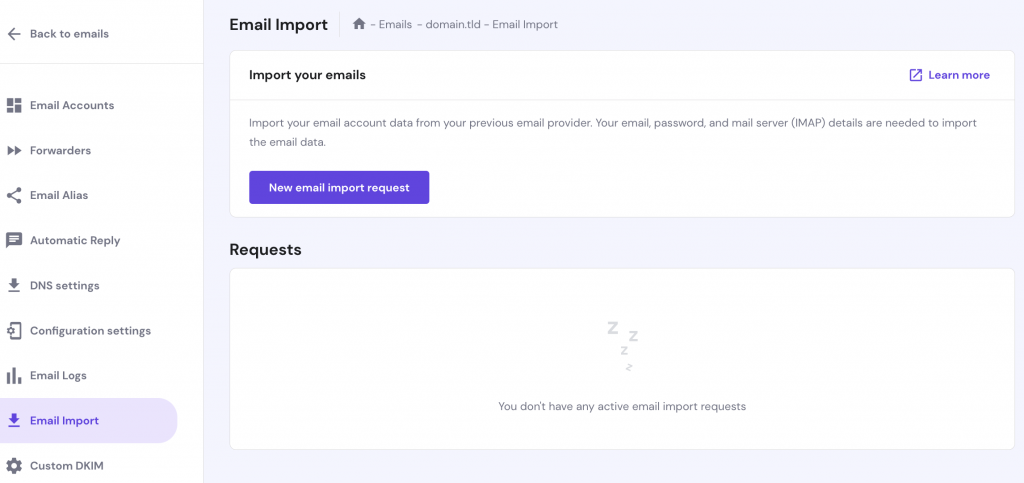
- Fill out the form with your email details and the IMAP server information.

- Choose the destination email account. It doesn’t have to match the previous email address.
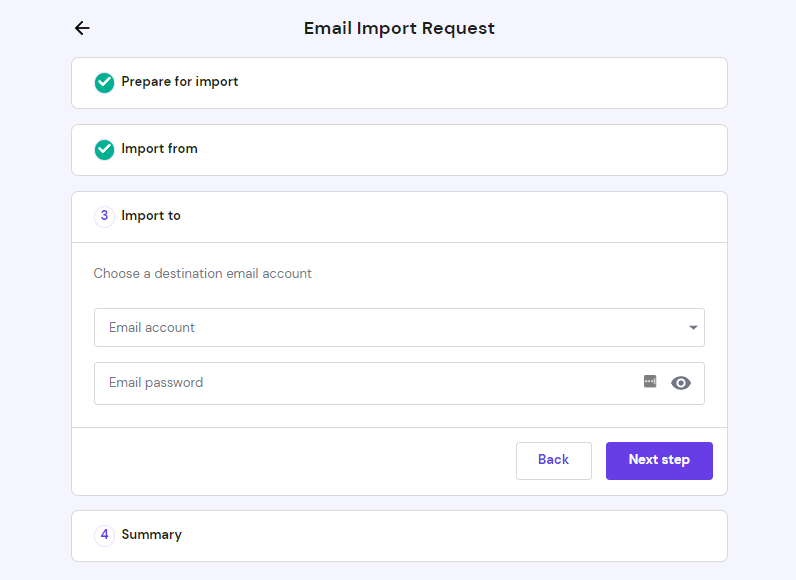
- Verify the information and click Start to begin the import process. The time required depends on the data size. Note that emails larger than 50 MB cannot be imported.

You can monitor the progress on the Email Import page, but note that we will send a notification once it’s completed. If needed, retry within seven days or import multiple email accounts simultaneously.
For more information, refer to this guide on importing emails to Hostinger.
Get the most out of hPanel
hPanel offers many features to simplify managing and optimizing your website. Below are some of hPanel’s most notable features and tools.
Automatic backups
Backing up your website whenever you make significant changes keeps it safe from data loss. We also recommend performing backups regularly in case you lose data from unexpected issues.
Hostinger offers a simple way to create automatic backups for your website. You will get free weekly backups with Premium web hosting. For daily backups, opt for higher-tier plans.
Note that VPS hosting includes free automatic weekly backups, but you can take a free snapshot before making any major changes.
Fortunately, Hostinger’s automatic backups do not take up your allocated storage space. Restoring backups is also easy.
Go to Files → Backups on your hPanel dashboard to access this feature:

Here are some of the features available in Backups:
- Restore website. Restore your website to the preferred date in one click. Business and higher-tier plans also display a screenshot of the website with each backup.
- Files backups. Choose a specific date to restore or download website files.
- Database backups. Select the database and a specific date to restore or download database files.
- Generate new backup. Create a new backup of your current files and databases. Note that you can only generate a new backup after 24 hours since your last one.

Easy-to-use File Manager

The File Manager gives you control over site content through HTTP. You can upload, edit, create, and delete website data with it.
Hostinger’s user-friendly File Manager is located under the Files section of your website’s dashboard in hPanel:

The file manager lets you explore the public_html directory, containing all your website files. When a user visits your website, the server will deliver content from this directory.
Our File Manager has the following sections:
- Left menu. Includes options to return to the root directory, create a new folder or file, find deleted files, and access your profile settings.
- Top menu. Change the viewing display, download or upload files or directories, calculate directory sizes, show information on a file, and select multiple files or directories.
- Files managing area. The main area displaying files and directories, including their names, sizes, and last modified dates.
Database management
Databases ensure that websites run smoothly. A database management system is software that interacts, retrieves, and stores data for users.
MySQL is one of the commonly used software for managing WordPress databases. Hostinger offers multiple ways to access and manage website databases using MySQL and phpMyAdmin.
Head to the Databases section on hPanel to control your databases:

MySQL databases

Here, you can Create a New MySQL Database And Database User and access the List of Current MySQL Databases And Users.
You can also change the user permissions of your databases and enter the phpMyAdmin for each database.
phpMyAdmin

This page is another way to access the List of Current Databases. We also provide a login link to users to access phpMyAdmin without logging into hPanel.
Remote MySQL

Use this feature to Create remote database connection by connecting your computer or another server to Hostinger’s MySQL server.
Add the IP address that will connect to the MySQL server and choose the database name you want to connect.
DNS management

Managing DNS settings is a vital aspect of domain management. hPanel provides an intuitive interface to configure your DNS settings through the DNS Zone Editor.
In the DNS Zone Editor, you can:
- Manage DNS records. Add, edit, or delete DNS records like A, CNAME, MX, and TXT.
- Manage nameservers. Change your domain’s nameservers easily.
Referral program
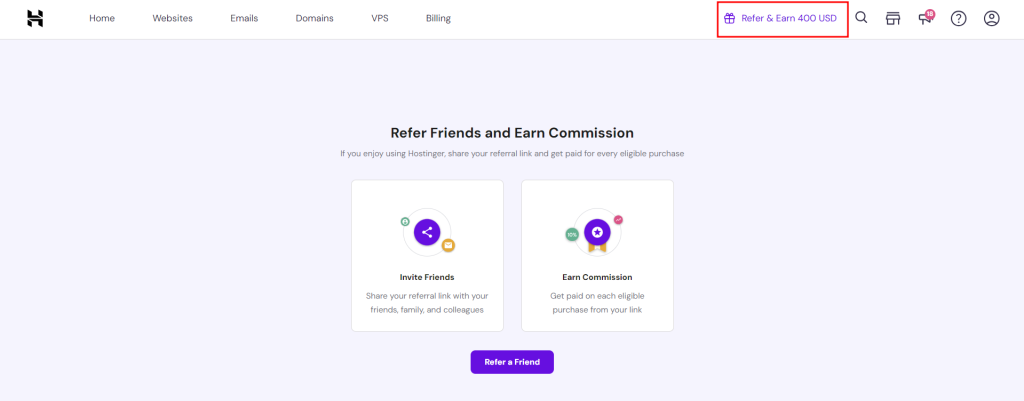
The Referral Program enables you to earn rewards by inviting others to use Hostinger’s services:
- Generate and share referral links. With our referral program, you can easily generate referral links and share them with friends and colleagues.
- Monitor referrals and earn rewards. Track the status of your referrals and the rewards you earn directly through hPanel.
Using our referral program is a win-win situation – you will earn 20% of your referral’s first purchase, while they will enjoy a 20% discount.
What’s next?
Hostinger’s comprehensive suite of tools and services makes it an excellent choice for anyone looking to establish or enhance their online presence.
Whether you need reliable web hosting, advanced AI tools, or extensive learning resources, Hostinger has everything to help your website succeed.
By leveraging Hostinger’s features, you can optimize your website, ensure its security, and scale as your business grows.

Matleena is a seasoned Content Writer with 5 years of content marketing experience. She has a particular interest in emerging digital marketing trends, website building, and AI. In her free time, Matleena enjoys cups of good coffee, tends to her balcony garden, and studies Japanese. Follow her on LinkedIn

Domantas leads the content and SEO teams forward with fresh ideas and out of the box approaches. Armed with extensive SEO and marketing knowledge, he aims to spread the word of Hostinger to every corner of the world. During his free time, Domantas likes to hone his web development skills and travel to exotic places.