How to Resolve High Usage of admin-ajax.php in WordPress
Asynchronous JavaScript and XML (AJAX) is a set of web development techniques that enhances a website’s user experience and interactivity.
WordPress theme and plugin developers commonly implement AJAX to create dynamic and interactive features. Moreover, AJAX allows site visitors to submit a newsletter form or comment on a blog post without reloading the web page.
WordPress is a content management system (CMS) that utilizes the admin-ajax.php file to manage AJAX requests.
The admin-ajax.php file enhances the website user experience. However, too many requests can impact performance. In this article, we will share troubleshooting methods to reduce your site’s admin-ajax.php file usage.
What Is the admin-ajax.php File in WordPress?
The admin-ajax.php file is a WordPress core file. It serves as an endpoint for handling AJAX calls or requests, such as loading comments and processing form submissions. This PHP script processes web server data and returns relevant information to users’ web browsers. By default, the admin-ajax.php file is located in the wp-admin folder.
How Can admin-ajax.php Slow Down Your WordPress Site?
The following are several factors that may cause an overload in WordPress AJAX requests:
Excessive Plugin Usage
Plugins often require additional resources and code to fully operate. Using too many plugins that rely on AJAX requests can lead to excessive usage of the admin-ajax.php file, resulting in a slower page load time.
High Traffic Volume
A website with heavy traffic can eventually cause the admin-ajax.php file to overload. This is because WordPress uses the PHP file to establish a connection between your website’s front and back end.
Inefficient Database Queries
Database queries retrieve and update WordPress site information from the back end. However, these queries can lead to high usage of the admin-ajax.php file if not optimized.
Why Is It Important to Reduce WordPress Admin AJAX Requests?
Reducing the high load of admin-ajax.php in WordPress can bring benefits to your site, such as:
Improved Performance
Minimize AJAX requests to reduce server response time. This results in faster page load times and a smoother browsing experience for your WordPress website visitors.
Enhanced User Experience
An optimized Admin AJAX file lets your website respond quickly to user interactions. Therefore, visitors can seamlessly navigate through your web pages, interact with buttons and forms, and access content. A positive user experience boosts engagement, returning visitors, and conversion rates.
Reduced Server Load
Reducing the number of admin-ajax.php requests can boost the server load, making your website accessible and responsive during high-traffic times.
You can also minimize server resources, such as processing power, memory, and storage space, so the website can handle traffic more effectively. This is especially helpful when running sites on a shared hosting plan.
How to Troubleshoot the admin-ajax.php Issue
In the following sections, we will use GTmetrix and Chrome Developer Console to identify if the admin-ajax.php file slows down your website.
GTmetrix
GTmetrix is a web-based tool used to monitor and analyze site performance. It measures various performance metrics and provides insights to fix or improve them.
The following are the steps to identify issues related to the admin-ajax.php file:
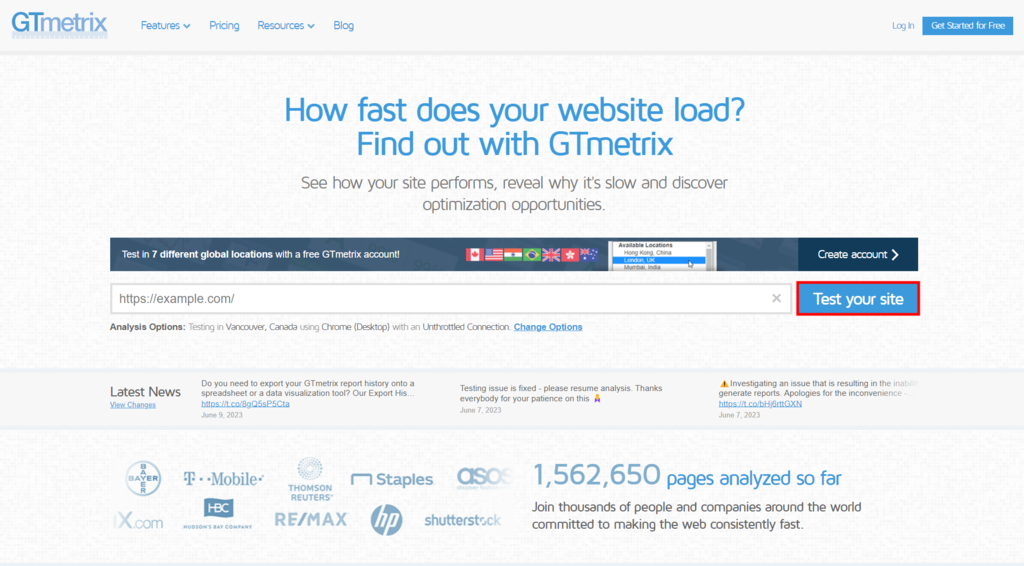
- Go to the GTmetrix homepage and type your website URL in the required field.
- Click the Test your site button to run the performance check. Note that the process varies depending on the size of your website.
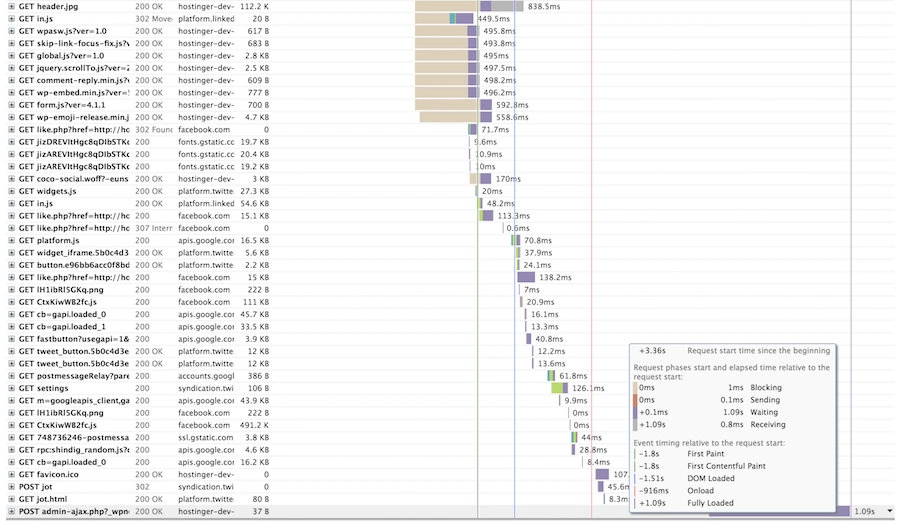
- Once finished, navigate to the Waterfall tab on the Latest Performance Report page.
- Search for admin-ajax.php using the search bar. For instance, the following performance report shows that the POST admin-ajax request takes longer than other requests.
- Click POST admin-ajax.php and navigate to the Post tab. The example below shows that the count_hit script causes the performance issue.

Chrome Developer Console
Another method to diagnose your site’s Admin AJAX usage is by using Chrome Developer Console. Follow the steps below:
- Visit your website via Google Chrome.
- Right-click on the page, such as your homepage, and click Inspect. Alternatively, click the three dots icon on the top-right corner of the screen, and go to More tools → Developer tools.
- Click on the Network tab and reload your website.
- In the filter box, type admin ajax to see if any process uses a WordPress AJAX call.
How to Reduce High Usage of Admin AJAX in WordPress
After identifying the admin-ajax.php file usage issue using GTmetrix or Google Chrome Console, implement the following methods to minimize the PHP file usage:
Disable WordPress Plugins
Since WordPress plugins frequently use AJAX calls, disabling them is the easiest way to solve the issue. Especially if you have identified that a particular WordPress plugin sends unnecessary AJAX requests. The following are the steps to deactivate it:
- Log in to your WordPress dashboard.
- Go to Plugins → Installed Plugins.
- Locate the plugin you want to disable and click the Deactivate button.
- Run a performance check using GTmetrix to see if the issue is solved.
If you cannot find which plugin is overloading the admin-ajax.php file, consider deactivating all plugins and running performance testing. Then, re-activate the plugins one by one if it doesn’t cause any problems. We highly recommend backing up your WordPress website first to avoid unexpected errors.
Enable Website Caching
Caching is crucial as it helps speed up your WordPress site. It involves creating a static version of your web pages and storing them in the visitors’ browsers or servers. The cached web pages are used when returning visitors access your website, making the page load faster.
WordPress has several caching plugins to help mitigate the impact of admin-ajax.php requests and optimize website performance:
- W3 Total Cache – reduces load and server response times by integrating advanced techniques, such as browser caching, CDNs, and CSS and JavaScript file minification.
- WP Super Cache – generates static HTML files from dynamic web pages and accelerates page load times using various caching options, such as Apache mod_rewrite, PHP, and legacy caching.
- WP Rocket – improves site performance by incorporating various caching mechanisms, like lazy loading, object caching, and GZIP compression.
- LiteSpeed Cache – Designed for WordPress websites running on LiteSpeed web servers. It includes features such as QUIC.cloud CDN cache, Heartbeat control, and image optimization.
Suggested reading
WP Super Cache vs W3 Total Cache
How to Optimize Your Site to 100% with LiteSpeed Cache
To demonstrate, we will share the steps to configure and use a caching plugin. We will use W3 Total Cache as the example:
- From the WordPress dashboard, install and activate the W3 Total Cache plugin.
- Once activated, navigate to Performance → Dashboard. Follow the W3 Total Cache setup guide.
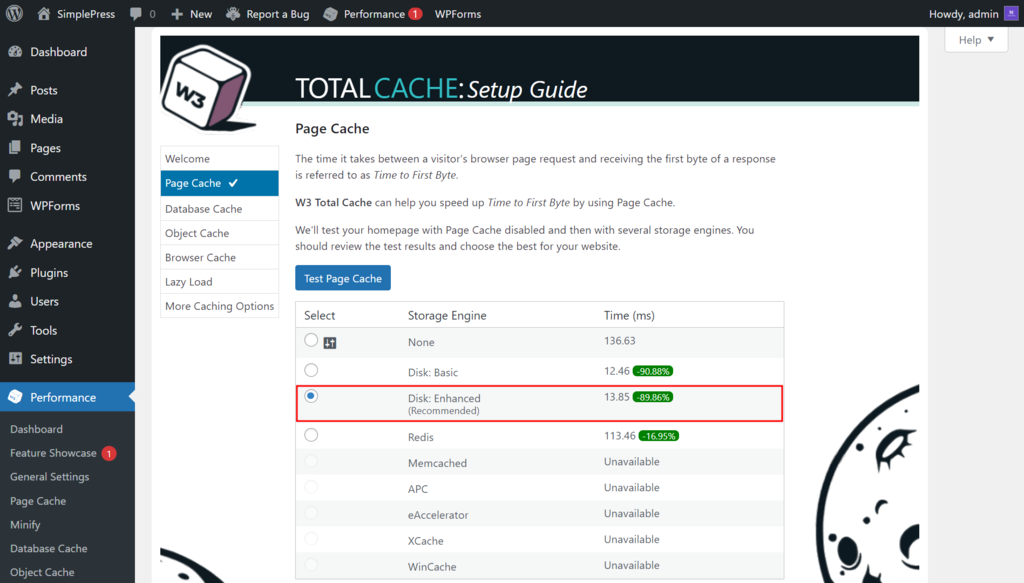
- Click the Test Page Cache button on the Page Cache screen. Wait until the process is complete.
- Choose the best page caching option. We recommend choosing the one with the Recommend label. In this case, let’s select Disk: Enhanced.
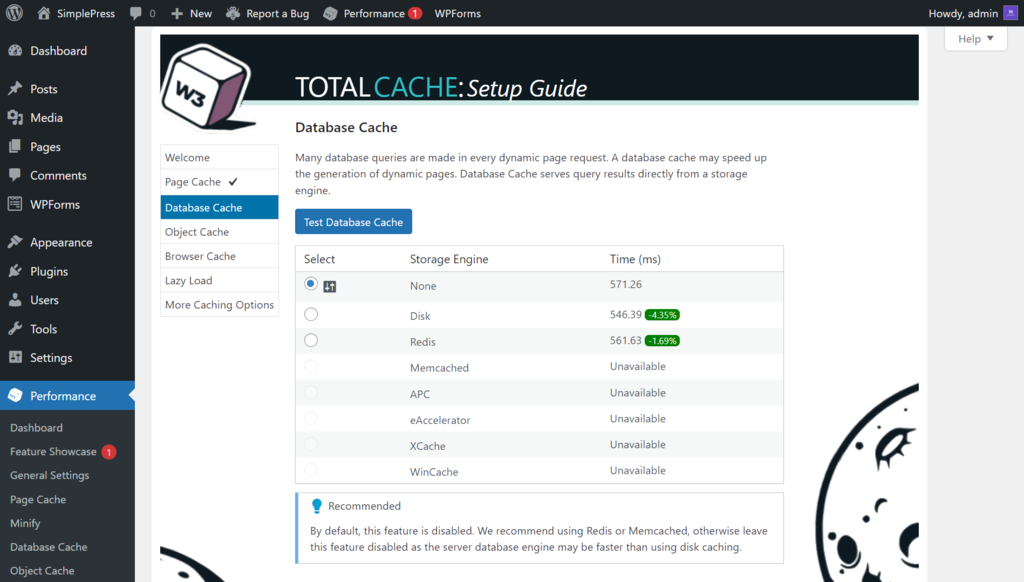
- Run the database cache check by clicking the Test Database Cache button. By default, this feature is disabled. You can also choose a database caching option from the list. The plugin recommends Redis or Memcached.
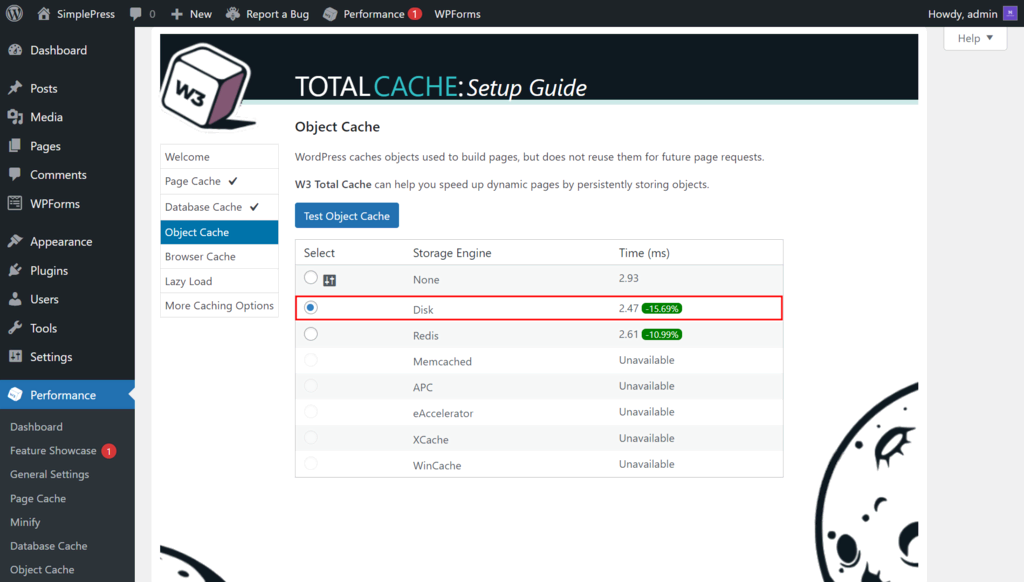
- On the Object Cache page, click the Test Object Cache button. Wait until the process is finished.
- Choose the best object cache result. For instance, we will select the Disk option since it receives the fastest response time.
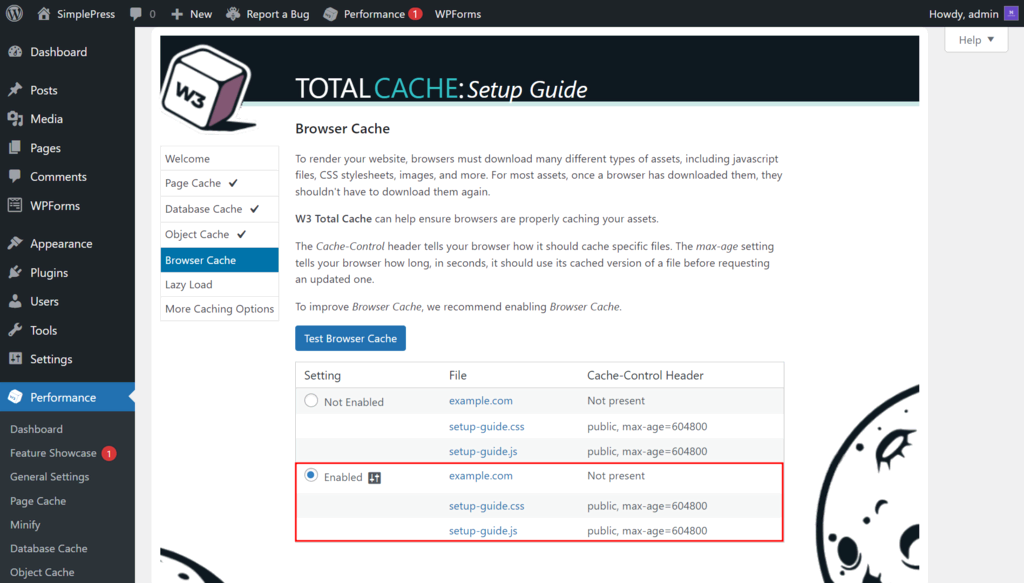
- On the next screen, click the Test Browser Cache button to perform the browser cache check. By default, the setting is set to the Enabled option.
- Enable the image optimization feature on the Lazy Load page by ticking the Lazy Load Images radio button.
- Review your W3 Total Cache settings and click the Dashboard button to complete the setup.
Hostinger hosting plans, including Business Web Hosting and Cloud Startup, have Object Cache and Cache Manager features. These built-in features automatically enable caching on your site, resulting in faster page load speed.
However, you must manually turn on Cache Manager using hPanel. Here are the steps:
- Log in to your Hostinger account and go to the Websites page.
- Select your website and click Manage.
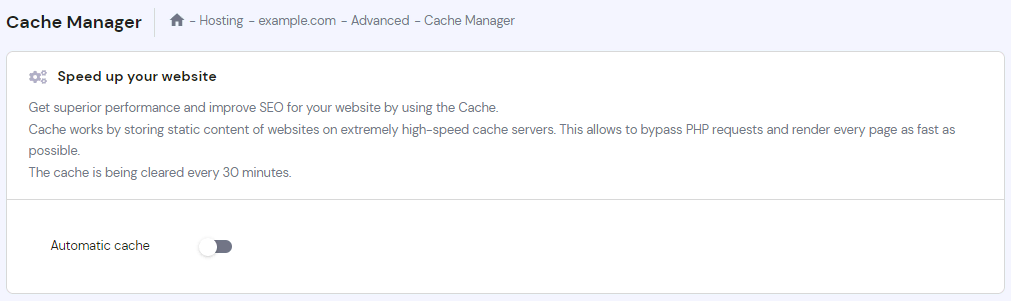
- On the hPanel dashboard, navigate to Advanced → Cache Manager. Alternatively, use the search bar and type cache manager.
- Activate the feature by toggling on the Automatic cache option.

Control WordPress Heartbeat API
WordPress Heartbeat API is a feature that allows real-time communication between a web browser and the server using AJAX requests.
However, its frequent requests can sometimes lead to high resource usage, increased server load, and heightened use of the admin-ajax.php file.
You can control WordPress Heartbeat API using two methods:
Using the LiteSpeed Cache Plugin
LiteSpeed Cache is a powerful plugin with various features, including Heartbeat Control. The following are the steps to configure this plugin to limit Heartbeat API usage:
- Log in to your WordPress dashboard.
- Install and activate the LiteSpeed plugin.
- From the sidebar menu, navigate to LiteSpeed Cache → Toolbox → Heartbeat. By default, the Heartbeat Control feature settings are disabled.
- Turn on an option and modify the Backend Heartbeat TTL value to your preference. For instance, enable the Backend Heartbeat Control and set the Backend Heartbeat TTL value to 15.
- Save the changes.
Modifying the function.php File
Another way to limit or disable Heartbeat API is by adding custom PHP code into the function.php file. Follow the steps below:
- From the WordPress dashboard, navigate to Tools → Theme File Editor.
- Go to the Theme Files section and select Theme Functions, which contains the function.php file.
- Copy and paste the following code snippet to the text editor:
add_action( 'init', 'disable_heartbeat', 1 );

function disable_heartbeat() {

wp_deregister_script('heartbeat');

}
- Click Update File to save the changes.
Conclusion
The admin-ajax.php file’s high usage in WordPress may significantly cause performance issues. Therefore, it is important to address this problem to improve your site’s performance, enhance user experience, and reduce server load.
In this article, we have discussed factors that lead to high usage of admin-ajax.php, such as excessive plugin usage, high traffic volume, and inefficient database queries.
You have also learned how to troubleshoot this AJAX script file issue using GTmetrix and Chrome Developer Console.
As for reducing the high usage of your WordPress site’s admin-ajax.php, here is a recap of the three methods:
- Disable WordPress plugins.
- Enable website caching.
- Control WordPress heartbeat API.
We hope this article has helped you understand how to reduce the high usage of admin-ajax.php on your WordPress site. Good luck on your online journey!
Learn More WordPress Tips and Techniques
How to Combine External JavaScript
How to Remove Query Strings From Static Resources
How to Defer Parsing of JavaScript
How to Eliminate Render-Blocking JavaScript and CSS

Information Technology and web development are Yoga's passions. He loves nothing more than sharing his experience with readers, and helping them to understand the world of IT. In his spare time, Yoga likes to make music and learn to code. He is always looking for new challenges, and enjoys pushing himself to learn new things.

Comments
January 18 2020
Thanks for this detailed guide. I was able to isolate the plugin that was causing the delay using GTmetrix and the Post method you described.
May 24 2022
admin-ajax.php slows down the saving of Ninja Forms up to the point where saving a complex form takes more than a minute. We installed Heartbeat Control and disabled all heartbeats. Still slow. Then started disabling plugins and things like WordFence and Elementor seem to slow down the saving of Ninja Forms. We manage to push back the saving time to 30s but the website becomes unworkable. Suggestions? Thanks Jan
May 24 2022
Hi Jan! Are you sure the slow speeds are caused by Ninja Forms? I'd suggest to start by checking the website on gtmetrix.com, then according to that - look for specific optimization options, such as eliminating render-blocking resources, image optimization for WordPress and more. You can find a more detailed website optimization guide here ?
May 28 2022
I have a bunch of sites but on a few, the ajax HTTP request doesn't go away not even with heartbeat disabled everywhere, no idea why!
May 31 2022
Hi there! If the request isn't passed at all, I would also suggest to have a look at the resource usage of your server or hosting plan - it could be that you're hitting your limits.