How to Set up a WordPress Intranet: A Comprehensive Guide
As your business grows and develops, it will start facing the need for a proper organizational tool to streamline employee tasks. To take care of that, consider creating a WordPress intranet site.
A company intranet can be used as a central digital workplace, allowing staff members to collaborate and communicate with each other.
Additionally, a WordPress intranet site can be a way to increase employee engagement. This is an important problem, as, according to a Gallup analysis, up to 65% of employees in the United States are not actively engaged at work.
Luckily, anyone can create an intranet site without having to hire a web developer – all you need is a WordPress website and a few plugins.
In this WordPress guide, we’ll walk you through each step of creating a WordPress intranet site for a business or an organization. We’ll also go over a few intranet themes you can use.
What Is a WordPress Intranet?
A WordPress intranet is an intranet set up that is hosted on WordPress, a popular content management system (CMS).

An intranet is a private network that is only accessible to a specific business or organization and its employees. Extranets differ from intranets in that they allow some people from outside of the company, such as suppliers or clients, to access them as well.
Creating a WordPress intranet site has other advantages too. It can:
- Serve as a project management tool – organizations can facilitate collaboration between team members by adding features like discussion dashboards, file sharing, and task management to their WordPress intranet site.
- Improve communication – a WordPress intranet site can be used for socialization. It eliminates the distance and barriers between employees, strengthening their team spirit.
- Act as a central hub – intranets can be a place for staff members to host and view business documents and company news. Here, new hires can also find training content or videos and orientation checklists.
How to Set up a WordPress Intranet Site?
Even though WordPress was not designed to be an intranet platform, it comes with a lot of features to efficiently run one.
There are two main ways to set up a WordPress intranet website:
- Using a localhost solution like XAMPP or WAMP – if you choose this method, employees will only be able to access the company intranet when they’re connected to the local network within the physical office space of your organization.
- Using a hosted WordPress site with plugins – this method lets employees access the intranet from anywhere as long as they have an internet connection.
In this article, we’ll focus on the second method. We’ll be setting up a WordPress intranet site using Hostinger’s website hosting. However, if you prefer using a different type of hosting, the process will still be the same. For bigger organizations, it’s recommended to use WordPress-optimized enterprise hosting plans.
We’ll use the plugins All-In-One Intranet and BuddyPress to create an intranet site. All-In-One Intranet will lock the site down and prevent unauthorized users from accessing it. BuddyPress, meanwhile, will provide social network functionality to your WordPress site.
Here are the steps to create an intranet on WordPress:
1. Set Up WordPress as a Base for the Intranet
The first step is to acquire a WordPress website hosted on a public server. For this purpose, we’ll choose the self-hosted version of WordPress as it allows for the installation of any plugin. You can read more about WordPress.org vs WordPress.com on our blog.
As your site will contain sensitive business information, make sure to pick a reliable hosting service with advanced security features like Hostinger.
Once your WordPress website is up and running, move on to the next step.
Pro Tip
In order for your WordPress intranet website to work, you will also need a domain name. The .link domain is a common choice for intranet sites, which you can get for free with some of the Hostinger’s hosting plans.
2. Install and Configure the All-In-One Intranet Plugin
All-In-One Intranet restricts unauthorized people from accessing the WordPress site and lets users configure its privacy.
It also offers the functionality to automatically terminate idle sessions. This feature is helpful in case a user forgets to log out on a public computer.
To install the plugin, navigate to your WordPress admin panel and go to Plugins → Add New. Then, type All-In-One Intranet in the search bar and click Install Now to start the installation.
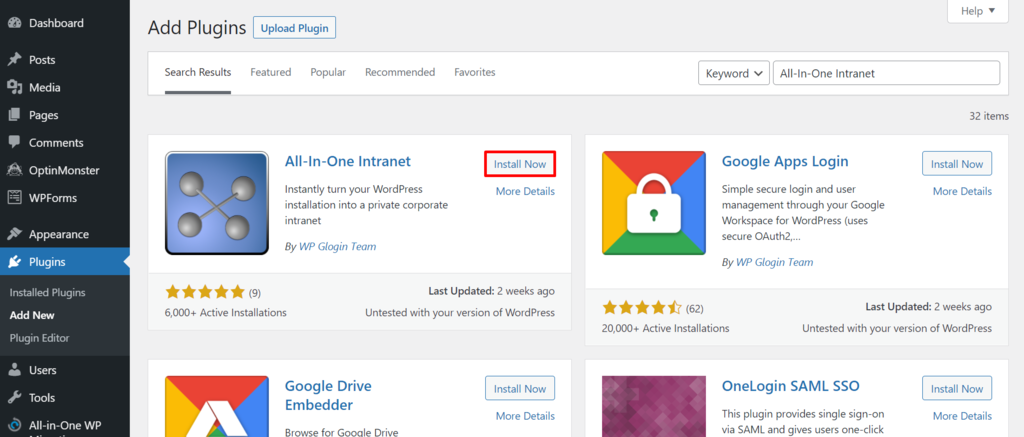
Wait for the process to finish, and select Activate.
All-In-One Intranet will automatically turn your WordPress site into an intranet network as soon as it’s activated.
Note that you’ll need to manually upload the All-In-One Intranet’s ZIP file through the WordPress dashboard if you buy the premium version.
After installing and activating All-In-One Intranet, navigate to Settings → All-in-One Intranet to configure the plugin.
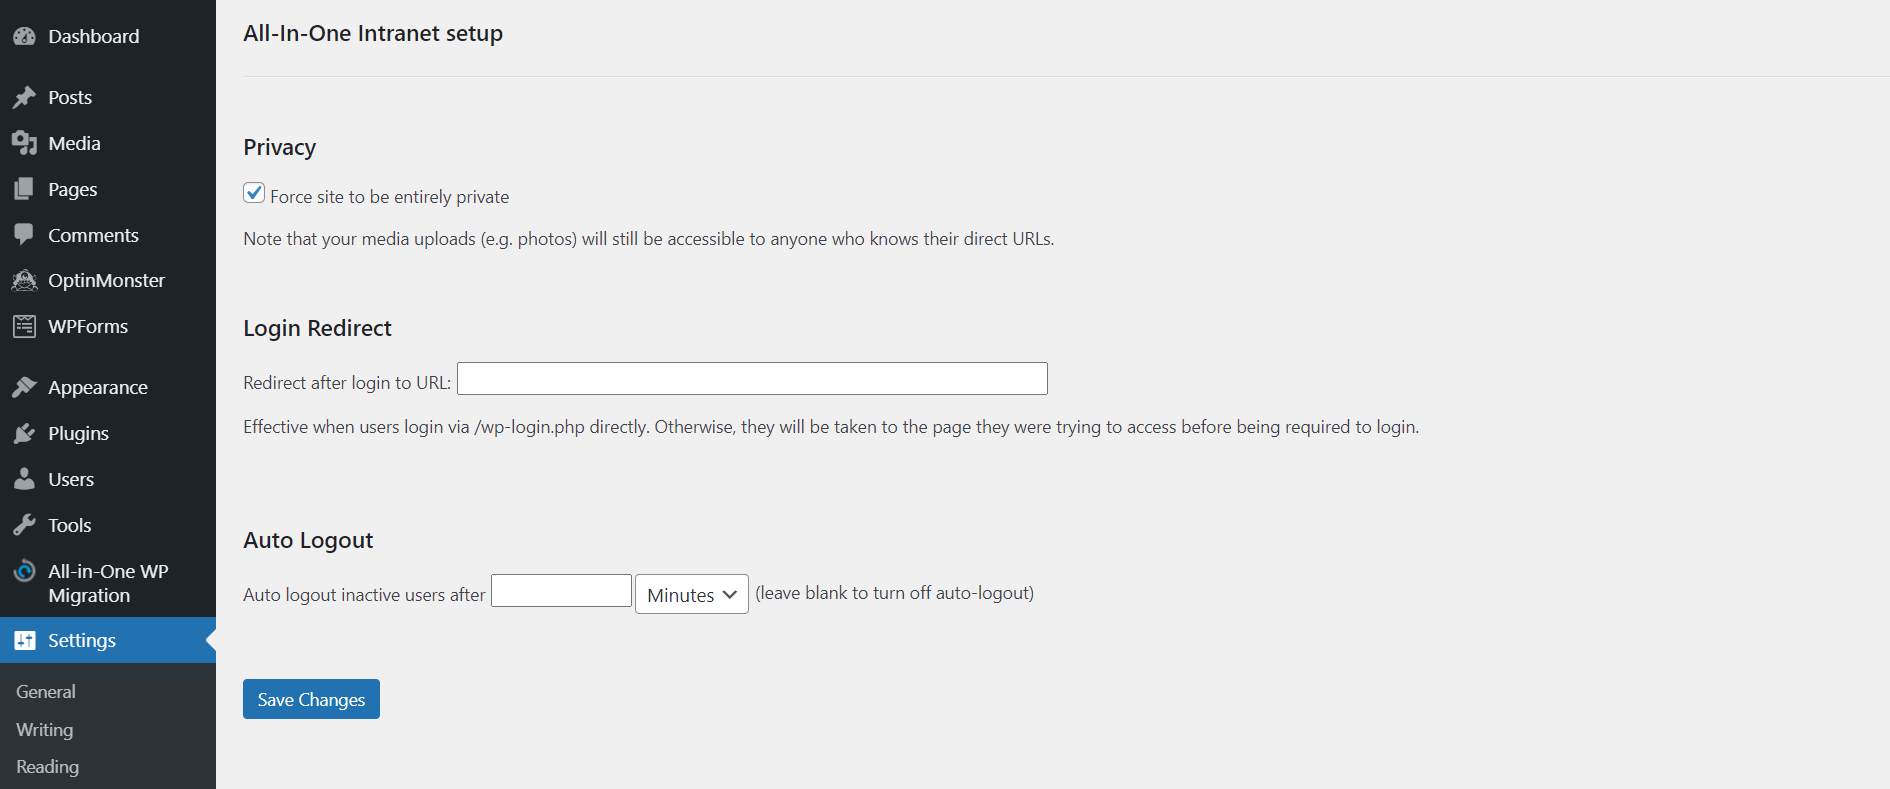
On the setup page, Force site to be entirely private will be ticked by default. This means that unauthorized people will no longer have access to your web pages, with the exception of media uploads.
In the Login Redirect section, enter the URL of the intranet page you wish to display to the users after logging in.
Here, you can also set up the Auto Logout feature by choosing the inactivity period before the system logs a user out.
After customizing the WordPress intranet, click Save Changes to apply the new settings.
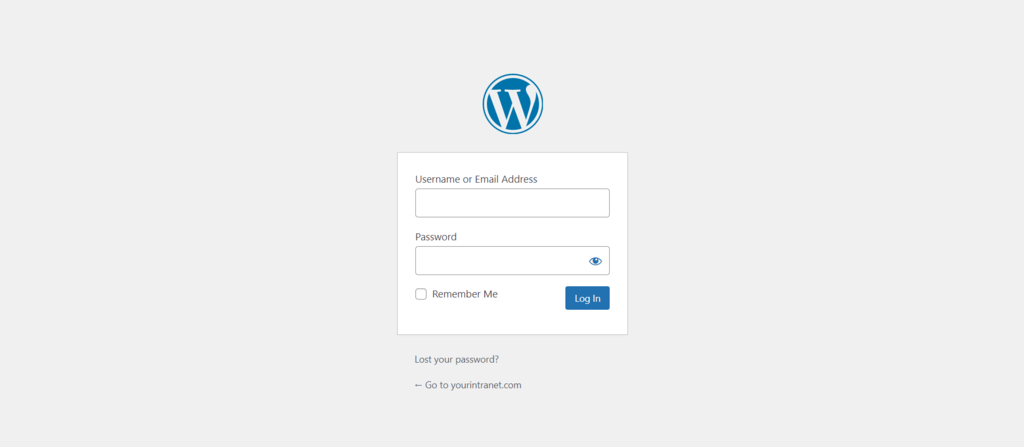
When you visit your WordPress site, you’ll notice that it is locked behind the default WordPress sign-in form.
3. Install and Set up the BuddyPress Plugin
The next step is to install BuddyPress. It will allow your WordPress intranet site to emulate social networks by enabling group discussions and instant messaging. This way, staff will be able to engage in private conversations and interact with each other.
Additionally, BuddyPress comes with a theme-compatibility API, which makes it work well with many different WordPress themes.
Before installing and setting up this plugin, make sure that your web hosting supports:
- 7.2 and higher PHP versions.
- 5.6 and higher MySQL versions, or 10.0 and higher MariaDB versions.
- HTTPS.
Pro Tip
All of Hostinger web hosting plans offer these features.
Log in to the WordPress admin control panel, open the Plugins menu, and click Add New. Enter BuddyPress as the search query to look it up. Then, click Install Now.
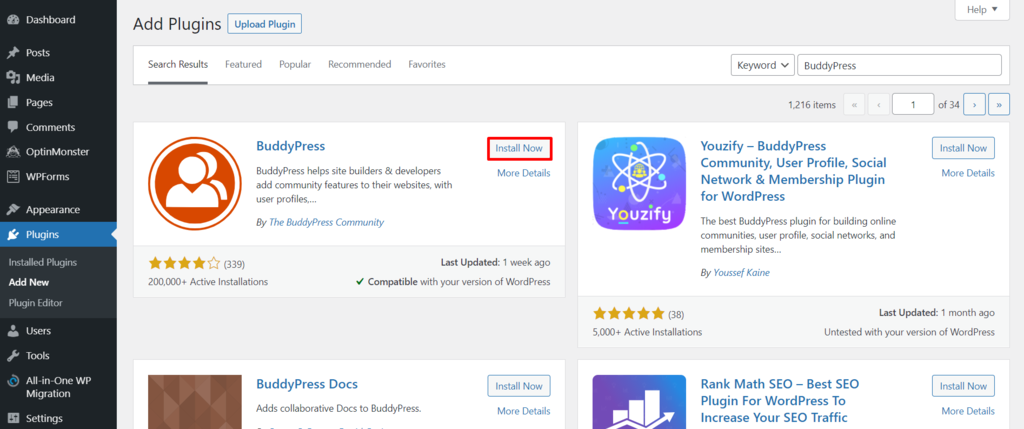
Click Activate, then navigate to Settings → BuddyPress to configure the plugin.
In the Components section, tick the box of any feature you want to enable and click Save Settings when done.
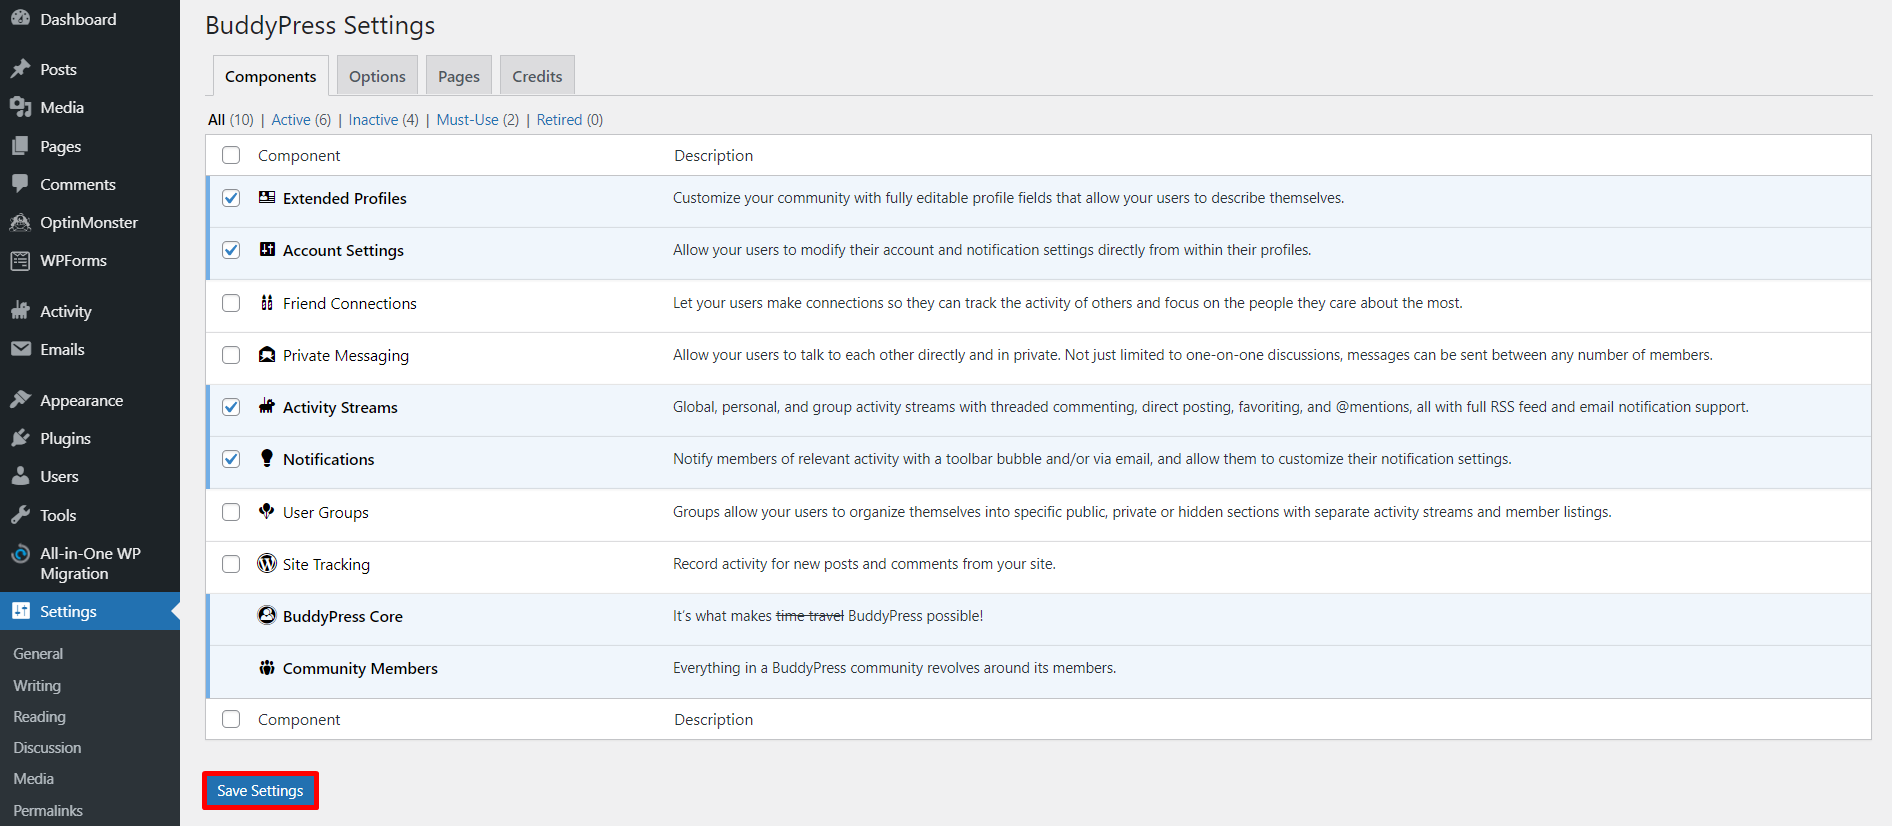
Next, click on the Options tab. Go through the settings and change them according to your preferences. Finish by clicking the Save Settings button.
Lastly, click on the Pages tab to set up directories and select the pages you want to configure for various BuddyPress elements. The plugin comes with default preset pages – users are free to use or alter them. After making the changes, remember to click Save Settings.
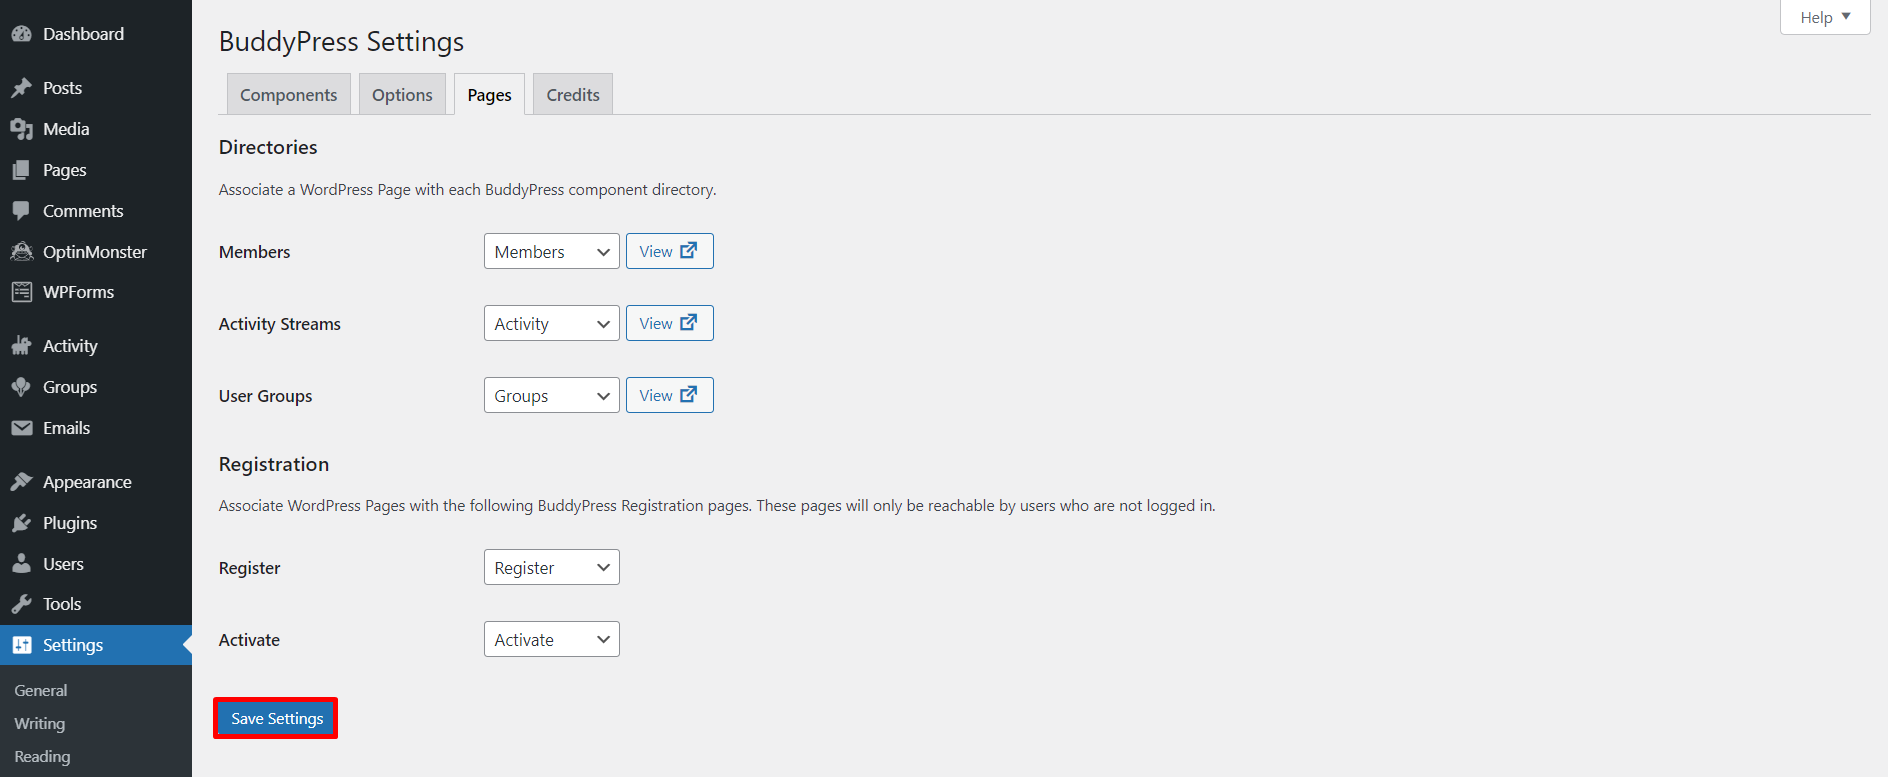
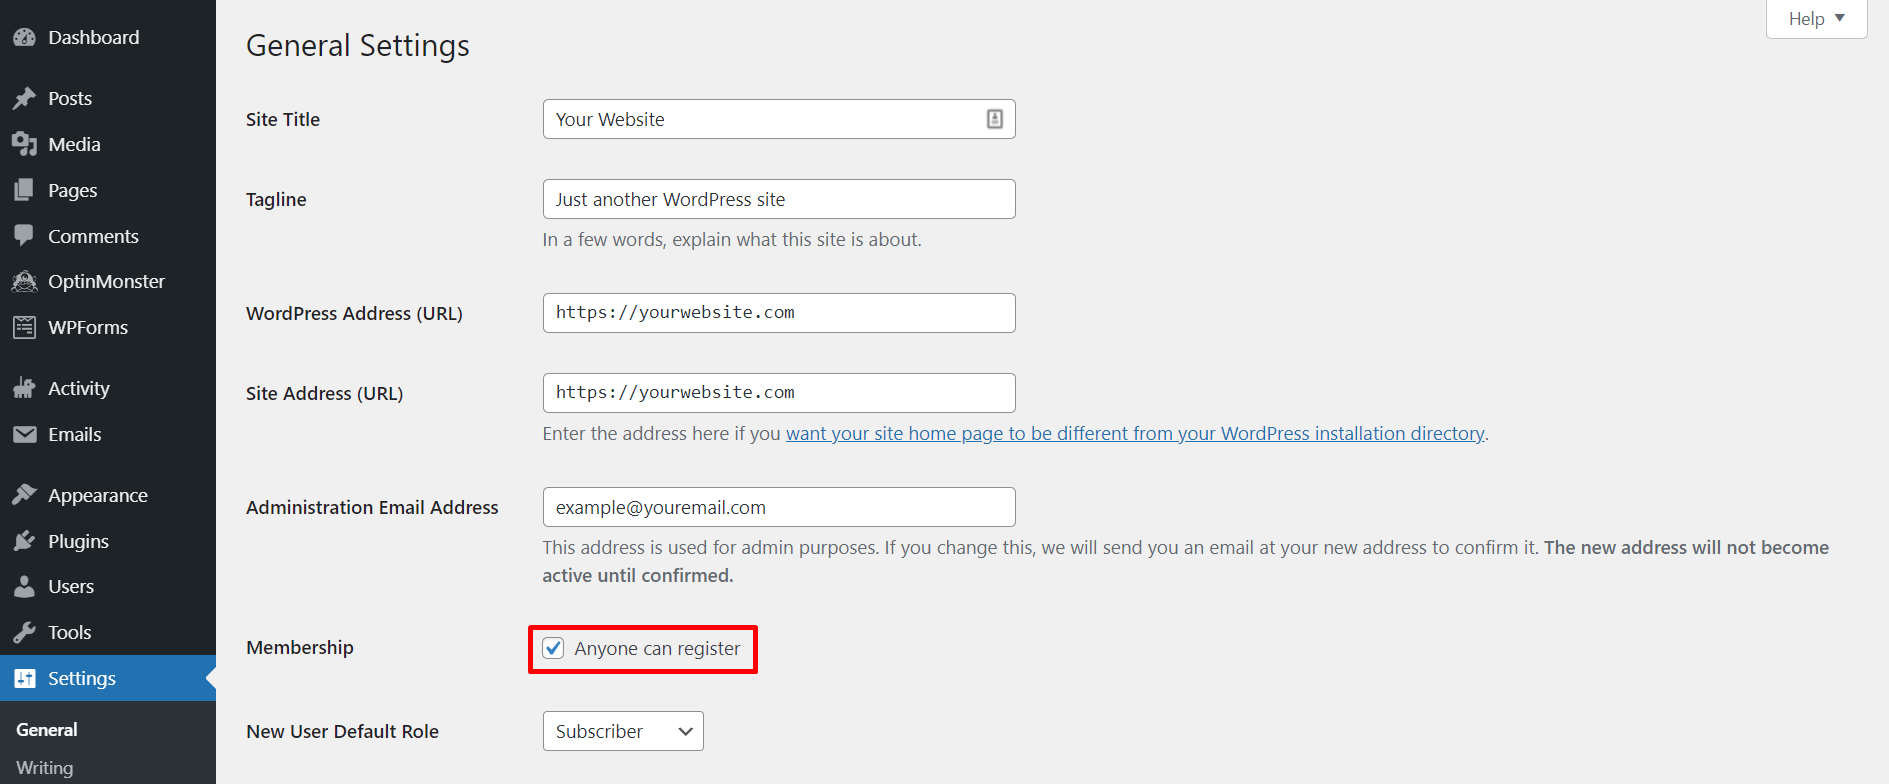
If the Register and Activate options don’t show up in the Pages section, enable user registration by going to Settings → General. Locate Membership, check the Anyone can register box, and click Save Changes. Then, return to the setup page of BuddyPress.
4. Integrate BuddyPress Pages on the Website
After configuring BuddyPress, the website won’t show any pages added by the plugin right away. To display them, go to Appearance → Menus. Then, fill the Menu Name field and click Create Menu.
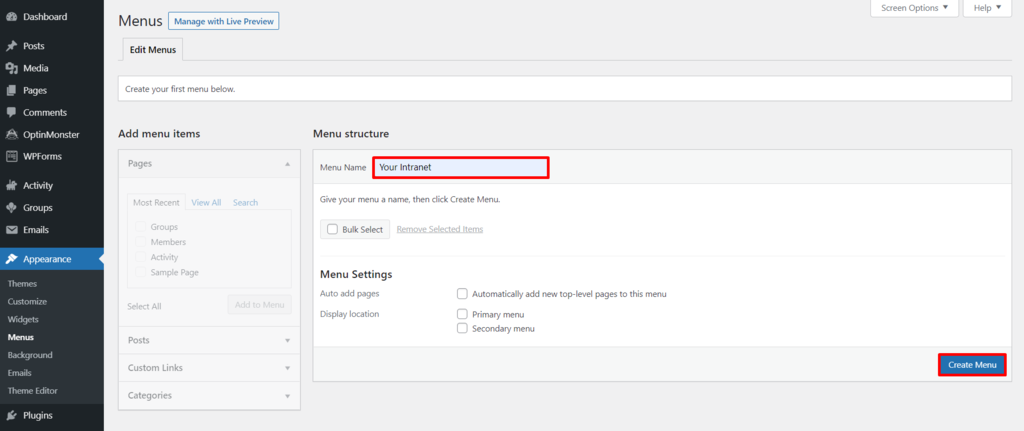
Select all BuddyPress pages on the left column, click Add to Menu, and then select Save Menu to store the changes.
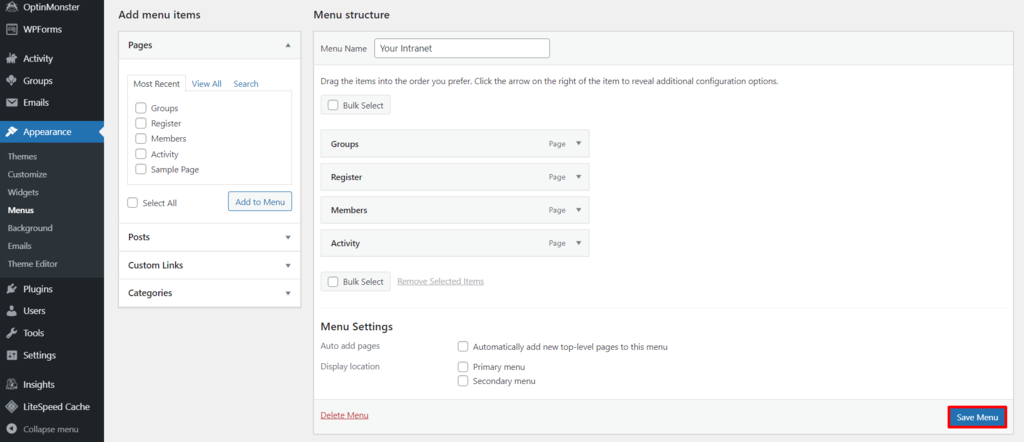
Once you’re done, go back to the website – you’ll now be able to see the pages you’ve just added to the BuddyPress menu.

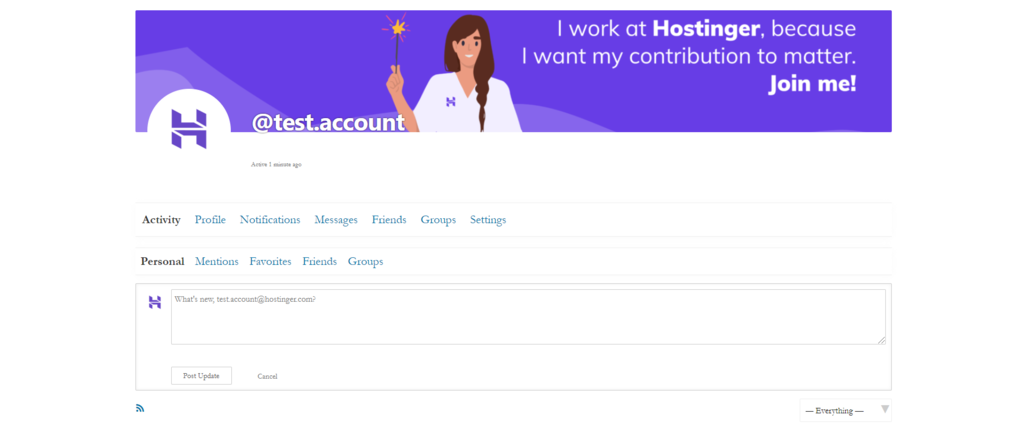
When users log in to their profile, they’ll see new features such as their activity, notifications, and messages.
While BuddyPress is compatible with most WordPress themes, in the rare case that it isn’t, the plugin has built-in templates to choose from.
5. Extending WordPress Intranet
Now that you have successfully created an intranet site, consider adding other WordPress plugins to improve its functionality.
Here are some of our recommendations:
- Prevent Direct Access – use this tool to protect media uploads such as company documents, audio files, images, and videos.
- Gravity Forms – it allows companies and organizations to create, manage, and schedule employee surveys.
- Knowledge Base for Documentation and FAQs – as the name suggests, this plugin can be used to create an internal knowledge base on a WordPress intranet for company employees.
- Kanban Boards for WordPress – this WordPress plugin is excellent for project management and collaboration as it lets users create tasks and to-do lists and show their progress.
- Google Drive Embedder – this plugin provides intranet users with easy access to documents on Google Drive.
Best WordPress Intranet Themes
WordPress was not designed to be intranet software. Thus, a regular WordPress theme might not be enough to accommodate the requirements of intranet sites.
Thankfully, there are plenty of excellent premade WordPress intranet themes available. They include the essential features and offer BuddyPress integration by default. Some of our favorites are:
1. Woffice

Woffice is a multipurpose WordPress theme suitable for company, government, and nonprofit organization intranet sites.
This intranet theme offers various built-in demos with a contemporary look and feel – business owners can choose any template they like and change its colors and fonts. It’s also possible to customize the login page to match your brand.
Moreover, the theme includes community features. The members map, for example, can display the locations of the employees around the globe, allowing them to see where the other team members are located.
Another great feature of Woffice is the extended search, which makes it easy for staff members to search through the available content or company information using advanced queries.
Other than that, Woffice is compatible with BuddyPress and supports all of its social network features, including the online chat and groups.
It costs $79 to buy a regular Woffice license, including support for six months.
2. WildCommunity
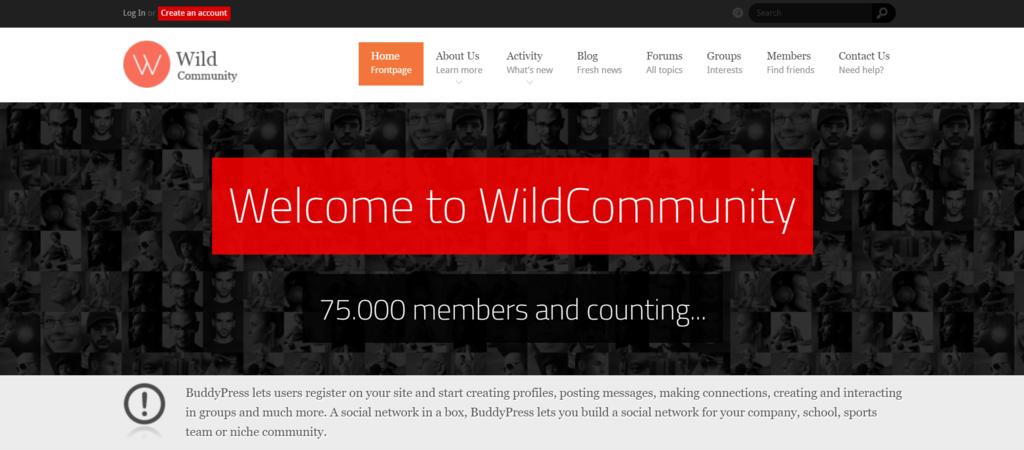
WildCommunity is an excellent option for creating a community website as it’s fully integrated with bbPress. This WordPress forum plugin can generate discussion boards on a WordPress website.
Since it is also BuddyPress compatible, users can use this theme to easily build a social network for their company.
Aside from that, WildCommunity also supports other WordPress plugins like WPMU and WooCommerce.
WildCommunity is not only designed for intranets, but it’s also suitable for extranets – it can display different content blocks for members and guests on the homepage.
Additionally, this WordPress theme is responsive by default. This means that a WildCommunity powered intranet site will look great on any device.
WildCommunity also includes a blog section, letting people share content related to their business or organization on the intranet.
Another notable feature of this WordPress theme is pop-up notifications that appear when members receive new messages or friend requests.
A regular license of this WordPress theme with six months of support costs $49.
3. BuddyApp
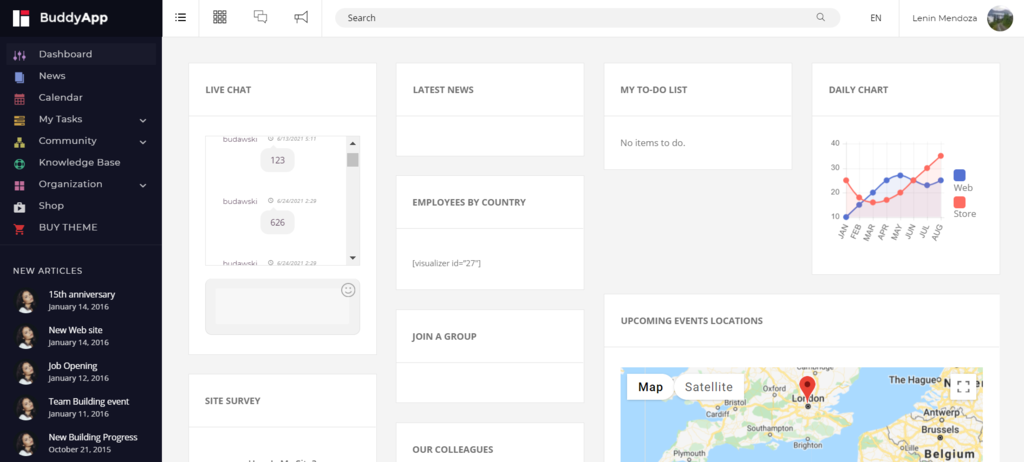
BuddyApp is an interactive WordPress intranet theme with three different demos to choose from – an online shop, a creative agency, or a private community.
This theme comes with a lot of features – one of them is the drag-and-drop page builder, which allows users to customize this template effortlessly with no coding knowledge.
To ensure your staff members have access to the information they need, BuddyApp has knowledge base integration. The theme also includes event registration, calendar, and booking management features.
In case you want to incorporate visual content and media albums into your intranet site, you can install the rtMedia plugin – it is fully compatible with BuddyApp.
Most importantly, the theme has a file management feature. It allows users to upload, share, and access files in the private environment of your organization.
The regular license for BuddyPress is priced at $43 and also includes six months of support.
Conclusion
Building a WordPress intranet site is an excellent way to facilitate employee communication and help them collaborate with each other while protecting sensitive business information.
It’s not difficult to set up an intranet either – by installing a few plugins, you can turn a WordPress website into a private network.
To recap, here are the steps to create an intranet site on WordPress:
- Set up WordPress as a base for the intranet – acquire web hosting and install WordPress on your site.
- Install and configure the All-In-One Intranet plugin – activate and set up this tool to restrict access to unauthorized users.
- Install and set up BuddyPress plugin – activate and configure this plugin to enable group discussions and instant messaging.
- Integrate BuddyPress pages on the website – add the BuddyPress pages to the intranet site.
- Extend WordPress intranet – improve the intranet functionality by adding more plugins, such as Prevent Direct Access or Gravity Forms.
Regular WordPress themes may be lacking for intranet functionality, so consider using a premade theme with essential intranet features already there.
We hope this article has helped you understand how to create a WordPress intranet site. If you have any questions, feel free to leave us a comment below.
Discover Other Tools to Make the Most of WordPress
How to Add Google Analytics to WordPress
How to Install Google Tag Manager in WordPress
How to Set Up Cloudflare CDN for WordPress Blog
How to Install and Use WP-CLI
How to Add AdSense to WordPress
How to Automatically Share WordPress Post to Facebook

Amanda is a WordPress and digital marketing enthusiast with a passion for helping others grow their businesses and careers. She enjoys producing content that is both informative and helpful. When she's not working, Amanda loves hiking, reading books, and filling her bullet journal.

Comments
August 27 2021
Hello, Is there a way to have online website which people around the world can see it but at the same time can have intranet pages for users? Thanks
September 20 2021
Hi Tima, I'd suggest to better use a subdomain for your intranet and the main domain for your public website. That way you'll be sure your internal data is safe and won't need to purchase a new domain for intranet. Main domain and subdomain will be two separate websites, so you should have no problem setting them up completely different - one for internal use and one public.