How to Create a WordPress Drop-Down Menu and Its Best Practices
Drop-down menus are essential for many websites’ navigation systems, providing a user-friendly way to organize and access content. WordPress, with its intuitive interface, makes creating drop-down menus easy.
This article will teach you three ways to make a drop-down menu. We’ll also explore best practices for designing drop-down menus that enhance user experience and optimize website navigation.
How to Create a WordPress Drop-Down Menu
Follow these steps to seamlessly integrate drop-down menus into your WordPress site using the Site Editor, the Max Mega Menu plugin, and manually. Let’s begin with the Site Editor method.
How to Add a WordPress Drop-Down Menu With Site Editor
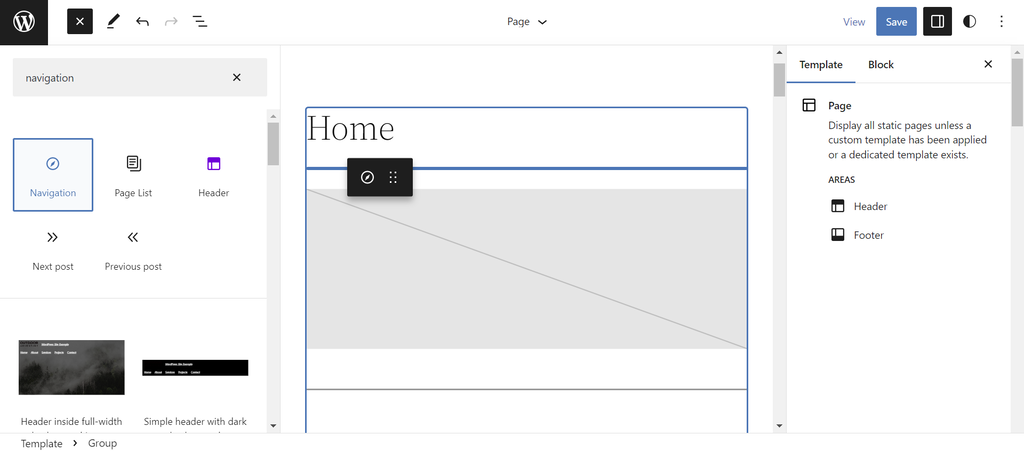
The Navigation block in the Site Editor provides a drag-and-drop interface for creating and organizing all the menu items, making it easier to build drop-down menus. Note that this method is currently only compatible with block themes.
Here’s how to create a drop-down menu using the Navigation block:
- Head to Appearance → Editor from your WordPress dashboard.
- Click the block inserter (+) icon in the top menu bar and search for the Navigation block. Drag and drop it anywhere in the editor interface.
- In the Settings sidebar, drag an existing menu item to a lower level, turning it into a child menu nested inside the main menu item.
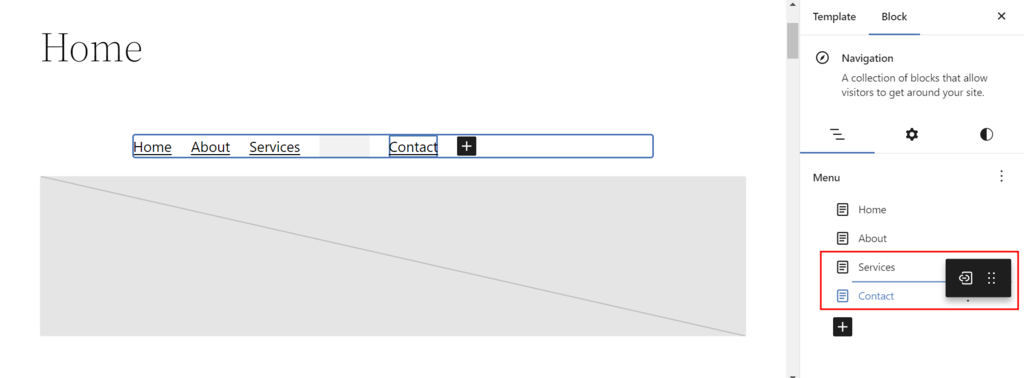
- To create a drop-down menu with a new menu link, select Options → Add submenu link next to the intended parent menu item.
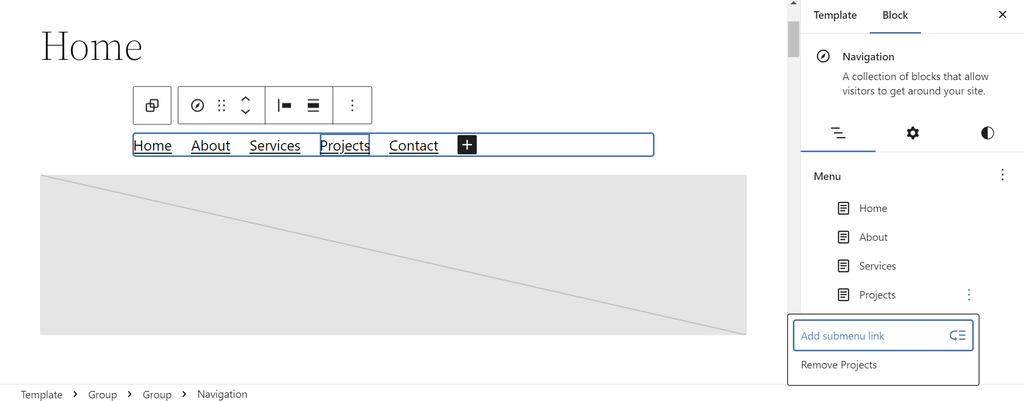
- Click on the block inserter (+) icon and pick a different block to create a submenu for another content type. Drag and drop it under its intended parent menu item.
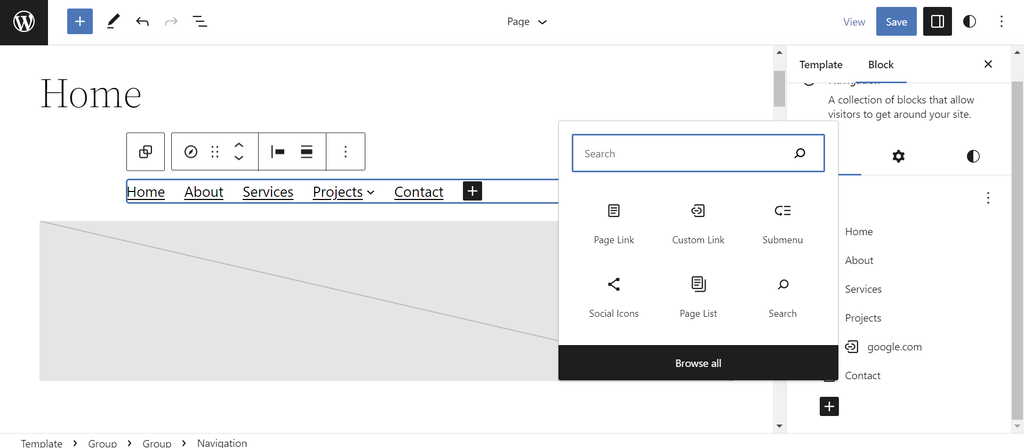
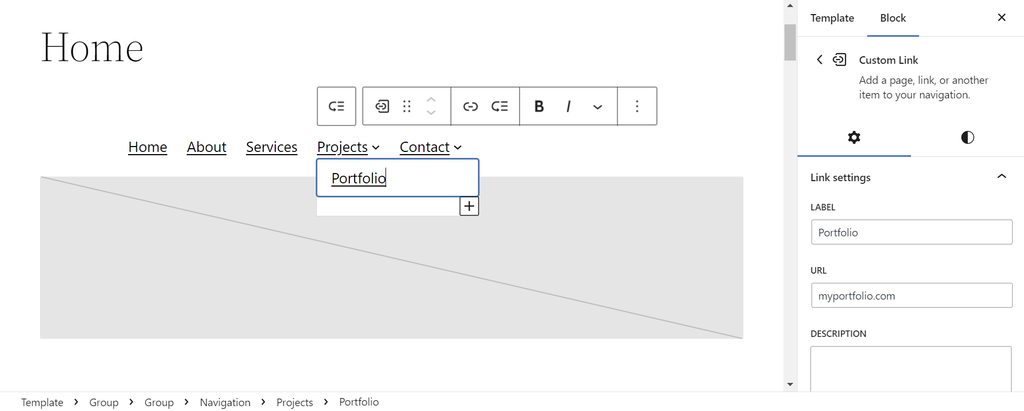
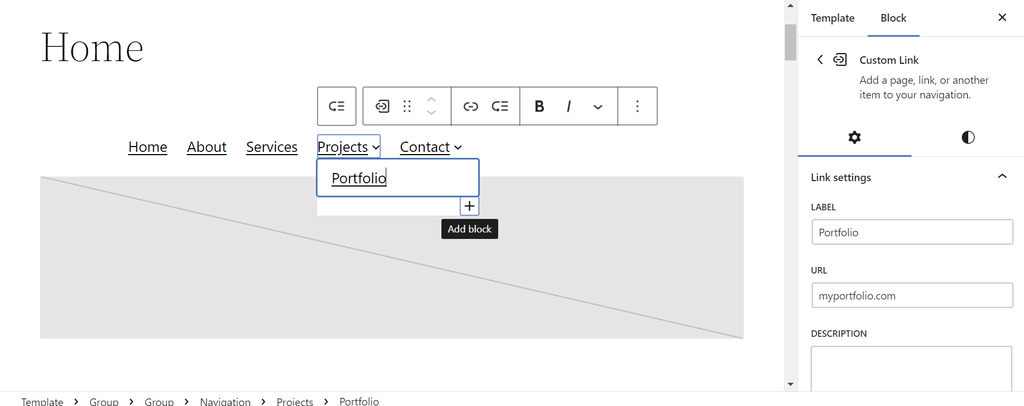
- Click on individual menu items to configure the menu settings, such as the label, URL, and description.
- To create a new submenu under the same parent menu item, select the block inserter (+) icon under the existing child menu item.
- The final result will look as follows:

How to Add a Drop-Down Menu in WordPress Using a Plugin
Another way to create custom drop-down menus involves using a drop-down menu plugin. There are many excellent menu plugins available in the WordPress plugin directory. For this tutorial, we’re going to show you how to create a drop-down menu using Max Mega Menu:
- Install and activate the WordPress plugin.
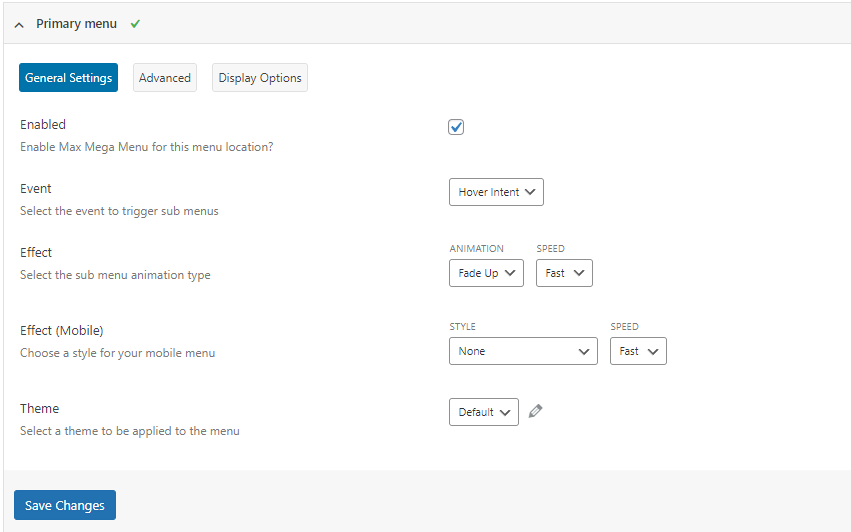
- Navigate to Mega Menu from your dashboard. In the Menu Locations section, click on your primary menu and check the Enable Max Mega Menu for this menu location box to enable the drop-down functionality. Inside the same section, choose the event that triggers the submenu and the drop-down menu’s animation on desktop and mobile and select Save Changes.
- The plugin will inherit your theme’s style by default. Open the Menu Themes tab if you want to tweak the menu’s style, animation, and size. Make sure the Select theme to edit option points to your primary menu.
- Navigate to Appearance → Menus and add items to the default or primary menu with the Max Mega Menu functionality enabled. Click Save Menu once you’re done.
How to Create Drop-Down Menus Manually
Creating a drop-down navigation menu in WordPress manually involves using the native features of a WordPress website. The upside of this method is that the drop-down menu will remain functional even after changing WordPress themes or installing new plugins.
With this method, you can include pages, posts, categories, and custom links in your menu. However, ensure your theme supports drop-down menus by checking the theme’s documentation.
Follow these steps to create a custom drop-down menu in WordPress manually:
1. Create the Menu Items
First, we need to create a new menu. Navigate to Appearance → Menus from your WordPress dashboard. Within the Edit Menus tab, you’ll see the Menu structure section where you can create a new menu.
Keep in mind that the appearance of this section will depend on your theme.
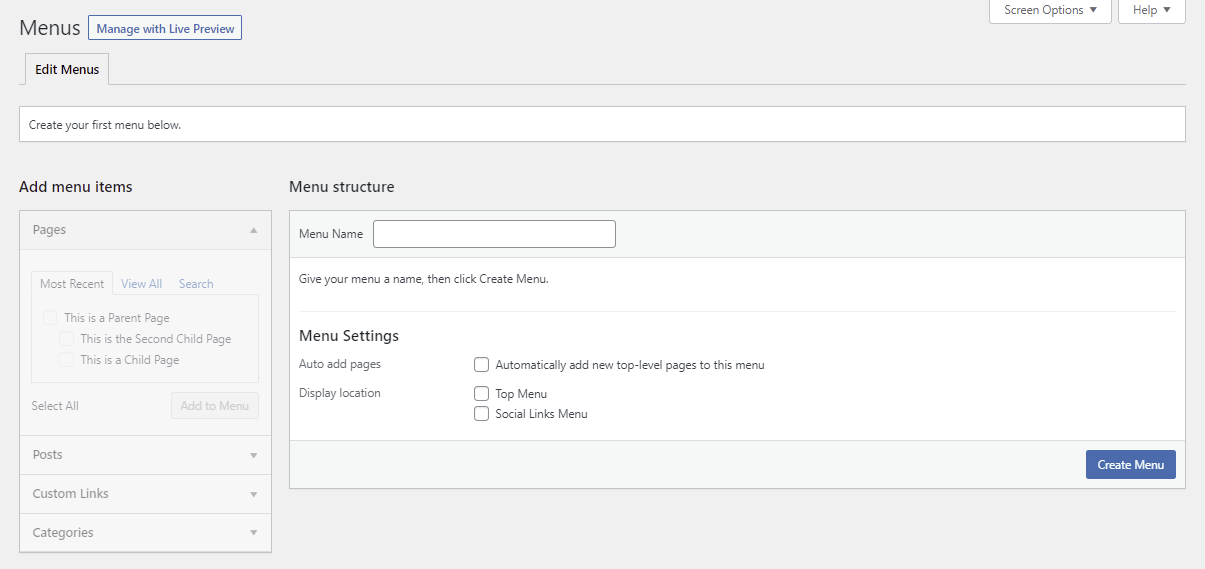
Add the menu name to the textbox and select Create Menu. Then, switch to the Add menu items section and pick the desired elements for the new submenu. You can do so by checking the box next to a chosen item and clicking Add to Menu.

The supported items you can use for sub-items include pages, posts, and categories. You can also insert custom links as menu items, allowing you to redirect users to a specific page on your site.
The selected menu items will appear under the Menu structure section. Simply drag and drop the items and sub-items in your preferred order.
2. Style the Menu
WordPress drop-down menus are customizable using CSS. Enable this function by selecting the Screen Options menu at the top right corner of the Menus page and checking the CSS Classes box.
If you expand a menu item, you’ll see a new text box labeled CSS Classes. This is where you can add WordPress CSS classes to customize the style of your new drop-down menu.
Check out our complete CSS cheat sheet to help you personalize the drop-down menu.
3. Publish the Menu
To change the location of the new menu, you can choose from the available options under the Menu Settings section or the Manage Locations tab. Once again, the choice depends on your active WordPress theme.
In this example, we will place the menu at the top:

Click the Save Menu button at the bottom right corner to save the changes and publish the drop-down menu.
Pro Tip
For a visual reference while changing menu locations, select the Manage with Live Preview button at the top of the page. This is especially helpful for creating complex multi-level drop-down menus. In the live preview mode, all changes made in the WordPress customizer are displayed in real time, allowing you to publish the drop-down menu directly from this mode.
Benefits of a Drop-Down Menu for WordPress Sites
Drop-down menus offer numerous advantages for WordPress sites, enhancing both aesthetics and functionality. Key benefits include:
- Efficient use of space. Submenus allow for more links without cluttering the menu area.
- Enhanced user navigation. They enable users to find and access specific pages quickly.
- Scalability. Easily accommodate new pages or categories without redesigning the entire menu.
- Aesthetic appeal. Customizable to match the site design, enhancing visual consistency.
- Improved accessibility. Drop-down menus help aid users with cognitive disabilities when browsing a website.
- Organized content structure. Helps structure site content for easier user comprehension.
Best Practices for Creating Drop-Down Menus in WordPress
Effective navigation menus are crucial for a positive user experience on WordPress sites. A well-designed menu, especially with drop-downs, should be intuitive and visually appealing to facilitate quick access to important content.
Here are essential tips for optimizing your drop-down menus:
Keep It Simple and Intuitive
For drop-down menus, simplicity is key. A clear menu structure helps prevent confusion and frustration. Prioritize your most important links and make sure they are visible and accessible.
It’s also crucial to limit the number of menu levels, as excessive layers can complicate navigation and overwhelm your visitors.
Use Descriptive Labels
Each menu item should be clearly and accurately labeled to reflect the content or page it leads to. Avoid using vague or generic terms that could confuse users about where a link will take them.
Consistent labeling not only helps in setting clear expectations but also maintains the coherence of your site’s branding.
Including accessible rich internet applications (ARIA) labels for menu items is also a good practice, enhancing accessibility for screen reader users and making your site more inclusive.
Use Visuals Elements
One of the best ways to make a menu more interactive is to add WordPress menu icons to each menu item using a plugin.
The Menu Image plugin, for example, provides a massive collection of FontAwesome and DashIcons icons to choose from. You can add the desired elements to the drop-down menu in different positions or include them as animations triggered on mouse hover.
However, avoid overcrowding the space with unnecessary icons, as this can hurt the menu’s readability and distract users from exploring your WordPress site.
Add Custom CSS
As previously mentioned, you can add custom CSS classes to new menus. Consider adding custom CSS to tweak the color, font size, and spacing of each menu item.
Go to Appearance → Customize from your dashboard and use the Additional CSS feature to add custom code to your site.
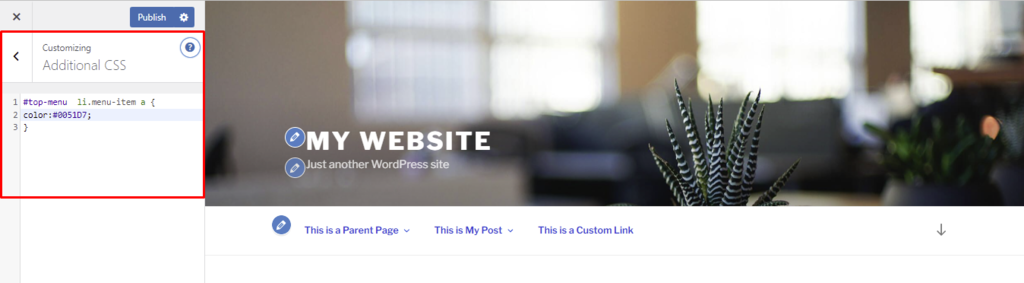
Use the inspect element tool in your browser to locate your theme’s CSS #ID selector – you’ll need it to select a specific element for customization.

In this example, we will change the top menu’s font color to blue. Here’s the code we used to alter the font color:
#top-menu li.menu-item a {
color:#0051D7;
}
Feel free to experiment with different CSS styles or use pre-made code to streamline the design process. For more information, follow this tutorial on how to create a simple CSS drop-down menu.
Create a Mega Menu
If you want to display a large number of options in a single drop-down menu, it’s best to create a WordPress mega menu. Unlike standard drop-down menus, mega menus typically contain more links and submenus.
Since this type of menu displays your website’s entire structure, visitors can access the deepest parts of the site from the main menu. It is ideal for large websites as they shorten the user journey.
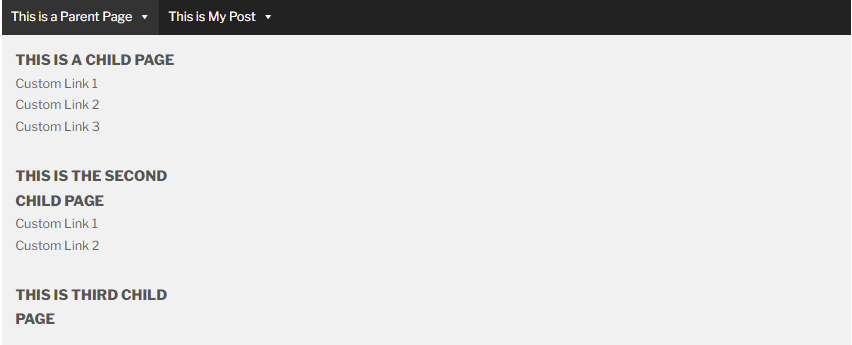
There are plenty of WordPress menu plugins to help you easily create a custom mega menu. We designed the mega menu design example above using the Max Mega Menu plugin. Other notable mega menu WordPress plugins include QuadMenu and Superfly.
Test Drop-Down Menus Across Different Browsers and Devices
It’s essential to test your drop-down menus on various browsers and devices to ensure compatibility and functionality of all interactive elements.
Utilizing a staging environment is highly recommended. This allows for safe testing and tweaking of menus and designs before implementation, ensuring a consistent and seamless user experience across all platforms.
A web hosting provider that offers a staging environment is beneficial for this purpose. Hostinger’s Business and Cloud Startup Managed WordPress hosting plans come with a useful staging tool.

Conclusion
The WordPress drop-down menu is a crucial part of the website navigation system. It makes exploring a site easier and, if created correctly, helps search engines’ crawlers with indexing.
This article has covered the steps to create a drop-down menu in WordPress manually and using a plugin. We also provided some tips to optimize your drop-down menus.
We hope this article has answered all your questions about this type of WordPress menu. Best of luck on your website-building journey!
WordPress Drop-Down Menu Tutorial FAQ
Here are some of the frequently asked questions about how to create a drop-down menu in WordPress.
How to Change the Order of Items in a Drop-Down Menu in WordPress?
To change the order of items in a WordPress drop-down menu, go to Appearance → Menus. Then, select the menu, drag the desired item to its new position, create submenus by dragging items to the right, and save your changes.
How Can I Make My Drop-Down Menu Visible on All Pages in WordPress?
Go to Appearance → Menus and select the menu you want to edit. Click on the Manage Locations tab, choose the location for your drop-down menu, then click Save Changes. The drop-down menu will now appear on all pages.
Do Drop-Down Menus Affect Website Loading Speed?
Yes, drop-down menus can impact website loading speed, especially if they contain complex scripts or high-resolution images. However, with optimized coding and lightweight design elements, their effect on speed can be minimal.

Jordana is a Senior Content Writer with over 5 years of experience in digital marketing and web development. When she’s not busy with work, she dabbles in creative writing and movie reviewing. Follow her on LinkedIn.

Matleena is a seasoned Content Writer with 5 years of content marketing experience. She has a particular interest in emerging digital marketing trends, website building, and AI. In her free time, Matleena enjoys cups of good coffee, tends to her balcony garden, and studies Japanese. Follow her on LinkedIn
