What Is PHP.ini File, and Where It’s Located? Understanding Main Parameters and Editing
PHP.ini is a configuration file containing your web server’s PHP settings. Every time PHP starts, your system will search for it and run the file to enable your site’s scripting rules.
Although it is pre-configured, you may need to change the default PHP settings to suit your needs. For example, you can modify the session cookie’s name and lifetime to enable the remember-me feature on your site.
In this article, we will explain the PHP.ini file location and its important parameters. You will also learn how to edit the file to change your PHP settings.

What Is PHP.ini?
PHP.ini is a configuration file containing your web server’s PHP settings. It lets you control your site’s PHP-related rules, such as setting the size limit when uploading files and hiding error messages.
This PHP configuration file location varies depending on the web server. To change its settings, edit the file and change the parameter’s value via a text editor.
Where Is the PHP.ini File Located
The PHP.ini location varies depending on your server, PHP version, and operating system. When running PHP, the system searches for the file in the following places:
- The server application programming interface (SAPI) module-specific location.
- The PHP runtime configuration (PHPRC) environment variable.
- Current working directory, searchable using the getcwd() function.
- The installed PHP or web server’s directory.
Instead of locating their INI files manually through their hosting’s file managers, users can do it automatically.
Among several methods, creating a new PHP file inside your domain’s root directory is the easiest. For this tutorial, we will show you how to do it via hPanel:
- Go to hPanel → Hosting → Manage.
- Click File Manager.

- Navigate to your site’s root directory. In our case, it is /home/username/public_html.
- Select + File icon. Enter any filename with a PHP extension, such as phpinfo.php. Then, click Create New File.
- Right-click the new file → Edit, and enter the following code:
<?php
   phpinfo();
?>
- Click Save Changes.
- Enter yourdomain.tld/phpinfo.php on your web browser and hit enter.
- Search for the Loaded configuration file. The PHP.ini path should look like this:

This method also works in cPanel to locate the PHP.ini file of a virtual private server (VPS). Alternatively, connect using SSH and execute the following command:
php -i | grep 'Configuration File'
Your SSH client will output the directory, which is usr/local/lib for most web servers. In addition to querying the location, you can move and edit the PHP.ini file with the SSH client.
Learn More about VPS and Linux Commands
What is VPS Hosting
40 Essential Linux Commands That Every User Should Know
Note that the PHP.ini file is usually inaccessible for shared hosting users. In this case, use the hosting control panel’s configuration menu or edit the .htaccess file to change PHP settings.
Important Parameters of the PHP.ini File
In this section, we will explain the most important parameters in the PHP.ini file, including their values and purposes. These parameters are also known as directives.
Important! Some parameters and values may be unavailable on certain PHP versions. Refer to the full PHP.ini directive list to learn more about the changes.
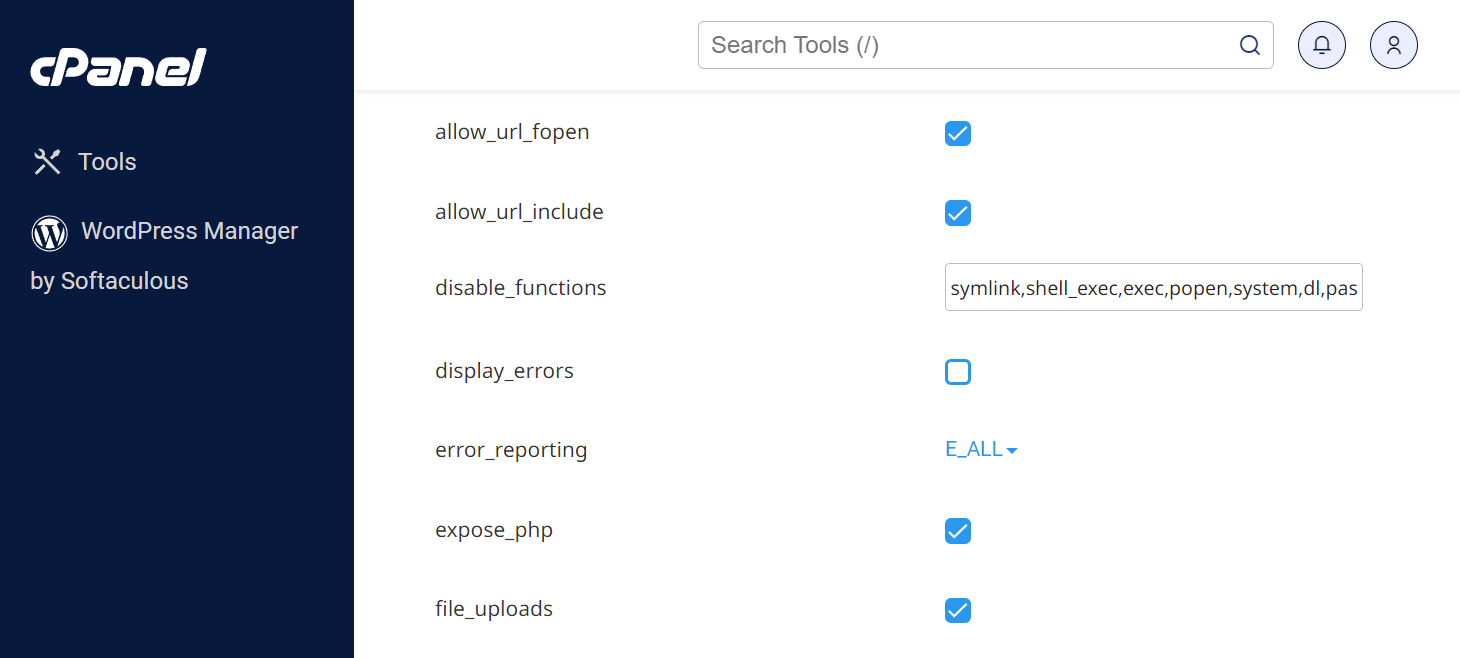
display_errors
Determine if PHP error messages are displayed to users during script execution or not using the on and off value. Due to security reasons, you should use this directive only when developing your site.
error_reporting
Set which error message is displayed to users when display_errors is enabled. The error_reporting parameter takes several constants to display different errors.
You may use multiple constants and exclude specific errors. For instance, to show all errors but the deprecation warning, use the following:
E_ALL & ~E_DEPRECATED
error_log
Specify the file where PHP will log errors for error troubleshooting. Before enabling it, ensure the web server’s users have permission to write the file.
file_uploads
Set whether the HTTP file uploads are enabled or not. The on value will allow users to upload files to your site, while off disables it.
upload_max_filesize
This parameter determines the maximum uploaded file size PHP allows on your site. Since the default value is 2 MB, you can increase the maximum upload file size limit to enable users to upload large files.
Suggested Reading
Check out this tutorial on how to fix the upload_max_filesize issue in case of an error.
post_max_size
The maximum POST data size PHP can collect from HTML forms on your site. The value should be larger than the maximum file size, as it is handled with the POST function.
allow_url_fopen
Write a PHP script to access remote files from another server. It is off by default, as enabling it may expose your server to a code injection attack.
allow_url_include
This directive has a similar function as allow_url_open, but uses the include function. To enable it, allow_url_open must be set to on.
session.name
This directive sets the current session’s name used in cookies and URLs. You may change the default PHPSESSID value to any descriptive name with alphanumeric characters.
session.auto_start
Choose whether a PHP session starts automatically or on request when users access your site. If you set the value to 0, the session will start manually using the session_start script.
session.cookie_lifetime
Specify a session cookie’s lifetime in your site’s visitors’ browsers. By default, the value is set to 0 seconds, meaning your site erases visitors’ session data after they close their browsers.
memory_limit
Set the maximum amount of RAM a PHP script can use. Be careful when increasing the memory limit, as wrong configurations may lead to slow sites or server outages.
max_execution_time
Determine a script’s maximum running time. You can change the default 30-second maximum execution time to any value, but setting it too high might cause performance issues.
Suggested Reading
Refer to our guide on how to fix Fatal Error: max_execution_time exceeded if you get this error code.
max_input_time
Set how long a script can parse data collected from HTML forms on your site using a POST or GET method. The more data your site collects, the higher the max_input_time value should be.
upload_temp_dir
Specify the temporary directory for storing uploaded files. All users should be able to write in the specified directory, or PHP will use the system’s default.
realpath_cache_ttl
Set the duration for your system to cache the realpath information. We recommend increasing the value for systems with rarely changing files.
arg_separator.output
Use this data-handling directive to separate arguments in PHP-generated URLs. Its default value is an ampersand (&).
arg_separator.output
Set the separator PHP uses to parse input URLs into variables. By default, it is an ampersand, but you can change it into other symbols like semicolons.
How to Edit the PHP.ini File
Before you edit the PHP.ini file, check your server’s PHP configuration using phpinfo.php. If configured as an Apache module, change the PHP setting using your .htaccess file.
Important! Create a backup of your PHP.ini file before editing. It lets you quickly restore the file, as misconfigurations may result in performance issues or downtime.
For PHP CGI, directly edit the INI file using cPanel’s MultiPHP INI Editor to configure the settings.
If you are using hPanel, simply download and edit the file using a text editor.
For cPanel users, here are the steps to do it:
- Access your cPanel.
- Go to the Software section → MultiPHP INI editor.
- Click the Basic Mode tab. For in-depth customization, select Editor Mode instead.
- From the drop-down menu, select the home directory or domain path. The latter will configure your domain-specific PHP.ini file.
- Change the settings for each PHP directive and click Apply to save the changes.
If your server doesn’t support the editor tool, use the PHP selector instead. Alternatively, download the PHP.ini file and change the configuration directives using a text editor.
For VPS users, configure PHP settings via SSH client. Ensure you have installed the Nano text editor and execute this command:
nano usr/local/lib/php.ini
Change the directory with your PHP.ini file path in your VPS.

Conclusion
PHP.ini is a configuration file that stores your web server’s PHP settings. You may edit it to change your site’s PHP-related rules, like restricting actions or limiting the uploaded data size.
Since its location varies, create a PHP info file in your domain’s root directory and load it in your browser to quickly find PHP.ini. On the PHP info, the location is in the loaded configuration file section.
PHP.ini file contains several parameters to set error handling, file uploads, session configuration, and other rules. To change the settings, edit the respective parameters’ values.
Hostinger’s hPanel users can just download the file and change the parameters in a text editor. Should you have any more questions, leave a comment below.

Aris is a Content Writer specializing in Linux and WordPress development. He has a passion for networking, front-end web development, and server administration. By combining his IT and writing experience, Aris creates content that helps people easily understand complex technical topics to start their online journey. Follow him on LinkedIn.


Comments
February 06 2024
Hi Aris, how can i download the php.ini-file from Hostinger's hPanel. Thanks for your answer.
February 20 2024
Hi Markus! Access to the php.ini file is disabled on Hostinger's Web and Cloud hosting plans. However, you can modify PHP settings through the PHP Options section in your hPanel or by using directives in your .htaccess file. If you require direct access to the php.ini file, you would need to consider upgrading to a VPS hosting plan ?