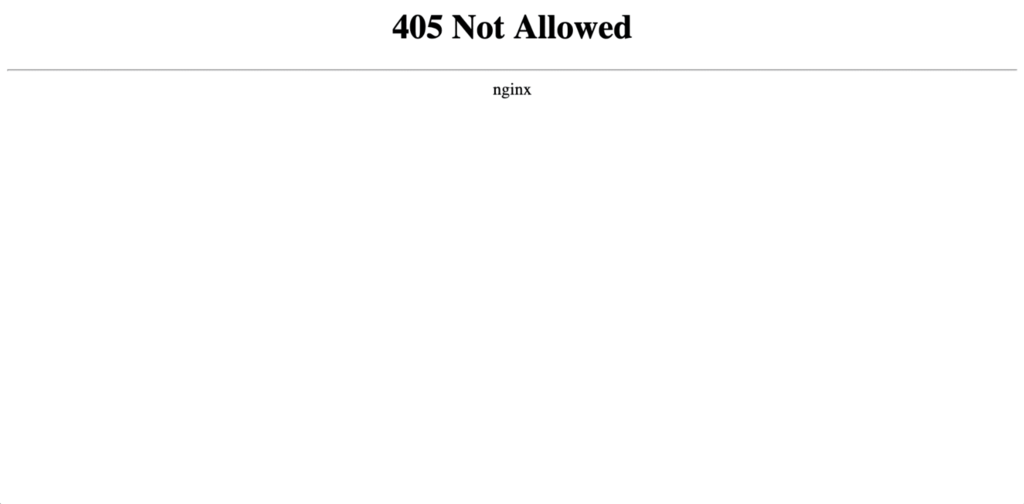
What Is Error 405 Method Not Allowed and How to Fix It

405 Method Not Allowed is a Hypertext Transfer Protocol (HTTP) error that prevents visitors from accessing your website’s content. When not resolved quickly, it can severely damage your brand reputation.
The problem is, the HTTP response status code alone can’t explain why the error occurred. Most of the time, you will only see a blank page and a message that says 405 Not Allowed.
While identifying the exact cause of the 405 status code can be difficult, we have listed 11 potential fixes to this HTTP issue.
| Error code | 405 Method Not Allowed |
| Error type | Client-side error |
| Error variations | HTTP Error 405 – Method Not Allowed HTTP 405 Method Not Allowed 405 Not Allowed Method Not Allowed HTTP Error 405 |
| Error causes | Unacceptable HTTP method Incorrect server configuration API restrictions Specific firewall rules |
Download comprehensive HTTP status codes cheat sheet
What Is the 405 Method Not Allowed Error?
The 405 Method Not Allowed error occurs when the web server understands the initial request made by a client but rejects the provided HTTP method, even though the resource exists. Since the web browser cannot access the requested page, it will show the 405 error message instead.
While it’s a client-side error, the 405 Method Not Allowed error code is often caused by server-side configuration.
In most cases, it appears when a client attempts to use a specific HTTP method that the server either does not allow or lacks support for the requested resource.
For instance, using the HTTP POST method on a URL that only accepts GET requests can lead to the 405 error. This is often the case with static pages that can only be retrieved and not altered.
Besides an unsupported request method, there are other potential causes:
- Server settings. Some web servers may be configured to reject certain HTTP methods for security reasons or due to improper setup.
- Web Application Firewall (WAF) rules. Sometimes, security layers like WAFs block certain types of HTTP requests, which can result in a 405 error.
- API restrictions. When interacting with APIs, the same error can occur if the API doesn’t support the method used in the request.
Depending on the browser, here’s how the error looks:
How to Fix 405 Method Not Allowed
Whatever the cause might be, let’s focus on fixing the 405 Method Not Allowed error. Here are several methods you can try to start troubleshooting.
1. Double Check the URL
Most web servers are configured in a way where improper URLs can’t send users to the wrong pages. That’s why the chance of encountering a 405 error due to an incorrect URL is very slim.
That said, double-checking the URL doesn’t take much effort. This method may sound simple, but you will save a lot of time troubleshooting if it works.
Whenever you come across web pages with the 405 Not Allowed error, look for a missing letter or a misspelled word in the URL. Once you’ve fixed the wrong URL, refresh the specific web page until it can load correctly.
If the issue persists, try the second solution.
2. Revert Recent Updates
Sometimes, the 405 error page shows up after updating your site. To fix it, try reverting any recent updates you have made on your site, including extensions, modules, themes, or plugins.
The process may differ from one platform or application to another. For example, if you’re running a WordPress site, use a WordPress plugin like Core Rollback to downgrade to the previous version of the content management system.
Remember, always check your website after each update to avoid the 405 HTTP status code.
3. Check for Unexpected Database Changes
Another possible reason behind the 405 Method Not Allowed response code is database changes.
To investigate if database changes are causing a 405 Method Not Allowed error, check the last update time of your database. This might reveal if a recent change, possibly made by an extension, is related to the issue.
Remember, some extensions can modify your database and may not revert changes even if uninstalled.
The steps to check for changes vary depending on the database. Hostinger users can follow this guide:
- Sign in to your hPanel account, head to Websites, and click Manage next to your intended domain.
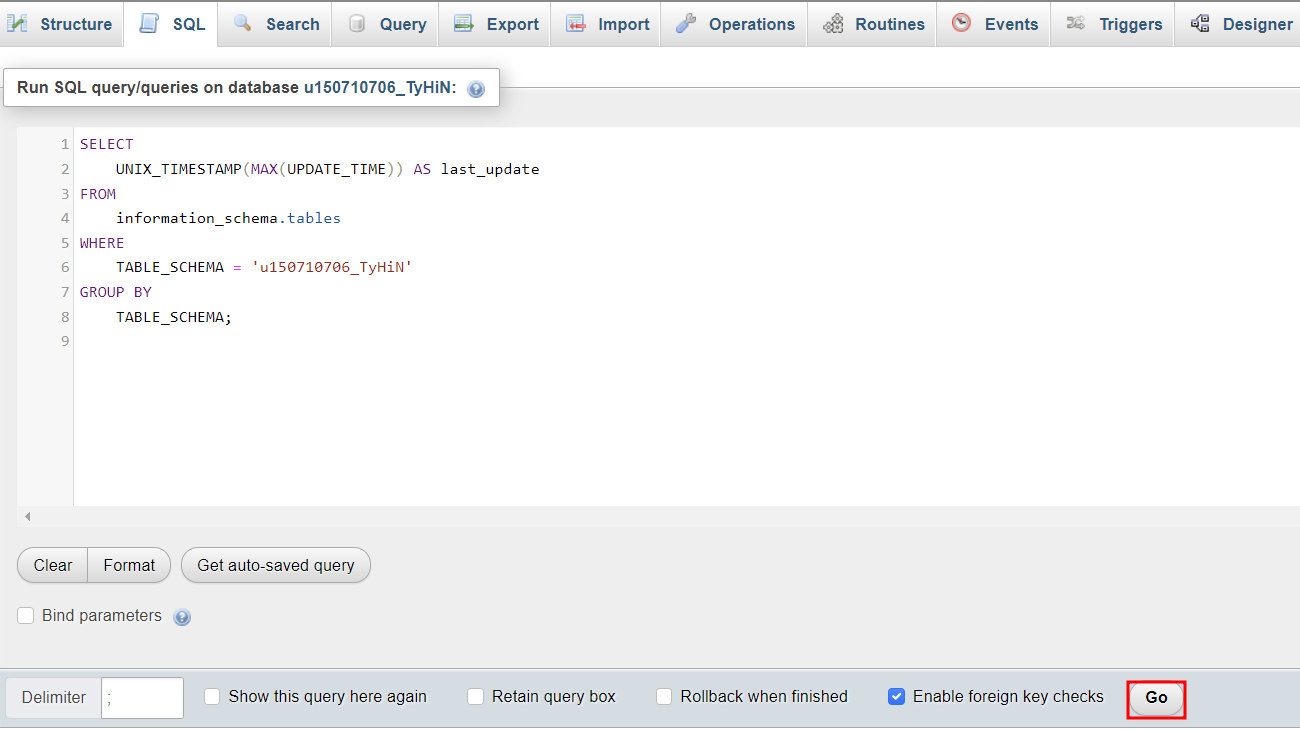
- From the Dashboard, select Databases to access the database management interface. After that, select your site’s MySQL database and click the Enter phpMyAdmin button on the right.
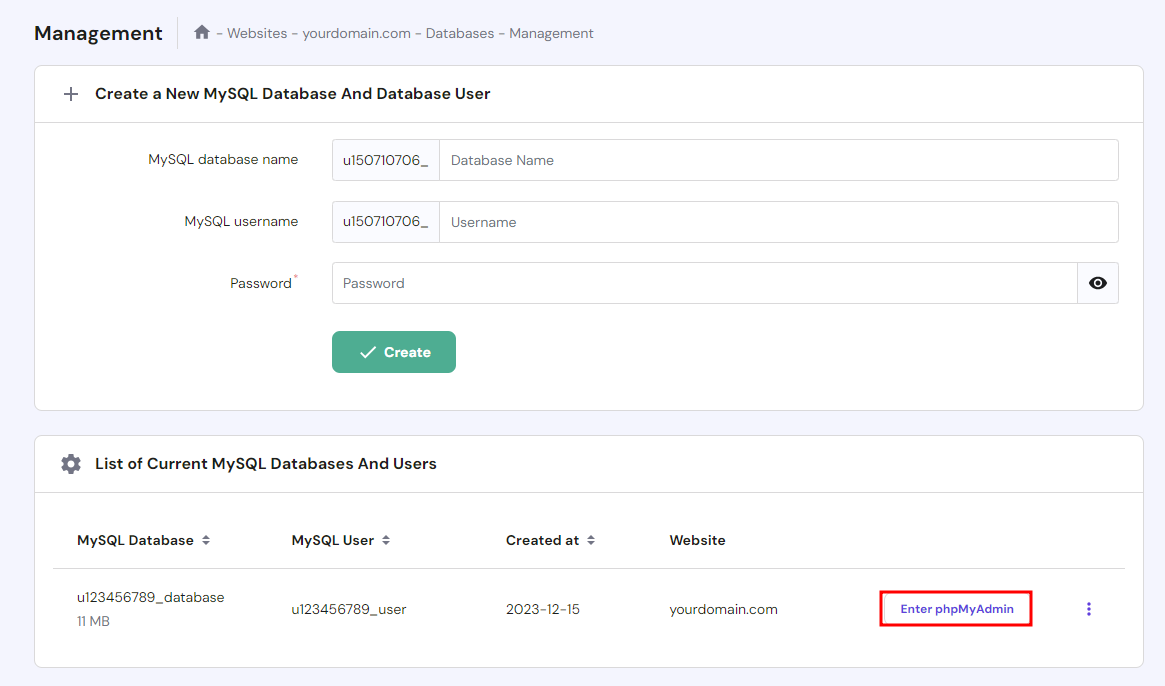
- Within phpMyAdmin, select your database and navigate to the SQL tab.
- Find the last update time of your database by running the following query. Make sure to replace your_database_name with the actual name of your database:
SELECT
    UNIX_TIMESTAMP(MAX(UPDATE_TIME)) AS last_update
FROM
    information_schema.tables
WHERE
    TABLE_SCHEMA = 'your_database_name'
GROUP BY
    TABLE_SCHEMA;
- Click Go on the right side of the page to complete the request, and it will display when you last updated the database.
Examine the tables and records for any modifications that seem out of place or could have been altered by an extension.
If you find suspicious changes, consider reverting them. However, proceed with caution to avoid unintentional data loss or corruption. Create a database backup, so you can revert back in case something goes wrong.
Unsure about making changes to your database? Then it’s best to consult with our Customer Success agents. They can provide guidance and help you avoid unnecessary or harmful modifications.
4. Uninstall New Plugins, Themes, and Extensions
When installing a theme, plugin, or extension, the website’s code may change, which may cause the 405 error.
If the error message starts appearing after you install a new plugin, theme, or extension, try uninstalling and reinstalling it again.
If you are a WordPress user, head to the WordPress Admin Panel → Plugins and click Deactivate below your newest plugins.

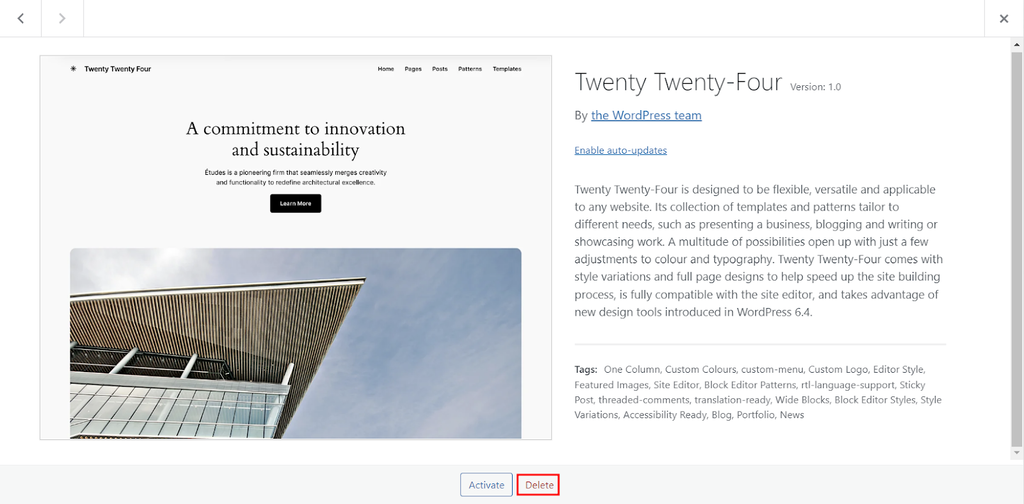
To remove a WordPress theme, navigate to Appearance → Themes. If you are using the newest theme, change it to another one first. Then, hover over the new theme, select Theme Details, and click the Delete button.
Hostinger users can also delete WordPress plugins and themes via hPanel:
- Go to Websites at the top menu bar.
- Next to your domain name, select Manage.
- From the left sidebar, head to WordPress → Security.
- Scroll down to Installed Themes and Installed Plugins.
- Click the red trash icon next to each intended plugin or theme.
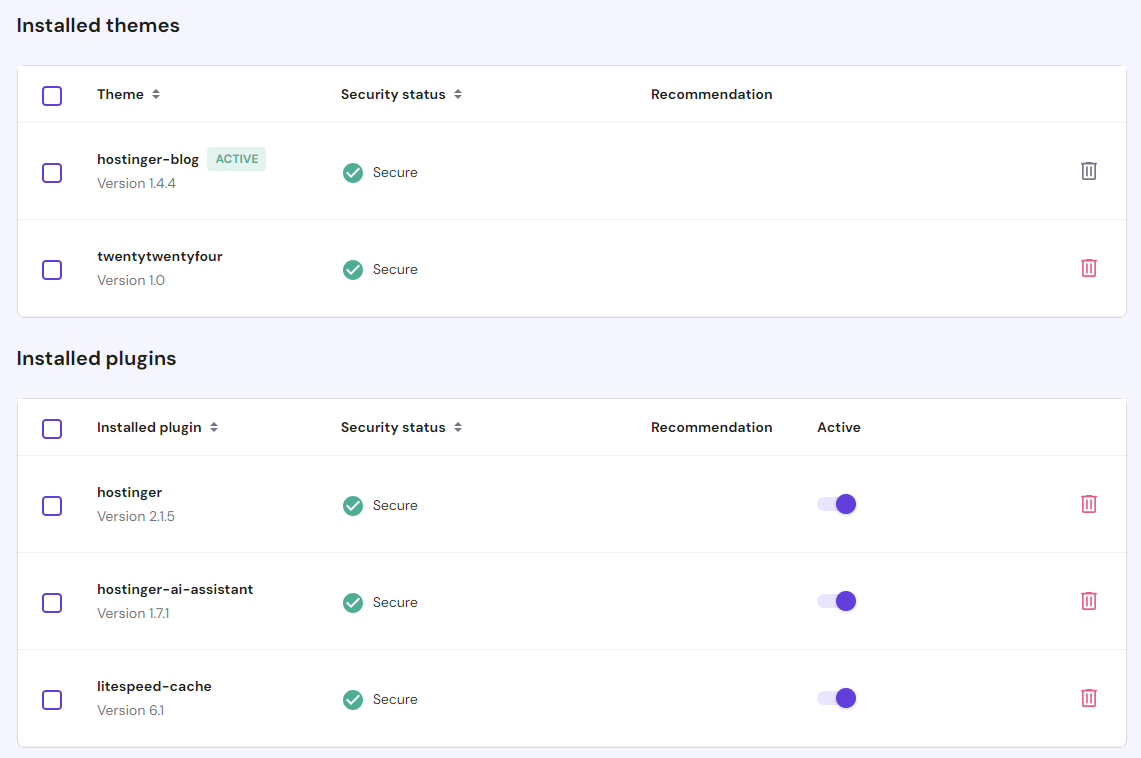
- When a confirmation message pops up, click Delete.
Check if the error message still appears after you disable your newest plugins and themes. If the issue is solved, try using a different extension on your site.
5. Check Your Server-Side Logs
Server logs are invaluable for diagnosing and understanding what happens on your website. These logs often hold the key to resolving issues such as the 405 Method Not Allowed error.
There are two primary types of logs: server logs and application logs.
Application logs store the complete history of what the app did, while server logs deal with the actual hardware running the application. Each type plays a distinct role in monitoring and troubleshooting your site environment.
Server Logs
Server logs are maintained by the web servers themselves, such as Apache and Nginx. They record every request made to the server and the server’s response.
These logs are typically divided into:
- Access logs. Provide detailed information about every access request received by the server and all connected services. Those may include the IP address of the requester, request date and time, HTTP method, URL requested, and HTTP status code.
- Error logs. Contain server errors, warnings, and other diagnostic information. These logs are crucial for identifying issues that prevent the server from fulfilling requests correctly.
To investigate a 405 Method Not Allowed error, you need to examine both the access and error logs.
The access log helps you track down the specific request that led to the error, while the error log offers clues about what went wrong on the server’s end.
Application Logs
Nearly every web application running on the server will keep some sort of application log. It’s basically the complete history of the web app’s past activities, from the database results it has returned to the pages it has requested.
These logs can vary significantly in format and detail level depending on the application’s logging strategy. They might include:
- Debug information. Detailed insights into the application’s execution, including variable values and state changes.
- Error messages. Information about exceptions or errors encountered during the application’s runtime.
- Audit trails. Records of significant actions or events within the web app, such as user logins, data changes, and system state alterations.
When dealing with a 405 Method Not Allowed error, application logs can provide context about how the application handled the request and why it might have responded with a 405 error.
For instance, the logs might reveal that the application’s routing logic doesn’t support the requested HTTP method for the given URL.
Accessing and Analyzing Logs
To access server logs, use a Secure Shell (SSH) terminal like PuTTy to connect to your server. This will give you command-line access to navigate through your server’s file system.
After that, locate the log files in /var/log/apache2/ on Ubuntu systems or /var/log/httpd/ on CentOS systems for Apache. If you use NGINX, check /var/log/nginx/. Regardless of the OS, you will find a logs folder in the application root directory, which will contain both access.log and error.log.
You can use text viewing commands like cat, less, or tail to view the contents of these log files. For instance, tail -f /var/log/apache2/error.log will show you the latest entries in the Apache error log in real time.
Having accessed your logs, it’s time to analyze them:
- Access logs. Look for entries that correspond to the time when the 405 errors occurred. Note the request method, like GET or POST, and the requested URL. This will help you identify the exact request that led to the error.
- Error logs. Pay attention to any entries that occur at the same time as the access log entries for the 405 error. These may provide more detail on why the request was not allowed, such as misconfigurations or denied access due to server rules.
6. Check Your Web Server Configuration
If the 405 Method Not Allowed problem persists, check the configuration files of your web server software. Look for any unintentional redirects or request handling instructions.
Most web servers use configuration files that dictate how requests are handled, and certain misconfigurations in these files can inadvertently block certain HTTP methods, leading to the 405 error.
Here’s a closer look at common misconfigurations for both Apache and NGINX:
Apache
Apache servers use the .htaccess file to define rules for individual directories.
Misconfigurations can arise from directives intended to restrict access or modify request handling. Both can inadvertently block legitimate requests:
- Mod_rewrite rules. Used for rewriting URLs and can be misconfigured to reject certain methods. For example, a RewriteRule intended to redirect traffic might not account for the POST request, causing a 405 error for that particular method.
- Limit directive. It allows you to specify which request methods are allowed or denied for the target resource. While the Limit directive is useful for enhancing security, it can also trigger client error responses if not configured carefully.
NGINX
NGINX uses nginx.conf for its configuration file. Similar to Apache, certain directives in this file can cause a 405 error if misconfigured:
- Location blocks. NGINX processes requests using location blocks, which can be configured to handle specific request methods. If a location block is improperly set up to reject certain methods, it can lead to the 405 error.
- Error_page directive. An incorrectly used error_page directive can inadvertently mask the actual error or even cause the 405 response code. This is because users might be redirected to a resource that doesn’t accept the method used in the request.
To avoid the 405 error, check the relevant configuration file based on your web server.
Apache users can access the .htaccess key file by going to the root directory of their website’s file system. The most common method is by using an FTP client.
Inside the file, try temporarily commenting out any RewriteRule directives that seem out of place. You can use the # character prefix and restart the web server to see if the error is solved.
If you use NGINX, access the nginx.conf file via an SSH terminal like PuTTy. Once you’ve accessed the config file, look for any directives that might be restricting certain HTTP methods.
After making any edits, always restart your web server for the changes to take effect.
7. Check Your Code and Scripts
The 405 error often stems from mismatched HTTP methods between your application’s requests and how the server is configured to handle them. Here’s what to focus on when reviewing custom code:
- Verify HTTP method usage. Ensure your code sends the correct methods for intended actions – GET for retrieving data, POST for creating data, and so on.
- Identify unsupported methods. Check if any libraries or frameworks you use might be sending unexpected HTTP methods that the server rejects.
A thorough code review can help prevent 405 errors upfront. Consider trying out the following:
- Code review. Manually inspect code to confirm it’s using appropriate HTTP methods and handling server responses correctly.
- Unit testing. Implement unit tests that simulate different HTTP methods to identify potential mismatches during development.
- Perform a debugging process. Copy your website to a local development machine and simulate the exact scenario in which the 405 Method Not Allowed occurs.
For example, for WordPress sites, deactivate plugins and switch themes to isolate the issue. Review custom scripts and the .htaccess file, and use browser developer tools to spot problematic requests.
8. Fully Restore Your Website From a Backup
Sometimes, the HTTP error 405 appears due to compatibility issues. Restoring your website using a backup can resolve this response code:
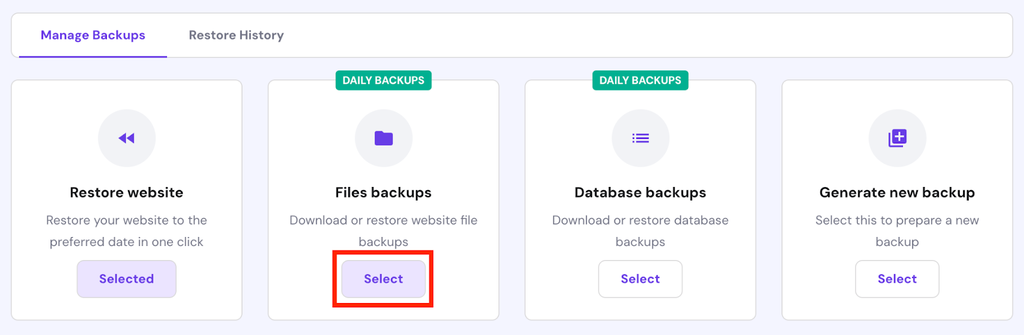
- In hPanel, select Backups under Files.
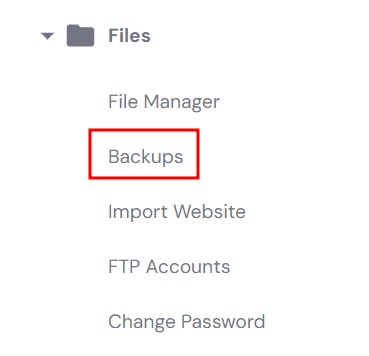
- Click Select under Files backups.
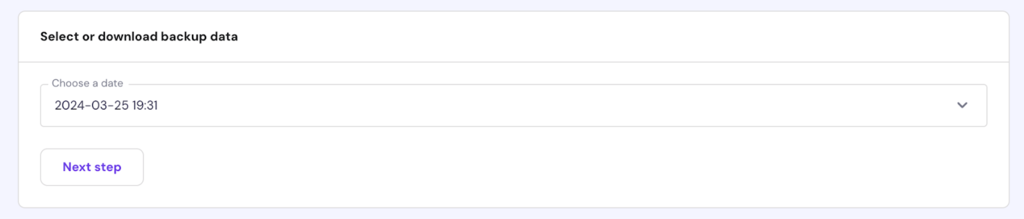
- Select which backup you want to retrieve the files from and click Next step.
- Navigate through the folders and select which ones to restore. Click Restore files.

- The system will start the process and notify you once it’s complete.
9. Double-Check the .htaccess File
Incorrect modifications to rewrite rules within the .htaccess file of a WordPress site can lead to 405 errors.
If you host a WordPress site on Hostinger, follow this troubleshooting process:
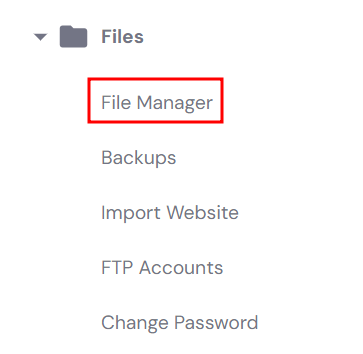
- Head to hPanel and go to Files → File Manager.
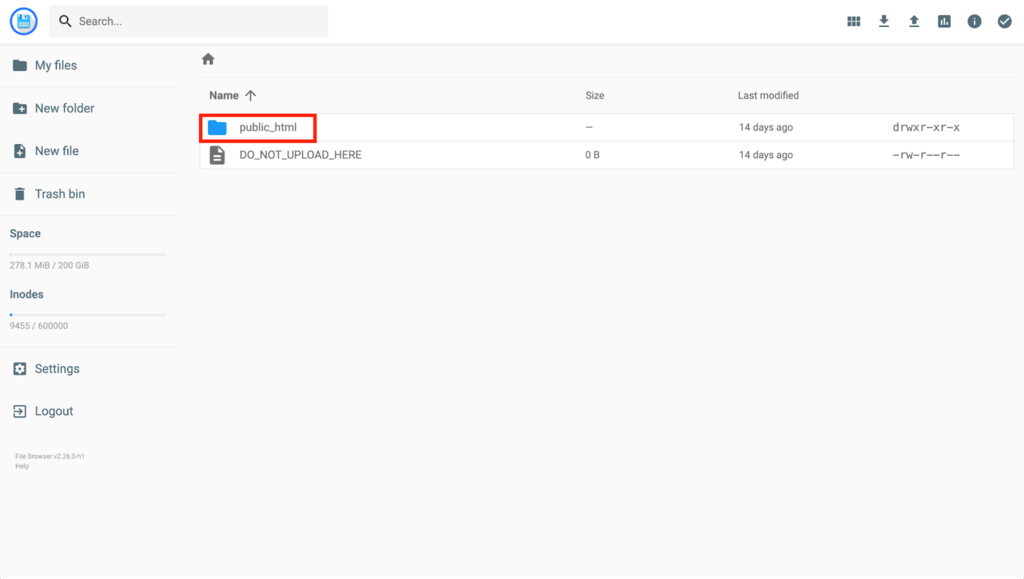
- In the File Manager, click on the public_html folder.
- Select the .htaccess file.
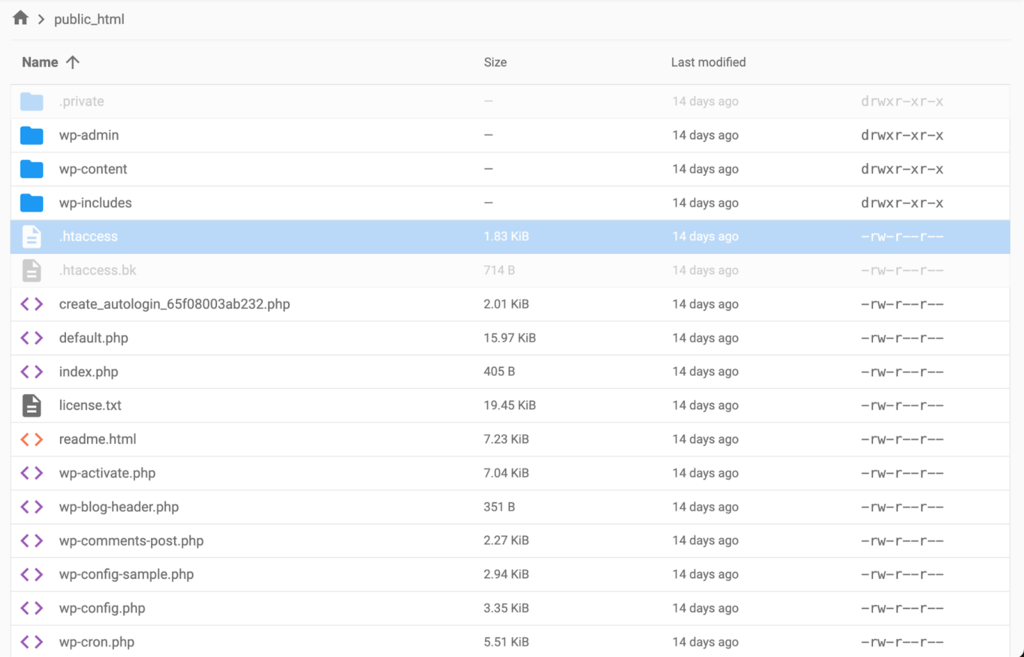
- Look for the lines that use Rewrite directives directing visitors to a URL. Check for [R=405]. If it is there, add a # at the end of the line. Then, refresh your website to see if this resolves the issue.

10. Fix File Ownership
File permissions control which users can access and modify files. An incorrect setup can sometimes lead to 405 errors, as the server might lack the necessary permissions to process requests correctly.
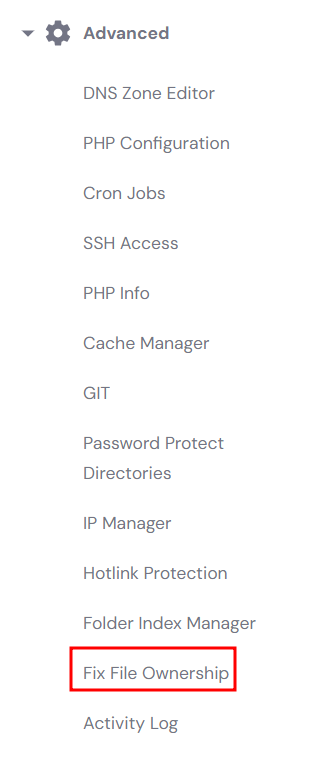
There are different ways to fix file ownership depending on your platform. If you’re a Hostinger user, access hPanel and go to Fix File Ownership settings under the Advanced menu.
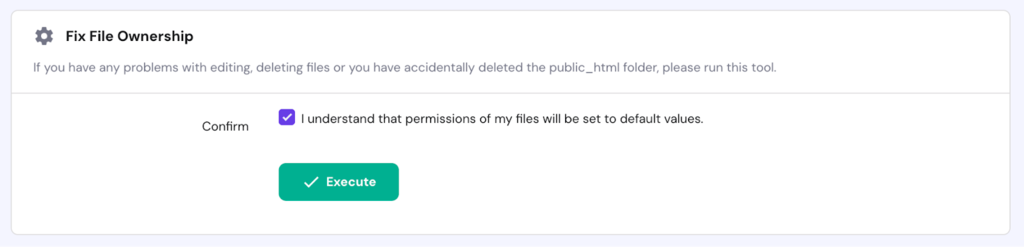
After that, confirm that you want to revert your site’s files and folders back to default values and click Execute.
11. Check A Records
Incorrect Domain Name System (DNS) configurations can lead to requests being sent to the wrong server, which may not be set up to handle specific HTTP methods, potentially resulting in a 405 HTTP status code.
Check the A records to make sure that all the details are correct. The A record is the most basic type of DNS record that points a domain or subdomain to an IP address.
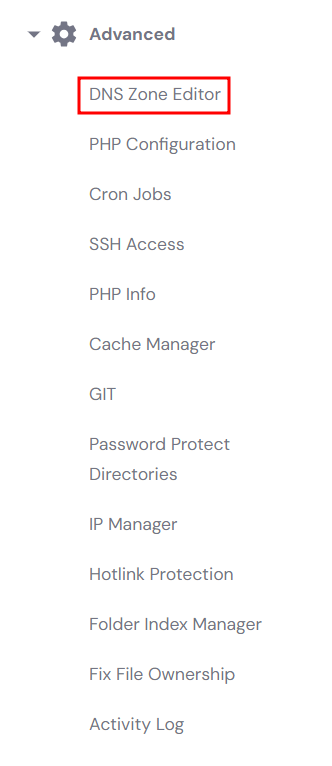
The steps to access your DNS records depend on your web hosting provider. Hostinger users can access their database records by heading to hPanel, and selecting the DNS Zone Editor in the Advanced menu:
Check that your A records contain this information:
- Type. The type of DNS record should be A.
- Name. Use @ if the domain or subdomain name points to another IP address.
- Points to. Verify if your domain or subdomain points to the correct IP address.
- Time to Live (TTL). How long should the DNS resolver save the query for this domain in the cache. Most hosting providers usually set it to 14400 seconds or 4 hours.
Domain settings that control URL redirection or proxy behaviors can also impact how requests are processed. Misconfigured redirection rules or proxies might alter or restrict HTTP methods, leading to unexpected 405 Method Not Allowed responses.
Troubleshooting Other 4xx Errors
To help you understand and resolve other common 4xx errors, which often share root causes with the 405 HTTP status code, explore these guides:
How to Solve HTTP Error 400
How to Fix 401 Unauthorized Error
How to Fix 403 Forbidden Error
How to Resolve 404 Not Found Error
Conclusion
A 405 Method Not Allowed error occurs when a web server receives a request using an HTTP method that doesn’t support or permit the requested resource. Common causes include:
- Misconfigured server or web app settings, restricting certain HTTP methods like POST, GET, PUT, or DELETE.
- Incorrect code or scripts within the application, particularly when custom code fails to align with server-side expectations.
To fix a 405 status code, consider these common solutions:
- Review server configuration. Ensure the server is configured to accept the HTTP methods used by your web app. This may involve adjusting settings in web server software like Apache or Nginx.
- Check the application code. Examine any custom scripts or backend code for errors in how HTTP methods are applied. Ensure the code matches the server’s expected methods for each endpoint.
- Inspect .htaccess and rewrite rules. Incorrect rewrite rules in the .htaccess file can lead to 405 errors. Review and correct these rules if necessary.
- Debug and test. Use local development environments to replicate the error and pinpoint its cause. Tools like Postman can simulate various HTTP requests to test server responses.
405 Method Not Allowed FAQ
Find answers to the most common questions about the 405 HTTP status code below.
What Causes a 405 Error?
The 405 error happens when a client attempts to use an HTTP method that is not allowed by the server. For example, this issue can occur when a user tries to use a method such as PUT or DELETE on a resource that only allows GET or POST requests.
How Can I Prevent the 405 Method Not Allowed Error?
Make sure to use the appropriate HTTP method for the resource being requested to prevent the 405 Method Not Allowed error. Check the server’s documentation to determine which methods are allowed for each resource, and ensure that requests use only allowed methods.
Can Incorrect File Permissions Trigger a 405 Method Not Allowed Error?
Incorrect file permissions typically do not trigger the 405 Method Not Allowed error directly. That said, it might lead to other types of HTTP errors, such as 403 Forbidden, 404 Not Found, and 500 Internal Server Error.

Brian is a Content Writer who knows the ins and outs of digital marketing and eCommerce. Driven by passion and a dose of caffeine, he constantly looks for better ways to tell complex stories in a simple manner. Follow him on LinkedIn.

Matleena is a seasoned Content Writer with 5 years of content marketing experience. She has a particular interest in emerging digital marketing trends, website building, and AI. In her free time, Matleena enjoys cups of good coffee, tends to her balcony garden, and studies Japanese. Follow her on LinkedIn