How to Set Up 301 Redirects in WordPress and When You Need Them
Whether you’re creating a new link structure or migrating your WordPress site to a new domain, setting up 301 redirects in WordPress is necessary. This enables you to permanently move a web page to a new URL without losing its ranking power.
In this article, you will learn why 301 redirects are important for WordPress SEO and different methods to set them up – via hPanel, redirection plugins, a PHP script, or your site’s .htaccess file.
What Is a 301 Redirect in WordPress?
A 301 redirect is an HTTP status code sent by a web server to a browser, signaling that a web page has been permanently moved to a new location. When users try to access the old URL, they will be redirected to the new URL by default. This process helps preserve your website’s traffic, link equity, and overall SEO value.
Why You Should Create 301 Redirects
Creating a permanent redirect, rather than a temporary redirect, brings several benefits to your WordPress website:
- Better user experience. When users land on your site using outdated links, they might encounter a 404 error or irrelevant content. Redirects ensure they reach the destination URL without interruption.
- Preserved SEO value. Search engines recognize 301 redirects as permanent changes and will transfer the link equity of the old page to the new page. Without permanent redirect rules, your website will lose its search engine rankings and accumulated authority.
- Updated URLs. Broken links frustrate users and negatively impact your site’s credibility. When reorganizing your entire website or updating its URL structure, 301 redirects ensure that every link points to the correct page.
- Minimized duplicate posts. If multiple URLs display the same content, search engines will struggle to decide which version is the authoritative one. Redirecting duplicate URLs to the preferred version will improve the visibility of your WordPress blog.
- Improved content. Over time, blog posts may become outdated, inaccurate, or no longer aligned with your current goals. With 301 redirects, you can improve existing WordPress content by replacing underperforming pieces with up-to-date articles.
5 Methods to Set Up 301 Redirects in WordPress
To create redirects automatically, use hPanel or a 301 redirection WordPress plugin.
For technically adept users, it’s also possible to set up 301 redirects by manually editing the site’s .htaccess file or creating a custom PHP script.
How to Set Up 301 Redirects Using hPanel
hPanel provides an intuitive interface for easy website management, including WordPress redirects.
If you’re a Hostinger user, follow these steps to set up a 301 redirect:
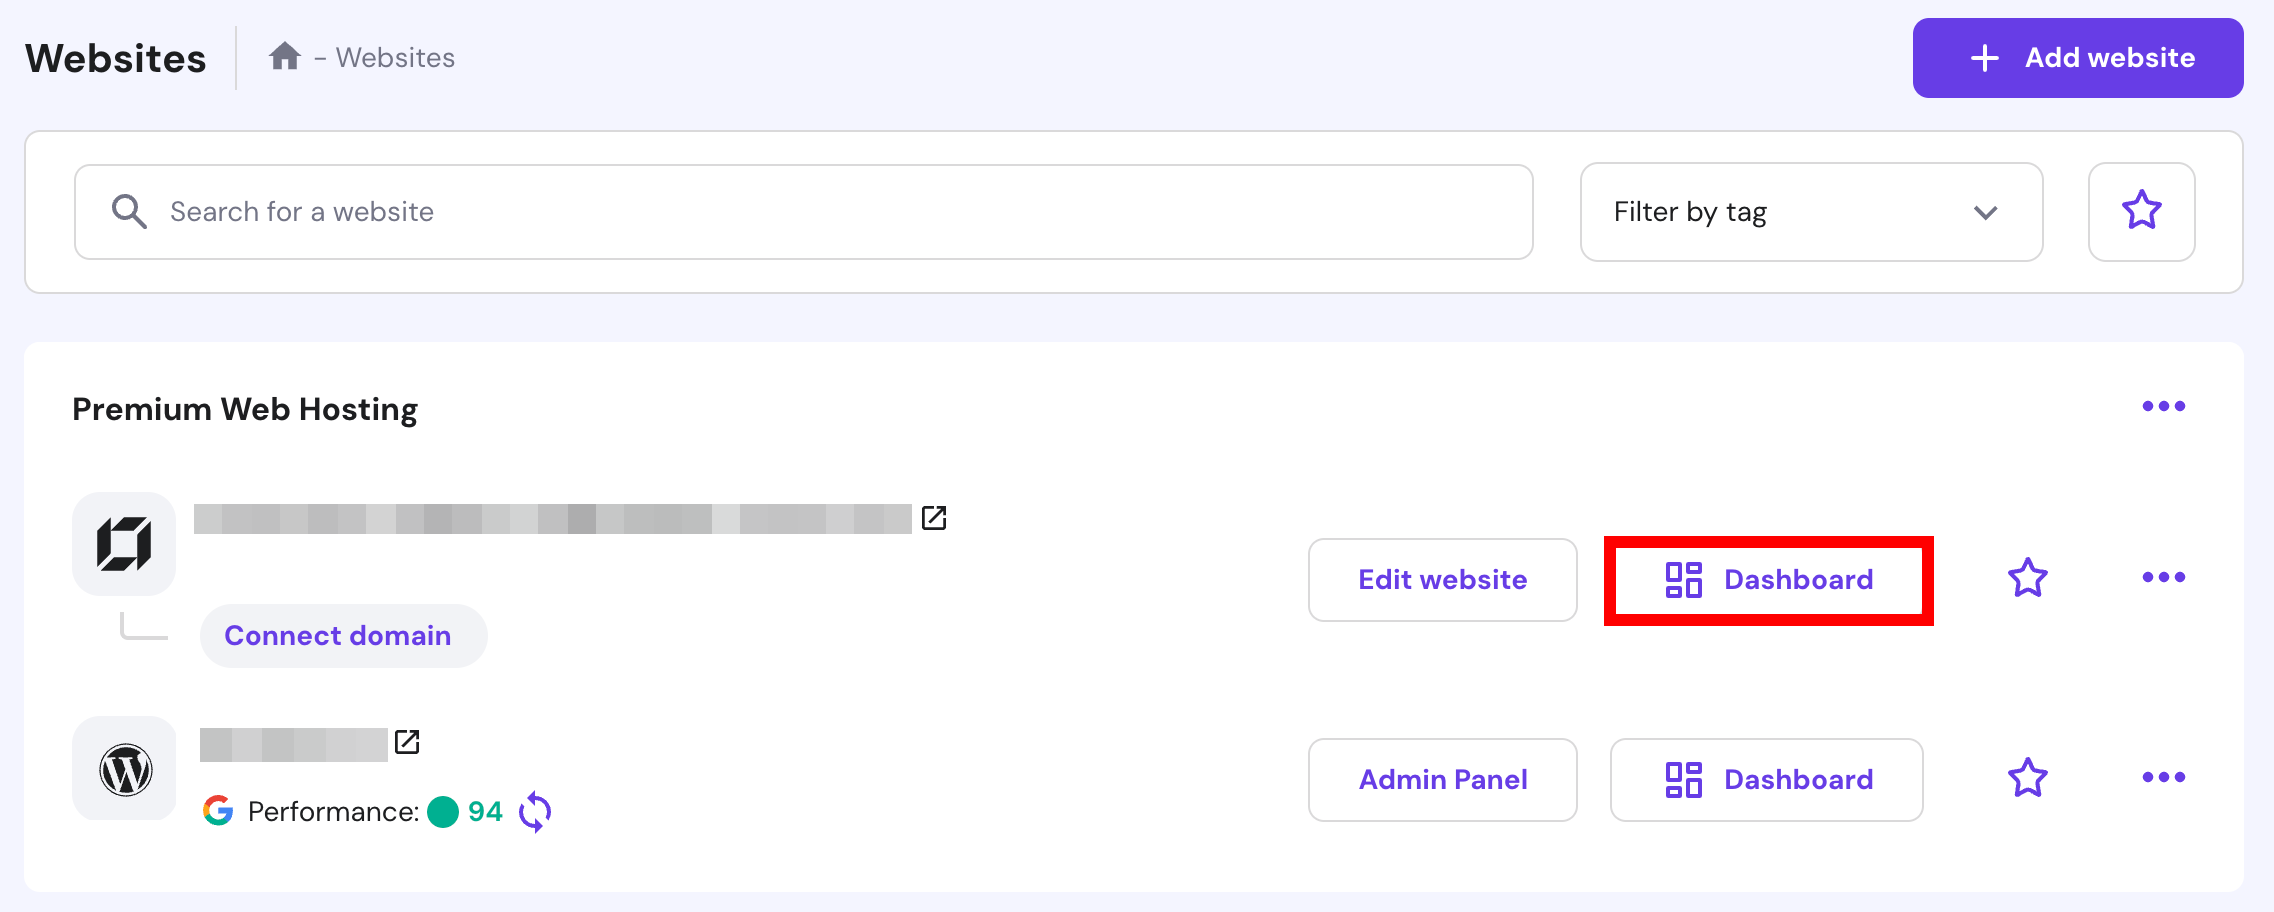
- Log in to your hPanel account and head to Websites.
- Choose your preferred website and click Dashboard.
- On the left sidebar, choose Domains → Redirects.
- Next to Redirect, select your domain from the dropdown list and specify the path if needed.
- Pick the destination type – URL or IP.
- Enter the new domain or IP address in the Redirect To field.
- Click Create.
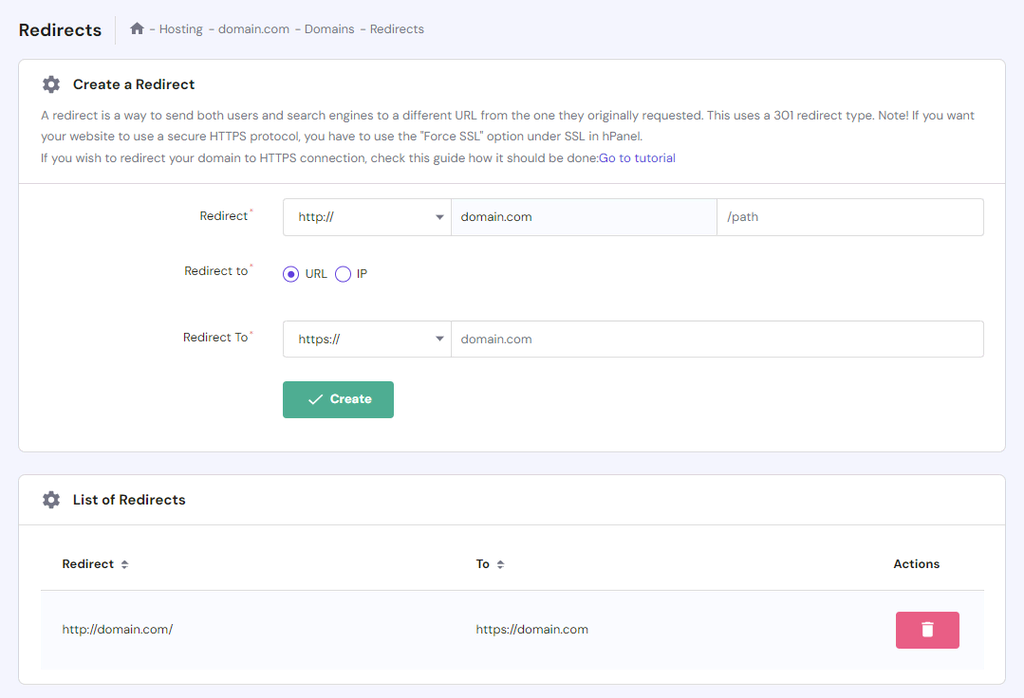
hPanel allows you to create multiple redirects – the list of existing redirects will appear at the bottom of the page. If you want to remove a 301 redirect, hit the Delete icon under Actions.
How to Set Up 301 Redirects Using the AIOSEO Plugin
All in One SEO (AIOSEO) is a WordPress plugin that offers many features to improve search engine rankings and boost website traffic.
Those include an automated WordPress sitemap creation, content analysis tool, Google Search Console integration, and easy redirect manager.
Here’s how to create a 301 redirect with this popular SEO plugin:
- Install and activate the plugin from the WordPress dashboard.
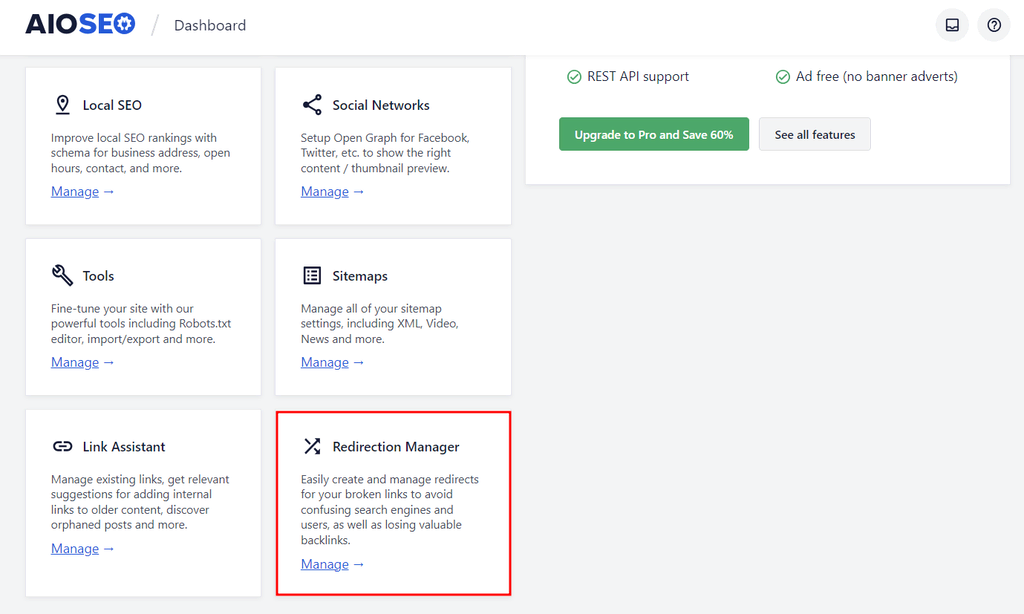
- Go to the All in One SEO plugin settings.
- Scroll down to Redirection Manager and click Manage.
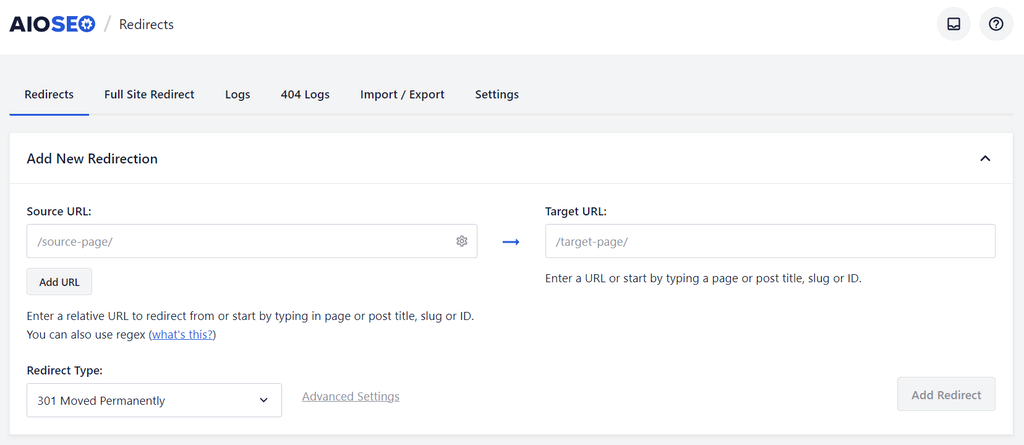
- Under Add New Redirection, enter your Source URL.
- Add the new page in the Target URL field.
- Choose 301 Moved Permanently as the Redirect Type.
- Click Add Redirect.
Unfortunately, redirects are only available for licensed pro users. If you’re looking for a free solution, consider other WordPress redirection plugins.
How to Set Up 301 Redirects Using the 301 Redirects Plugin
301 Redirects is another recommended WP plugin to properly redirect users from the source URL to the new destination.
Besides creating a permanent 301 redirect, its free version also allows you to set up temporary 302 and 307 redirects:
- Log in to your WordPress dashboard and install the 301 Redirects plugin.
- With the plugin installed and activated, navigate to Settings and find 301 Redirects.
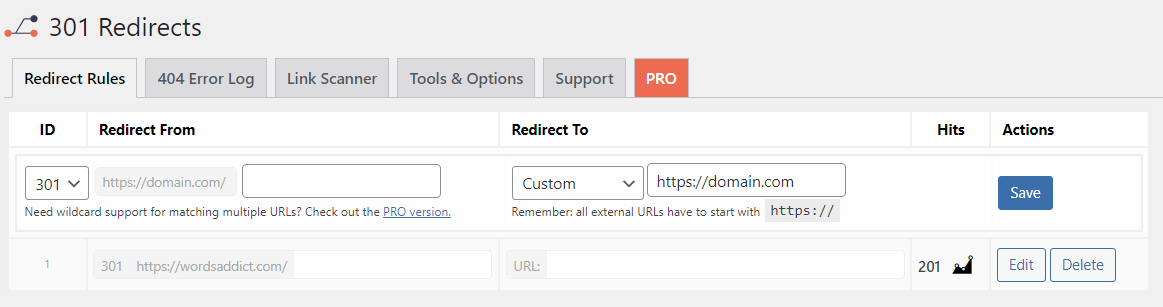
- Go to Redirect Rules and choose one of the redirect types – 301, 302, or 307.
- Enter your existing page or post URL in the Redirect From section.
- Under Redirect To, set the drop-down menu to Custom and enter your new link.
- Click the Save button.
How to Set Up 301 Redirects Manually by Editing the .htaccess File
If you’re comfortable writing code, manually editing the .htaccess file is another viable option.
Follow these steps to locate the .htaccess file in your site’s root folder and create a 301 redirect:
- Access your website’s files using an FTP client or File Manager. If you’re on Hostinger, open hPanel → Websites → Dashboard.
- On the left menu, navigate to Files → File Manager and access your site’s files.

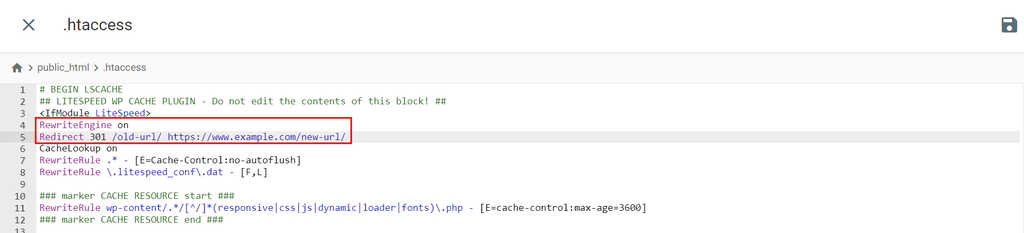
- Open the public_html folder and double-click the .htaccess file.
- Below the line that says RewriteEngine on, add the following code snippet to set up a 301 redirect:
Redirect 301 /old-url/ https://www.example.com/new-url/
- Replace /old-url/ with the source URL and https://www.example.com/new-url/ with the target URL.
- Save the .htaccess file by clicking the Disk icon on the top right.
It’s also possible to move your old website to a new domain using a .htaccess redirect:
RewriteCond %{HTTP_HOST} ^olddomain.com [NC,OR]
RewriteCond %{HTTP_HOST} ^www.olddomain.com [NC]
RewriteRule ^(.*)$ https://newdomain.com/$1 [L,R=301,NC]
Make sure to replace both olddomain.com and newdomain.com with your site’s domain names.
How to Set Up 301 Redirects Using a PHP Script
Advanced users can also create a PHP script to set up 301 redirects in WordPress. This method is useful for managing multiple redirects.
If you’re a Hostinger user, log in to hPanel and access your WordPress files via Websites → Dashboard → Files → File Manager. After that, follow these steps:
- Open the public_html folder.
- On the left sidebar, click New File and name it redirects.php.
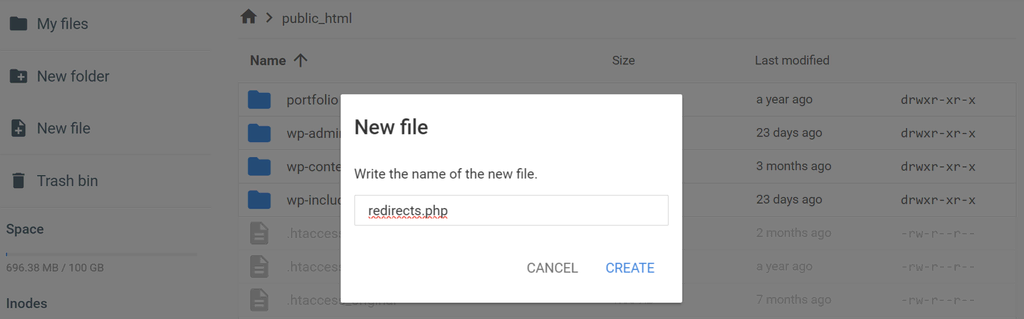
- Once created, the new PHP file will automatically open.
- Add the following code:
<?php
header("HTTP/1.1 301 Moved Permanently");
header("Location: https://www.example.com/new-url/");
exit();
?>
- Replace https://www.example.com/new-url/ with the new URL you want to redirect to. You can add multiple blocks of this code for different redirects.
- Click the Disk icon to save the PHP file.

To test whether the 301 redirect works, open your browser and type the address of your PHP script – it should look like this:
https://www.yourwebsite.com/redirects.php.
Remember that a slight typo or misspelling in the code can lead to website errors. Thus, always double-check your code and test the redirects thoroughly before deploying them.
As a precaution, it also pays to create a website backup to keep your files safe. With Hostinger’s managed WordPress hosting, you will get automated daily or weekly backups, depending on the chosen plan.

Each hosting package also comes with a free domain, unlimited SSL certificates, one-click WordPress installation, and LiteSpeed cache for improved performance. Plus, we have a rich library of WordPress tutorials, guiding you closer to online success.
What Are Other Types of Redirect Code?
When it comes to creating redirects, the 301 status code is not the only available option.
In this section, we’ll dive deeper into the key differences between a 301 redirect and other commonly used redirection codes.
301 Redirect
A 301 redirect signals a permanent move from one URL to a different URL. This is particularly crucial for maintaining SEO equity and preserving user experience.
It’s the best choice when you’re certain that the change is permanent and you want to seamlessly transition visitors to the new location.
302 Redirect
Unlike the permanent nature of the 301 redirect, a 302 redirect indicates a temporary URL move – the original URL will be restored at some point.
This type of redirect is beneficial when you need to perform maintenance or testing on the original page but plan to bring it back online later.
303 Redirect
A 303 redirect is a specific type of redirect that indicates a resource can be found at another location. This is often used in response to a POST request made by a web browser.
Essentially, a 303 status code informs the client to make a GET request to retrieve the resource. A common scenario happens when a form submission redirects users to a different page.
307 Redirect
Similar to the 302 redirect, a 307 redirect denotes a temporary move. It indicates that the resource being accessed has been temporarily moved to another location.
When You Should Use 301 Redirects
Implementing 301 redirects ensures a seamless user experience and maintains your website’s SEO rankings. Here are some scenarios where using 301 redirects is highly recommended:
- Canonicalization. Having multiple pages with similar content can negatively impact SEO. Use 301 redirects to consolidate the ranking potential of these versions to a single URL. Common examples include HTTP to HTTPS and non-www to www redirects, or vice versa.
- Page or post deletion. If you want to remove a high-traffic page or post from your website, redirect it to a new location first. This approach will prevent users from encountering a 404 Not Found error.
- Website restructuring. Using a 301 redirect is also beneficial when making significant changes to your website. These include creating new categories or changing the URL structure.
- Domain migration. When moving your website to an entirely new domain, using a 301 redirect is also necessary. It helps you transfer the existing traffic and SEO authority of the current domain to the new web address.
- Updating URLs. After optimizing URLs for keywords or better readability, use 301 redirects to guide users and search engines to the new URL. This prevents broken links and preserves your content’s authority.
- Changing permalink structure. If you change the permalink structure of your posts or pages, old links will become invalid. To avoid breaking external links and bookmarks, set up 301 redirects from the old URLs to the new ones.
Conclusion
When migrating to a new domain, restructuring your website, or simply updating your URLs, 301 redirects are pivotal in preserving user experience and maintaining SEO rankings.
If you’re a Hostinger user, it’s easy to create a 301 redirect via hPanel. Otherwise, there are various methods to set up 301 redirects in WordPress, such as:
- Use a redirection plugin like AIOSEO and 301 Redirects.
- Manually edit the .htaccess file of your site.
- Create a custom PHP script.
Whatever method you choose, back up your website beforehand to avoid data loss if something goes wrong.
Have more questions about setting up a WordPress page redirect? Read through our FAQ section or simply leave a comment below.
301 Redirects in WordPress FAQ
Here are some commonly asked questions about a 301 redirect.
Can I Create a 301 Redirect in WordPress?
In short, yes. WordPress provides an easy way to create 301 redirects through plugins like AIOSEO and 301 Redirects. If you possess the technical know-how, it’s also possible to edit the .htaccess file or create a custom PHP script.
Why Is My Website Not Redirecting Properly?
There are several reasons why your 301 redirect is not working as expected. One common issue is caching, where your browser stores the old website version. Clear your browser cache and any caching plugins you’re using. Also, double-check your .htaccess code and ensure there are no typos or syntax errors.
What Are the Alternatives to 301 Redirects?
While 301 redirects are great for permanent changes, there are times when you might need temporary redirects. For this, consider using 302, 303, or 307 redirects. These can be beneficial when you’re testing new URLs or making temporary changes to your website.

Brian is a Content Writer who knows the ins and outs of digital marketing and eCommerce. Driven by passion and a dose of caffeine, he constantly looks for better ways to tell complex stories in a simple manner. Follow him on LinkedIn.
