16 VPS Security Tips to Prevent Attacks on Your Server
Knowing how to secure your Linux virtual private server is important to avoid cyber threats. However, this is not a one-time task – besides applying the best security practices, you must continuously monitor your virtual private server (VPS).
In this article, we will dive deeper into Linux security and its common vulnerabilities. We will also discuss 16 VPS security tips to prevent cyber attacks on your virtual server.

Linux Security and Common Weaknesses
Even though Linux VPS security is generally robust, it has some weaknesses. Many cyber threats can compromise your Linux server’s security and data. Here are the most common ones:
- Malware – intrusive software intentionally designed to harm computers and their operating systems. It comes in many forms, including Trojans, ransomware, viruses, and spyware.
- Sniffing attack – a cyber attack that happens when a hacker uses packet sniffers to intercept and extract data from a network.
- Brute-force attack – a hacking method involving an attacker who uses trial and error to guess login credentials.
- SQL injection – an attack that occurs when a hacker exploits code in a web application to gain access to the server’s database.
- Cross-site scripting (XSS) – a client-side attack during which a hacker injects malicious code into a website.
- No function-level control – when the access rights to a server aren’t verified properly, giving unauthorized users root privileges.
- Broken authentication – identity theft that happens due to unencrypted data, weak passwords, or poorly-configured application session timeouts.
Before implementing any security measures, learn the crucial elements you should monitor in your virtual private server, which include:
- VPS hosting security
- Server software
- SSH connection
- Root access and logins
- Passwords and credentials
- Firewalls
- FTP connection
- User rights and privileges
- Server logs
16 VPS Security Tips to Protect Your Server Security
This section contains 16 security tips for preventing cyber attacks on VPS hosting.
1. Research Your Web Hosting Security
Your VPS hosting provider must have a strong security infrastructure and offer additional protection to keep your server safe. While users can install extra security features, some are pre-configured.
Depending on the provider, the security features will differ. At Hostinger, we apply comprehensive security practices for all our virtual machine hosting plans to ensure optimal safety, including:
- Web application firewall – a dedicated security feature that analyzes and filters incoming requests based on predefined security rules. It adds extra protection to your server, ensuring only legitimate and secure traffic reaches your websites.
- Suhosin PHP hardening – a module that fortifies your PHP applications against vulnerabilities that cyber criminals often exploit to launch an attack. It also patches PHP flaws to help reduce the risk of successful hacking attempts.
- PHP open_basedir protection – a security measure that restricts PHP script access to specific directories only. It helps prevent unauthorized access to sensitive files and mitigate potential security breaches.
- BitNinja’s full-stack server protection – a suite of security solutions with various modules for IP reputation, malware detection, and proactive defense mechanisms. It provides complete protection for your VPS against various cyber threats.
- Advanced DDoS mitigation – a distributed denial-of-service (DDoS) attack sends malicious internet traffic to slow down your entire server performance. Hostinger mitigates DDoS using the remotely triggered black hole (RTBH) and traffic filtering.
- Monarx anti-malware – a security tool that continuously scans your VPS for malware, suspicious files, and potentially malicious activities. It helps ensure your server is safe without needing to manually scan it.
- Secure sockets layer (SSL) – SSL certificates encrypt data transmission between your website and its visitors. It helps prevent hackers from stealing sensitive data from the network.
Suggested Reading
Check out our guide on how to install SSL certificate on Linux running CentOS 7.
Furthermore, Hostinger offers automated backups and live snapshots for easy data restoration in case of cyber attacks or other incidents.
This is ideal, as most users and beginners should choose managed VPS security whenever possible. It means the provider handles all your hosting server security features, updates outdated software, and scans for malware. It keeps your VPS server secure with minimal effort.
However, advanced users that want more flexibility and control over their VPS security can still benefit from Hostinger’s self-managed hosting. Users get root access to the VPS servers – plus, we offer a dedicated technical support team for assistance.

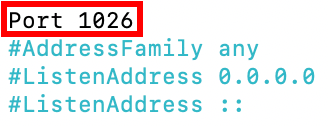
2. Change the Default SSH Port
If you still use port 22 to access your virtual server via an SSH connection, hacking attempts may likely occur. This is because attackers can scan open ports to perform brute-force attacks and obtain SSH access to the remote server.
We recommend changing your default SSH listening port to protect your data against automated attacks. Here’s how to change the SSH port:
- Open Terminal and log in to SSH.
- Run the following command to edit the service configuration file:
nano /etc/ssh/sshd_config
- Locate the line that reads Port 22.
- Replace 22 with a new port number and remove #.
- Save the changes and exit.
- Enter the following command to restart the service:
- For Debian and Ubuntu
service ssh restart
- For CentOS and Red Hat Enterprise Linux (RHEL)
systemctl restart sshd.service
- Log in to SSH using the new port to check if the changes were applied successfully.
3. Disable Root Login
Linux VPS has a root user that possesses the most privileges on the operating system and can modify any aspect of the server. Cyber criminals might target this user to gain full access to the server.
Deactivating this account helps improve root access security, safeguarding your server from brute-force attacks. However, we recommend creating an alternative username with the privilege to execute root-level commands for server configuration purposes.
Follow the steps below to disable root login:
- Open Terminal and log in to your SSH account.
- To open and edit the configuration file, run the following command using the nano or vi text editor:
nano /etc/ssh/sshd_config
- Find the following parameter and change it to no to disable the root login:
PermitRootLogin=no
- Run the following commands to save the changes and restart the SSH service:
- For Debian and Ubuntu
service ssh restart
- For CentOS and Red Hat Enterprise Linux (RHEL)
systemctl restart sshd.service
4. Use Strong Passwords
Passwords containing information about your identity or simple passphrases are easy to guess. To prevent successful brute-force attacks, create a long and complicated password with several elements, such as numbers and special characters.
You can use tools like NordPass to easily create and store strong passwords. These IT tools provide various customization options, such as limiting the password length and the used characters.
Don’t use the same password for more than one account and remember to change it regularly, ideally once every three months. In addition, avoid sharing login credentials for accounts with root privileges to prevent unauthorized server modification.
5. Start Using SSH Keys
If you still use a password to log in to your SSH account, you may become a target of sniffing attacks. To avoid this, use SSH keys instead of a password for VPS authentication.
These encryption keys are additional login credentials for securing an SSH connection on VPS. Being computer-generated, they can be up to 4096 bits long. It means they are more complex and harder to decipher than a root password.
SSH keys come in two sets – public and private. The former is saved on the server, while the latter is stored on the user’s machine. When the server detects a login attempt, it will generate a random string and encrypt it with a public key. The encrypted message only decrypts using the associated private key.
Here’s how to generate an SSH key on a Linux server:
- Open the Terminal application and log in to SSH.
- To generate public and private keys, enter the following command:
ssh-keygen -t rsa
- Once a reply appears, hit Enter:
Enter file in which to save the key (/root/.ssh/id_rsa):
- You will be prompted to fill in a passphrase twice. If you don’t have it, press Enter twice.
Enter passphrase (empty for no passphrase):
Enter same passphrase again:
- Your private and public keys are now saved successfully.
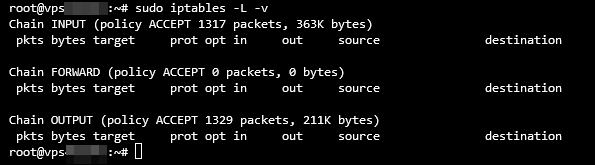
6. Setup an Internal Firewall (IP Tables)
Since HTTP traffic has various origins, setting up a firewall for VPS helps filter the requests to ensure only legitimate visitors can access your system. Doing so helps you avoid malicious traffic and potential DDoS attacks.
Linux distributions come with an internal firewall service called iptables. This tool monitors traffic from and to your server using tables. It employs rules called chains to filter incoming and outgoing data packets.
It lets you adjust firewall rules according to your needs. Here’s how to install and check the current iptables configuration on Ubuntu:
- Open Terminal and log in to SSH.
- Run the following command to install iptables:
sudo apt-get install iptables
- After the installation is complete, enter the following command:
sudo iptables -L -v
Terminal will output a list of all iptables rules in detail. Here’s what the output may look like:
7. Configure Your UFW Firewall
The Uncomplicated Firewall (UFW) is a built-in application on Ubuntu that acts as the front end for iptables. Simply put, it will deny all incoming connections and allow outgoing ones, decreasing the risk of potential threats.
You can modify and add rules to the firewall according to your preferences. Here’s how to enable it:
- Open Terminal and connect via SSH.
- Type the following command to enable UFW and press Enter:
sudo ufw enable
- If the reply states that the command was not found, install the firewall using this command:
sudo apt-get install ufw
- Once the installation is complete, run the command from step two to enable UFW.
- Verify the firewall status using the following command:
sudo ufw status

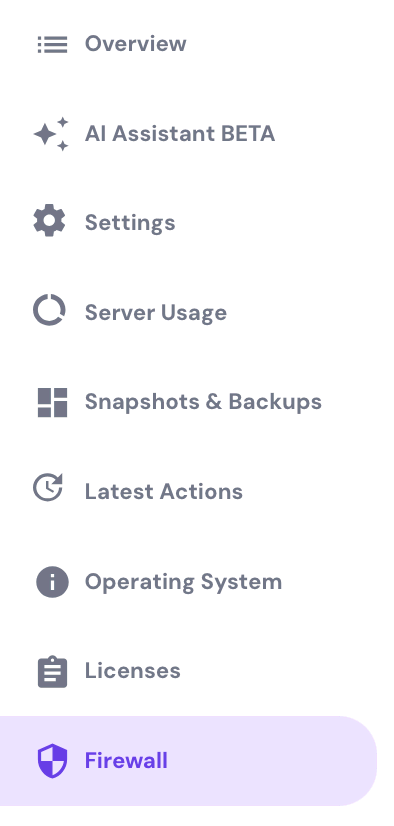
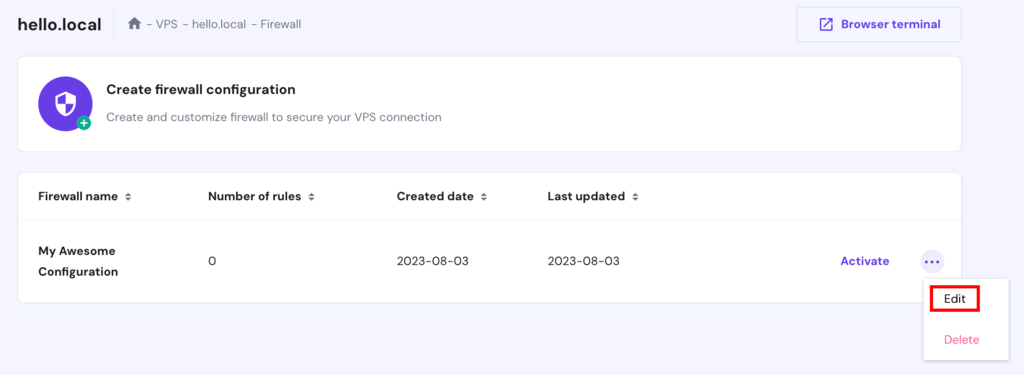
Alternatively, use our integrated VPS Firewall on hPanel. Select your VPS and choose Firewall:
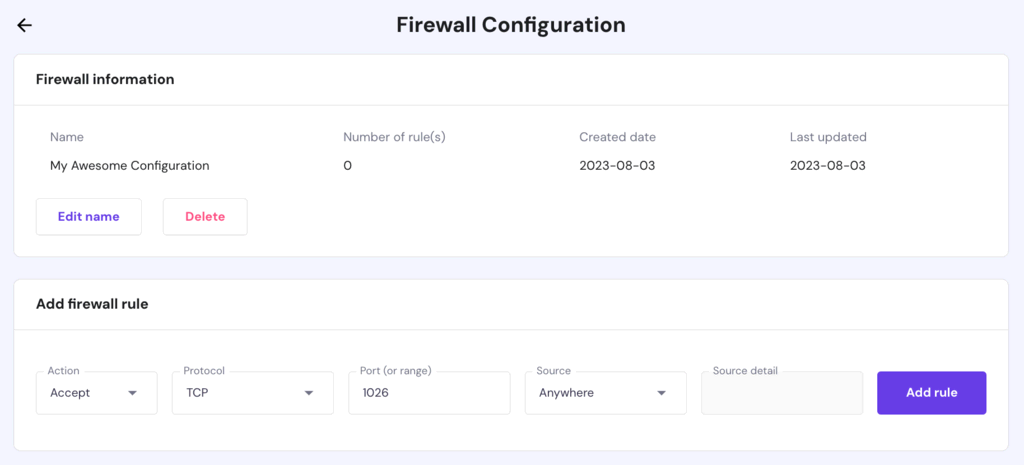
Then, create a new firewall configuration. Once created, select the Edit button:
Lastly, create any preferred rules:
We also recommend installing Suricata on your Ubuntu system. This tool automatically identifies malicious traffic on your network and its sources, which you can later include in the UFW blocklist.
8. Using SFTP Instead of FTP
While commonly used, the file transfer protocol (FTP) connection is unsafe due to the lack of encryption. While FTP over transport layer security (TLS) or FTPS encrypts the login credentials, it doesn’t secure the file transmission.
As a result, using either of these connections may put your data at risk. Hackers can easily perform a sniffing attack to steal your login credentials and intercept file transfers.
To avoid it, use the secure file transfer protocol (SFTP) instead. This secure FTP connection encrypts all data, including the credentials and transferred files. Furthermore, SFTP protects users from man-in-the-middle attacks, as the client needs to be authenticated before accessing the system.
Follow these steps to set up a secure file transfer protocol connection:
- Open Terminal and log in to SSH.
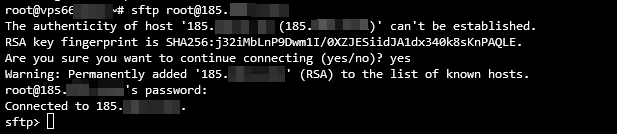
- Initiate an SFTP connection by using this command:
sftp user@server_ipaddress
or
sftp user@remotehost_domainname
- If you’re using a custom port, run the following command:
sftp -oPort=customport user@server_ipaddress
or
sftp -oPort=customport user@remotehost_domainname
Once you’re connected, an SFTP prompt will appear like the following:
9. Set Up Fail2Ban
The security software Fail2Ban monitors system logs and blocks hackers after multiple failed logins. In addition, it protects servers against DoS, DDoS, dictionary, and brute-force attacks. Fail2Ban uses iptables and a firewall to ban IP addresses.
Follow these steps to set up the Fail2Ban software package on Ubuntu:
- Open Terminal and start an SSH connection.
- Input the following command to install the Fail2Ban software package:
sudo apt-get install fail2ban
- The following output will appear. Type Y and hit Enter.
Do you want to continue? [Y/n] y
- Once the installation is finished, verify the status by running the following command:
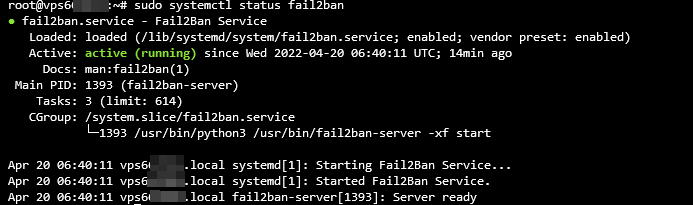
sudo systemctl status fail2ban
If the Fail2Ban software package is active and running, Terminal should return the following:
10. Install an Antivirus
In addition to setting up a firewall to filter incoming traffic, it’s important to monitor files in your VPS. As virus attacks are one of the main Linux server vulnerabilities, this cyber threat can target your servers and damage your data.
It makes installing an antivirus a crucial security-hardening practice. There are many options available, but the most notable one is ClamAV. It’s open-source and used to detect suspicious activity and quarantine unwanted files.
Important! Don’t enable ClamAV if your VPS has less than 2 GB of spare RAM. Doing so may consume all the remaining memory, crashing your server.
Follow these instructions to install ClamAV on CentOS:
- Open Terminal and log in to SSH.
- Install Extra Packages for Enterprise Linux (EPEL) using this command:
sudo yum -y install epel-release
- The Complete! output will signal that the EPEL installation is done. Press Enter to create a new line.
- Enter the following command to clear all cached information:
sudo yum clean all
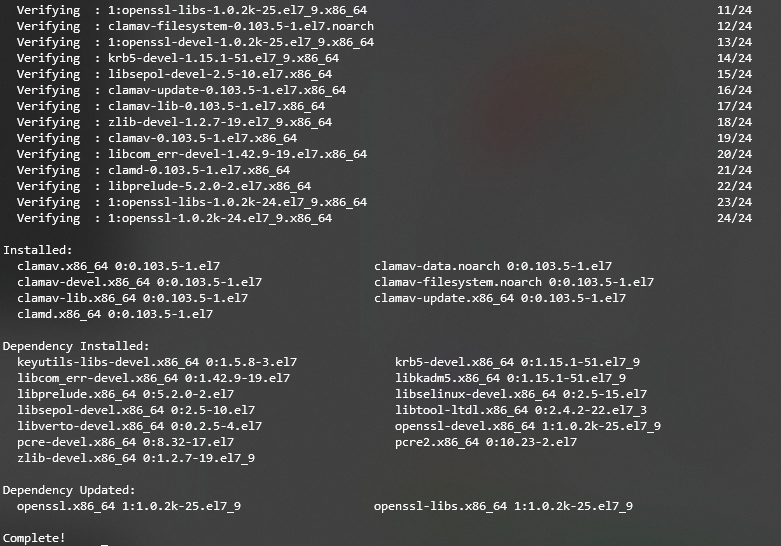
- Run the command below to install ClamAV:
sudo yum -y install clamav-server clamav-data clamav-update clamav-filesystem clamav clamav-scanner-systemd clamav-devel clamav-lib clamav-server-systemd
A Complete! line will appear, indicating that the installation is finished and ClamAV is running. Here’s how the final output should look:
11. Use a Malware Scanner
While an antivirus protects your VPS from threats like trojans and worms, it may be unable to detect newer exploits like zero-day malware.
To enhance your VPS security, pair antivirus with a malware scanner. This type of software updates the detection rule faster, allowing it to distinguish newer threats on your system.
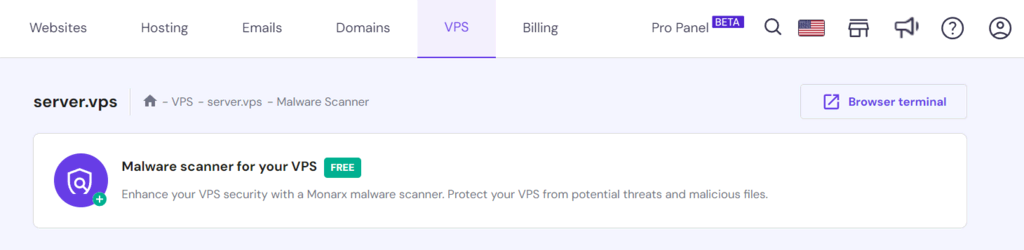
Linux supports various malware scanners, which you must install manually via Terminal. At Hostinger, all our VPS plans include a free Monarx malware scanner. Its graphical user interface makes the tool easy to use, especially for non-technical users.
After setting up your VPS, follow these steps to install Monarx:
- Log in to the Members Area and click VPS on the top menu.
- From the sidebar, go to Security → Malware Scanner.
- Click on the malware scanner banner and select Install on the pop-up prompt.
Important! Restoring a snapshot and rescanning your VPS will reset the current malware diagnostic results. Also, re-install Monarx if you are changing the server’s operating system.
The installation process may take up to 60 minutes. Once installed, access the tool by going to the VPS Dashboard’s sidebar → Security → Malware Scanner. This section displays the automatic scan results, including the number of compromised files.
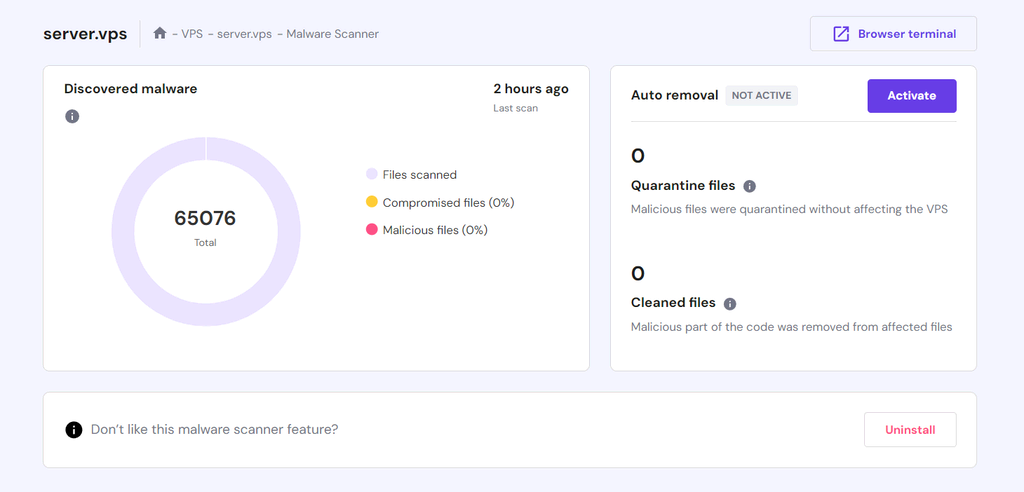
You can manually clean up the malicious files or use Monarx’s Auto removal tool. This feature automatically deletes the injected malware and quarantines potentially compromised files, enabling you to maintain optimal server security with minimal effort.
To enable auto-removal, purchase the license by pressing Activate on the Auto removal section. It costs $7/month, and the billing cycle will automatically adjust based on your remaining VPS subscription length.
12. Set Up a VPN for Your VPS
If you use a public connection, someone may intercept your traffic and steal your data. To avoid this, we recommend setting up a virtual private network (VPN) to combat security threats.
A VPN will provide an alternative IP address for your machine to route traffic through an encrypted tunnel and mask your location. It makes your IP address untraceable, allowing you to maintain anonymity while browsing the internet.
In short, a VPN keeps your data safe and prevents hackers from intercepting your traffic. It works hand in hand with a firewall to provide additional VPS security.
Pro Tip
A VPN is also beneficial for users who live in an area with location-based restrictions since it lets them change their IP addresses to bypass internet censorship.
Follow these steps to install OpenVPN on CentOS:
- Open Terminal and connect with SSH.
- Install the net-tools package before installing OpenVPN. Run this command:
sudo yum install net-tools
- Enter the following curl command to download the OpenVPN package:
curl -O http://swupdate.openvpn.org/as/openvpn-as-2.7.3-CentOS7.x86_64.rpm
- Print SHA256 checksum to validate the installation using this command:
sha256sum openvpn-as-*
- The output will print the checksum as shown below:

- Compare the downloaded binary’s checksum with the one provided on the website. If they match, you can start installing OpenVPN with this command:
sudo rpm --install openvpn-as-*.rpm
- After the installation, you will get the Admin UI and Client UI details. Press Enter to create a new line.
- Set up a password with the following command:
passwd openvpn
- You will be prompted to retype the new password.
- Visit the Admin or Client UI to access the screen below:

- Enter the username openvpn and the password you have just set up. Press Sign In.
Pro Tip
The new Hostinger KVM VPS plans are compatible with any VPN software available in the market.
13. Review User Rights
If there are many users on your VPS hosting, carefully consider the distribution of control and rights. Providing all users with root privileges will expose your server’s resources and sensitive data to security risks.
To prevent this issue, set a user access limit on your server. You can do so by managing users and granting them different permissions for specific files and system resources.
Linux has a user privileges management feature, which lets you modify system access permissions for different accounts. Simply create a group for users with the same access privileges.
Here’s how to manage users and their privileges on Ubuntu:
- Open Terminal and connect via SSH.
- Enter the following command to create a group. Replace my_group with the group name:
sudo addgroup my_group
- Next, run the following command to create a new user. Replace first_user with your user name:
adduser first_user
- The output will prompt you to set a password and bio, such as full name, room number, and phone number. Type y and press Enter to confirm the entered information.
- To add a user to a group, run the command below. Note that it doesn’t produce any output.
sudo usermod -a -G group1,group2 first_user
- If you want to grant root access to a user, run the following command. It also won’t give any output.
sudo usermod -aG sudo first_user
- If you have a directory and want to add read and write privileges to it, use a command with this syntax:
sudo chmod -R g+w /directory
We also recommend regularly listing users in your Linux system to check for malicious ones. It’s important since hackers often create an account in a compromised machine to gain access.
14. Disable IPv6
Disabling IPv6 helps avoid security vulnerabilities and makes your VPS hosting less prone to cyber attacks. As hackers often send malicious traffic through IPv6, leaving the protocol open can expose your server to potential security breaches.
Even if you’re not actively using IPv6, some of your programs may open listening sockets on it. When a packet comes in, these programs will process it, even a malicious one.
To keep your operating system and VPS server safe, follow these instructions to disable IPv6 on Ubuntu:
- Open Terminal and log in to SSH.
- Enter the following command to disable IPv6:
sudo nano /etc/sysctl.d/99-sysctl.conf
- The configuration file will open. Add the following lines at the bottom:
net.ipv6.conf.all.disable_ipv6 = 1
net.ipv6.conf.default.disable_ipv6 = 1
net.ipv6.conf.lo.disable_ipv6 = 1
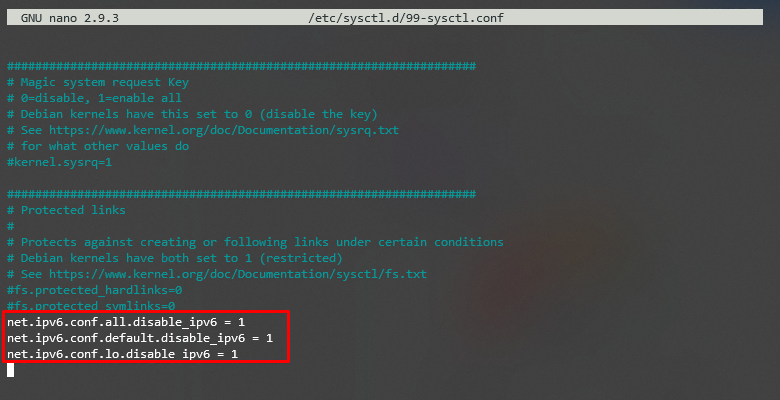
- Save and close the file.
- Next, run the command below to execute the changes:
sudo sysctl -p
- Lastly, insert the following command and hit Enter. If you see 1, that means IPv6 has been disabled successfully.
cat /proc/sys/net/ipv6/conf/all/disable_ipv6

15. Monitor Your Server Logs
Monitoring your server logs gives insights into what’s happening with your VPS hosting. These logs can also provide detailed information about the VPS condition, including the server load and resource usage, for reporting purposes.
Server log monitoring helps you determine whether the server is experiencing cyber attacks or other security threats. The sooner those vulnerabilities are fixed, the fewer opportunities attackers will have to intercept data.
One of the critical directories on your Linux system is called /var/log. It stores a collection of log files that contain crucial information related to the system, kernel, package managers, and various applications running on the server.
Here’s how to open /var/log on a Ubuntu server for log monitoring:
- Open Terminal and log in to SSH.
- Run the command below to change the working directory to /var/log. It won’t produce any output, but your command line should show the directory.
cd /var/log
- To list all the files, enter the following command:
ls

- To check the logs, enter this command:
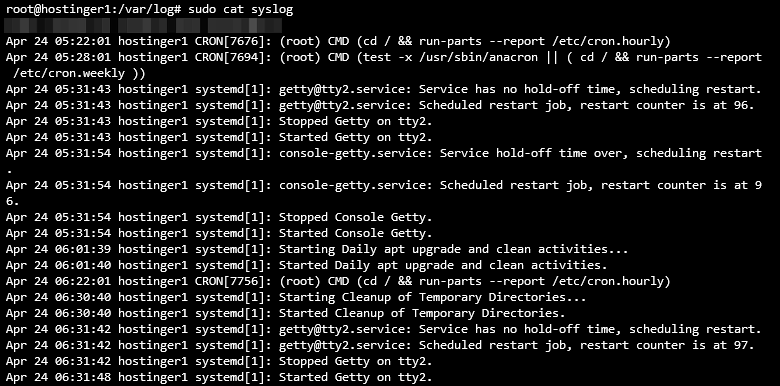
sudo cat syslog
Here’s how your VPS logs should look like:
16. Keep Your Applications Up to Date
Since old software may have vulnerabilities, keeping applications up-to-date helps prevent cyber attacks on your VPS. Developers usually release updates and security patches regularly, so check for the latest versions of your software and install them as soon as possible.
In a Linux operating system, you can run a command to quickly list and install all the available package updates. Here’s how to do it on Debian or Ubuntu:
- If you are updating the entire package list, run the following command:
sudo apt-get update
- If you are updating the actual package, use this command:
sudo apt-get upgrade
Meanwhile, follow these steps to do it on CentOS/RHEL:
- Enter this command to refresh the package database and install updates:
sudo yum update
- To check for any updates, run the following command:
sudo yum check-update
We recommend enabling automated updates if you use a content management system (CMS) on your server. In addition, you can create cron jobs, a Linux-based utility to schedule a command or script to run at a specified time and date.
The most convenient way to install and run a cron job on CentOS or RHEL is using the yum-cron service. It will automatically update the software every time a new version is released. Here’s how to set it up on CentOS or RHEL:
- Open Terminal and connect via SSH.
- Enter this command to install yum-cron:
sudo yum install yum-cron
- Run the following command to enable the service. This command doesn’t give any output.
sudo systemctl enable yum-cron.service
- Enter the command below to start the service. This command also won’t produce a reply.
sudo systemctl start yum-cron.service
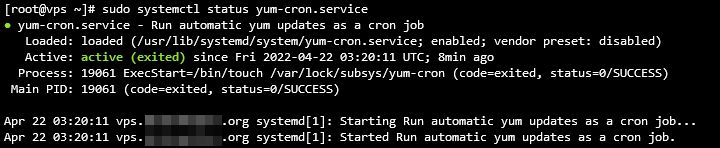
- Then, use this command to check the service’s status:
sudo systemctl status yum-cron.service
- Use the command below to open the configuration file:
sudo vi /etc/yum/yum-cron.conf
- Find the following line on the output and replace no with yes. Save the changes and exit the file using this command:
apply_updates = yes

Conclusion
Protecting your VPS server is important since it contains sensitive data. Although Linux is famous for its robust security, the VPS server still has vulnerabilities.
Common cyber attacks and issues in a Linux system include malware, sniffing and brute-force attacks, SQL injections, cross-site scripting (XSS), missing function-level control, and broken authentication.
To avoid them, owners of virtual private servers must know how to monitor the server and operating system to apply robust security measures. To get you started, we have compiled the 16 best VPS hosting security tips:
- Pick a secure VPS hosting provider.
- Use a more secure SSH port.
- Disable root logins.
- Use complex passwords with symbols and numbers.
- Enable SSH keys for VPS authentication.
- Use iptables on your server.
- Install a UFW firewall as an additional security layer.
- Start using the secure file transfer protocol (SFTP) instead of FTP.
- Activate the Fail2Ban feature to block failed login attempts.
- Install antivirus software.
- Use a malware scanner.
- Set up a VPN for VPS.
- Review user access privileges.
- Disable IPv6 on your server.
- Monitor server logs.
- Check for security updates.
We hope this article has helped you improve your VPS hosting security. If you have any questions or other tips, please leave them in the comments below.
Suggested Reading
Check out our guide about web application security and protect your site from cyber attacks.
VPS Security FAQ
In this section, we will answer several common questions about VPS security.
What Is VPS Security?
VPS security is the resilience of your virtual servers against various cyber threats like SQL injection, malware, and sniffing attacks.
Improving VPS security involves proper server management, bug patching, and applying security features. Your hosting provider’s support, built-in features, and services also determine your VPS security.
Why Is VPS Security Important?
Weak VPS security makes your server, websites, and visitors vulnerable to cyber attacks. Such attacks can compromise privacy, leak sensitive data, and cause huge financial losses. For businesses, cyber attacks may tarnish their reputation, driving customers away and slowing down sales.
Is VPS Hosting More Secure Than Other Types of Hosting?
VPS is commonly more secure than a shared hosting plan due to additional security features, isolated resources, and better website privacy. Meanwhile, VPS and dedicated server hosting offer a similar security level.
However, while dedicated server hosting is generally more secure, it lacks VPS’ automatic failover feature that helps prevent data loss.
Does VPS Have a Firewall?
Yes, VPS typically has a pre-configured firewall that users can adjust. Several Linux distributions have built-in applications for configuring VPS firewall rules, like Uncomplicated Firewall and iptables.

Noviantika is a web development enthusiast with customer obsession at heart. Linux commands and web hosting are like music to her ears. When she's not writing, Noviantika likes to snuggle with her cats and brew some coffee.

Aris is a Content Writer specializing in Linux and WordPress development. He has a passion for networking, front-end web development, and server administration. By combining his IT and writing experience, Aris creates content that helps people easily understand complex technical topics to start their online journey. Follow him on LinkedIn.
