How to Submit Your Website to Search Engines and Start Ranking
Search engines drive around 93% of all web traffic. Therefore, submitting a website to search engines is an essential step to rank higher on search engine results pages (SERPs) and drive more traffic.
Search engines index websites automatically. However, submitting your site will help to include complete and accurate data of your website.
Keep in mind that different search engines have different submission processes. This guide will go over how to submit your website to three major search engines: Google, Bing, and Yandex, since other well-known search engines, such as Yahoo and DuckDuckGo, use Bing’s indexing data.
In addition, we’ll also share tips and tricks on how to check the index status and avoid errors during the website submission process. By the end of this tutorial, you will be able to improve your website’s ranking on SERPs.

Video Tutorial on How to Submit a Website to Search Engines
If you prefer video content, check out our video tutorial on how to add your WordPress site to Google Search Console.

Submitting a Website to Google
Google dominates the search engine market worldwide by 92.49%. So, submitting your website to Google helps increase brand awareness and drive higher traffic. For business sites, adding their URL to Google My Business will also help rank higher on SERPs.
Don’t forget that website submission can refer to the whole domain or individual web pages.
Uploading a Sitemap to Google Search Console
To submit your website to Google, upload your sitemap to Google Search Console. A sitemap is an XML file containing data on your website and the relationship between its pages.
Google uses XML sitemaps to index your site faster by storing its web pages more efficiently. Here are some of the benefits of using an XML sitemap to submit your site to Google:
- Tracking new content – helps to notify Google about new content on your website.
- Easy navigation – shows the structure of your website by providing search engine crawlers with a map of your site.
- SEO – helps optimize your website by resulting in more frequent updates and notifying Google that you don’t have duplicate content.
To upload XML sitemaps to Google Search Console, first create a sitemap for your website. Choose your way of making one:
- Manually – create an XML file with a relevant HTML code. Then, use a sitemap validator to avoid handing in an invalid sitemap and hampering your site.
- Automatically – insert your URL on an online generator, and it will automatically generate a sitemap URL.
- Plugin – install the YoastSEO plugin to create a sitemap for your WordPress site.
Any method will generate a sitemap URL, which will follow this format:
http://example.com/sitemap_index.xml
Once you have your XML sitemap, go to the GSC page to submit your website. Here are the steps after logging into your account:
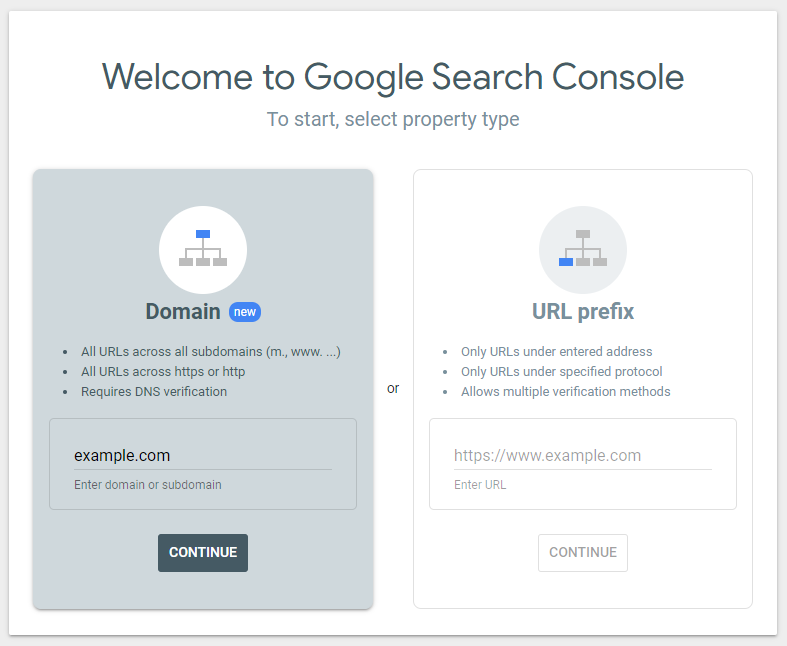
- Select the property type:
- Domain – to get information from all URLs, enter your domain name. This option requires DNS verification.
- URL prefix – it’s for a specific page and has multiple verification methods.
For this example, we’ll use Domain.
- Verify your domain by adding the TXT record from the Google Search Console to your DNS server. With Hostinger, go to hPanel -> DNS Zone Editor and add the record under the Manage DNS records box.
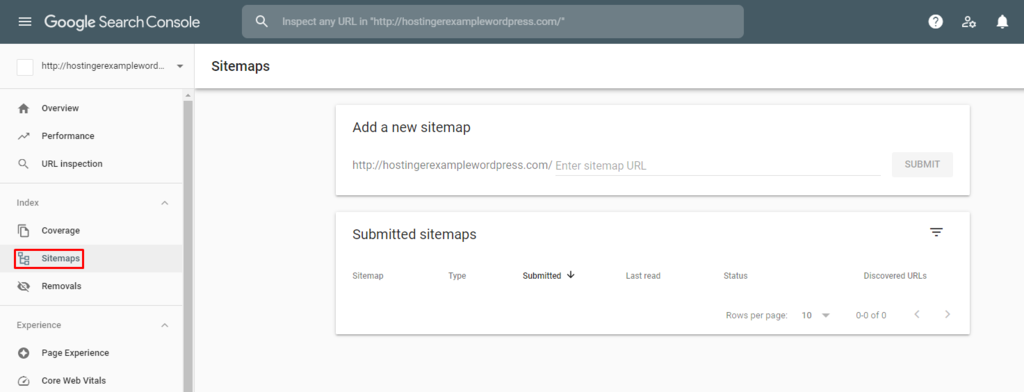
- From the Google Search Console home page, select Sitemaps on the left sidebar menu. Then, insert your sitemap URL under the Add a new sitemap section. Click on the SUBMIT button to finalize the process.
To check the status, head to Sitemaps -> Submitted sitemaps. After indexing a site, Google Search Console will give feedback on optimizing the site and improving its ranking. Google also provides documentation and resources to optimize your site.
Submitting an Individual Page to Google
After submitting your site, Google will crawl it for new content. Note that submitting individual URLs after a content update will make Google index it faster. To do so, use the URL Inspection tool on Google Search Console.
This tool will provide data about a specific page, including its AMP errors and indexing issues.
Submit your page by following these steps:
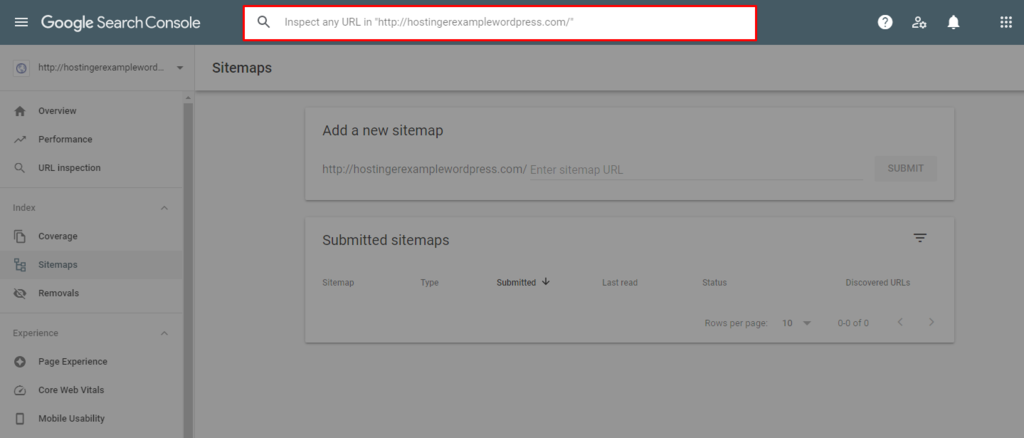
- After logging into your Google Search Console account, add the individual page’s URL in the Inspect any URL box on the header.
- Google will check if the URL has been indexed. No further steps are necessary if it shows the URL is on Google confirmation. However, if it shows the URL is not on Google warning, click on the REQUEST INDEXING button.
Keep note that Google only allows a maximum of 10 URL submissions per day.
Submitting a URL to Google My Business
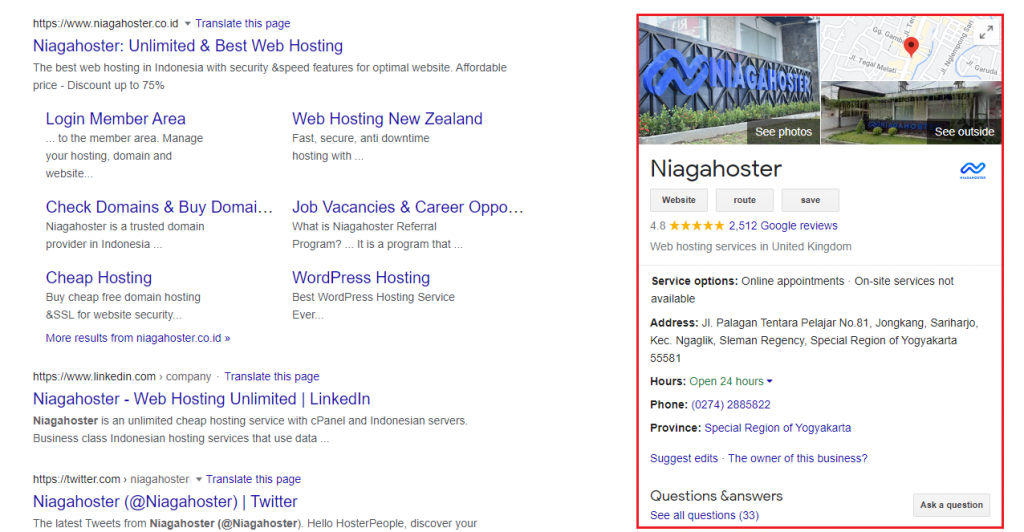
Submitting a business site to Google My Business (GMB) can drive more traffic as this free tool shows business details on top of the search results. Submitting a URL to this tool is crucial for traffic as around 56% of actions on GMB listings are website visits.
GMB boosts business’ online presence across Google, including the Search and Maps. When users Google a service near your company’s area, the search engine will suggest your company.
Some of the tool’s benefits include:
- Details – from descriptions to contact information, users will be able to find all the details of your business faster.
- Engagement – users can ask questions and give reviews on your profile, so your business can answer or respond directly.
- Reach – expand your presence by learning how customers search for your business.
Moreover, this tool is beginner-friendly, suitable for companies of any size. Follow the steps below to submit your company’s profile and URL to Google:
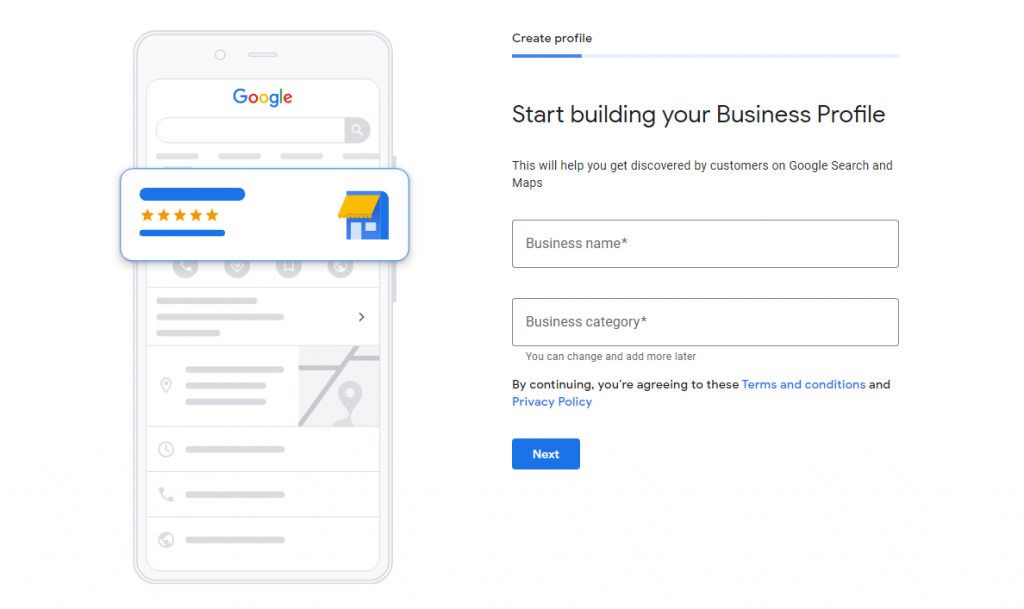
- Create your profile by inserting your business name and selecting the category.
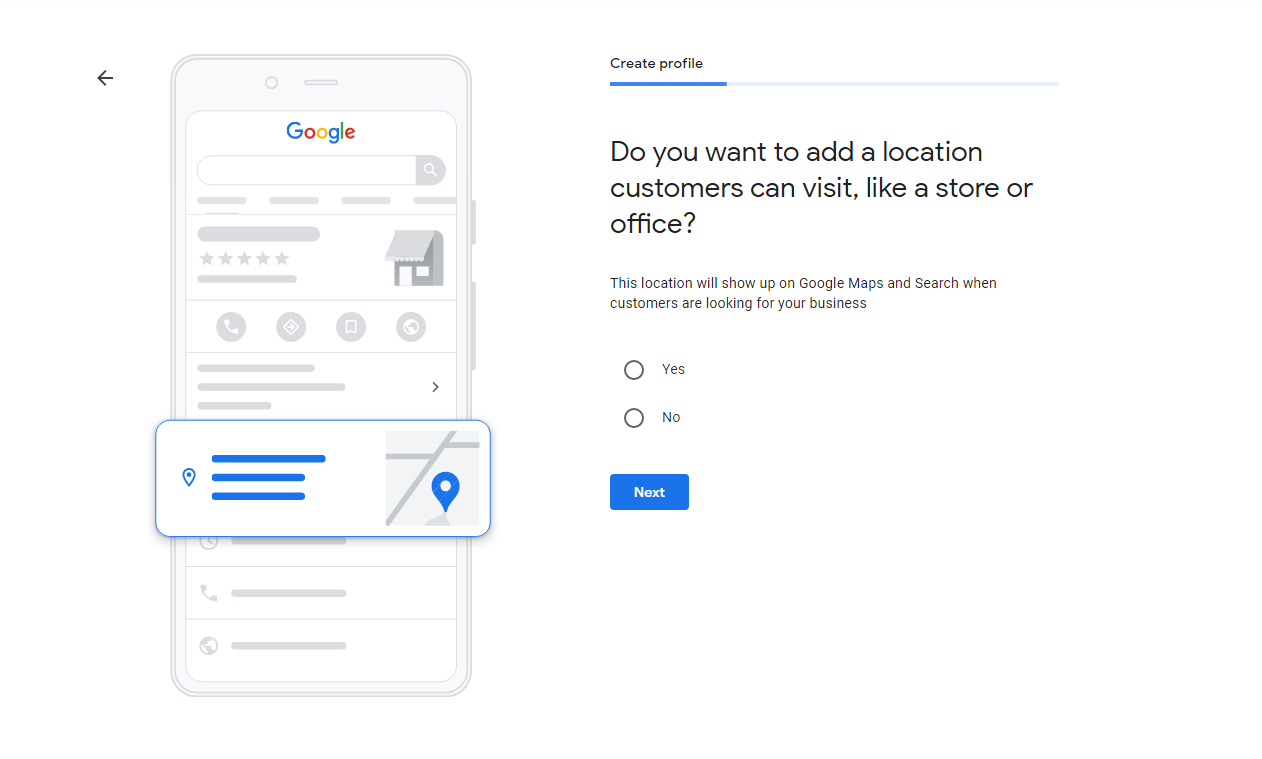
- Add your location and select the region.
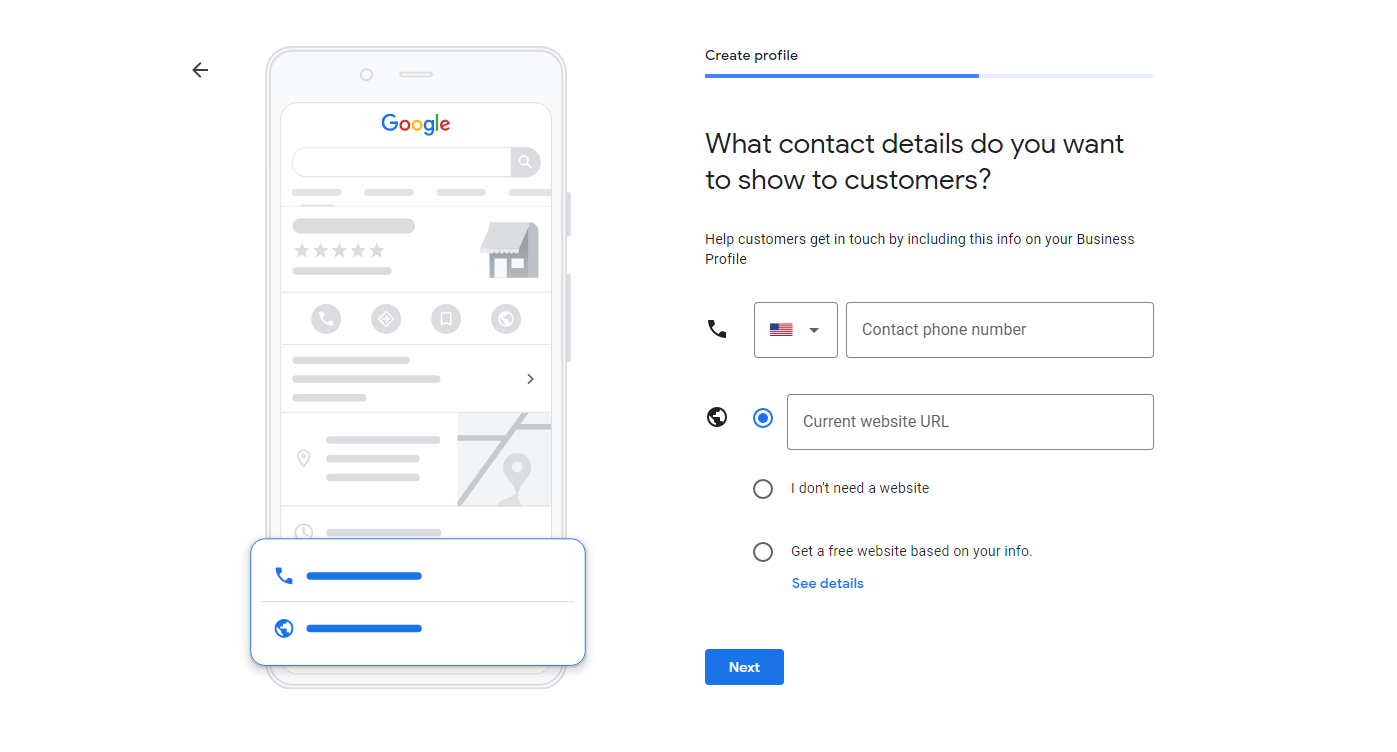
- Add contact details, including the phone number and website URL.
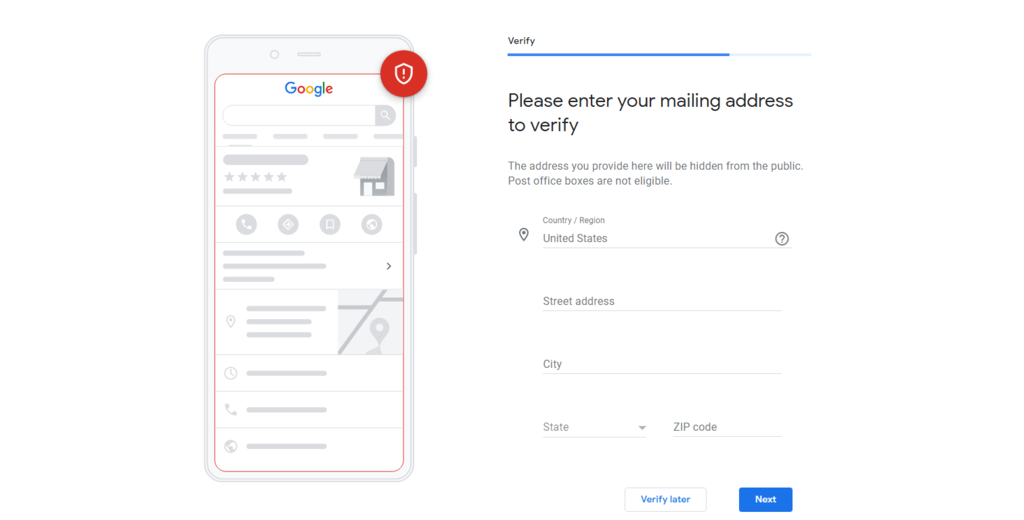
- Other steps are optional and can be changed later. After, there will be a verification process by adding your business mailing address.
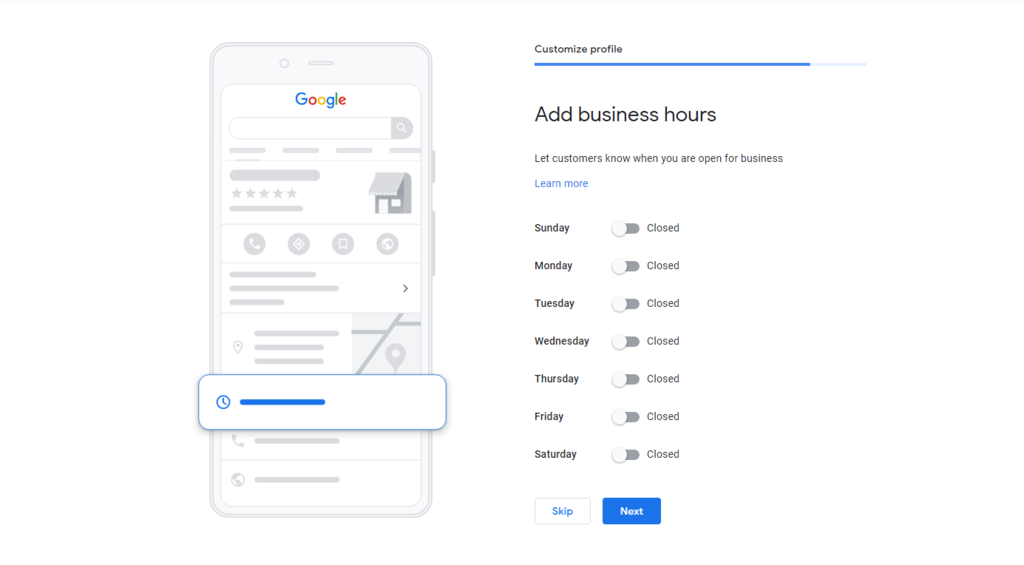
- In addition, there is an option to customize your profile to add all necessary business information:
- Business hours – specify the time when your business is open.
- Messaging – an optional messaging tool to communicate with customers directly.
- Business description – write a maximum 750 character description of your business.
- Business photos – add images of your business or product.
Internal Linking
A web crawler is software that goes from link to link to bring data from websites to Google’s servers. By adding internal linking regularly, Google will find, index, and rank your page faster.
There are two types of internal links: navigational and contextual. Both types help build a website hierarchy and establish authority, which helps guide the crawlers.
Navigational links, for example, the main menu bar and the footer menu on a website, help users navigate between the different pages in a domain.
Contextual links connect relevant content in an article to help readers find additional material about a topic. This type of link also builds relationships between individual pages on a site. For example, a link in a blog post connects users to another article that gives relevant information.
In addition, contextual links signal to Google that your website has a high-value article. To give signals to search engines, use anchor texts or phrases when adding a hyperlink to a text.
Submitting a Website to Bing
Bing is the second most popular search engine worldwide. In addition, both Yahoo and DuckDuckGo also use Bing’s search index to find new sites. To submit a website for immediate crawling and indexing, use Bing Webmaster Tools.
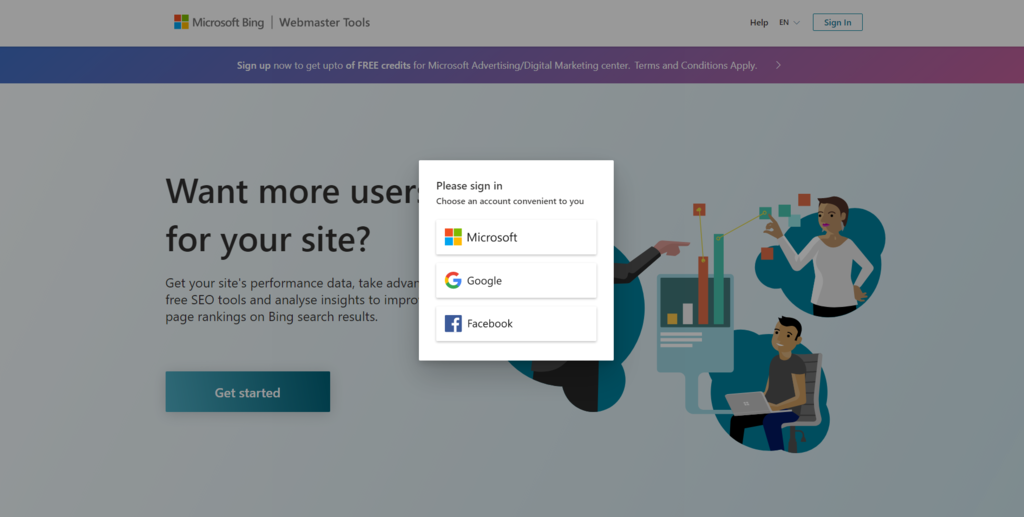
Submit your website to Bing by following these steps:
- Sign in to Bing Webmaster Tools by using Microsoft, Google, or Facebook accounts.
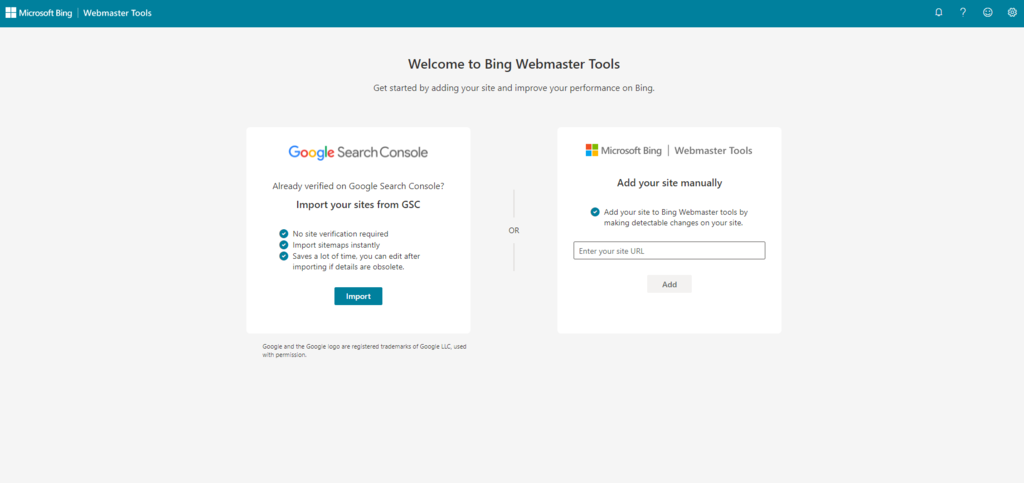
- Add your URL under the Add your site manually section. If you sign in using a Google account and have already verified your website on Google Search Console, click the Import button.
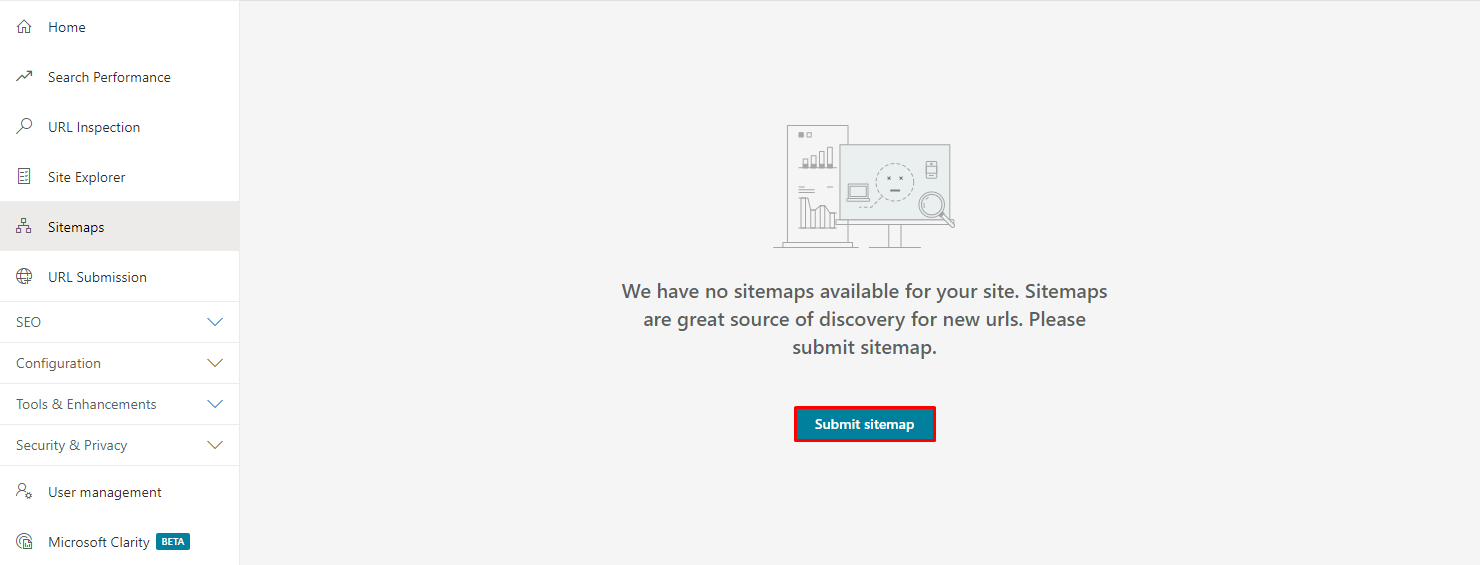
- After that, select Sitemaps -> Submit Sitemaps. There, add your sitemap URL to notify Bing Webmaster Tool to index your site.
Those are the steps to submit your website to Bing. However, there is a different way to submit an individual page:
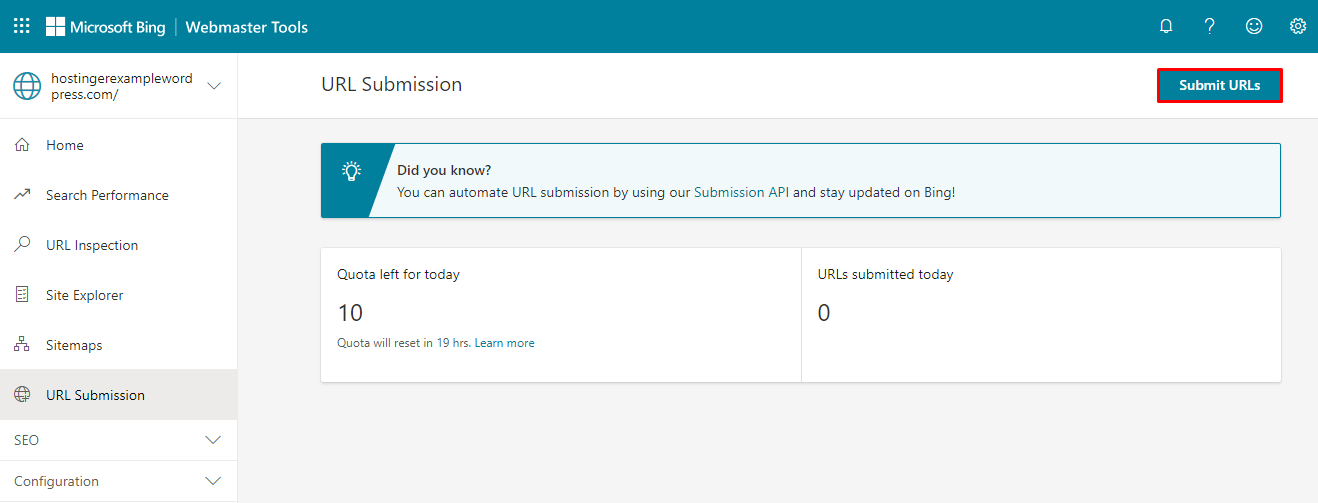
- Go to the URL Submission on the left sidebar menu and click on the Submit URLs button.
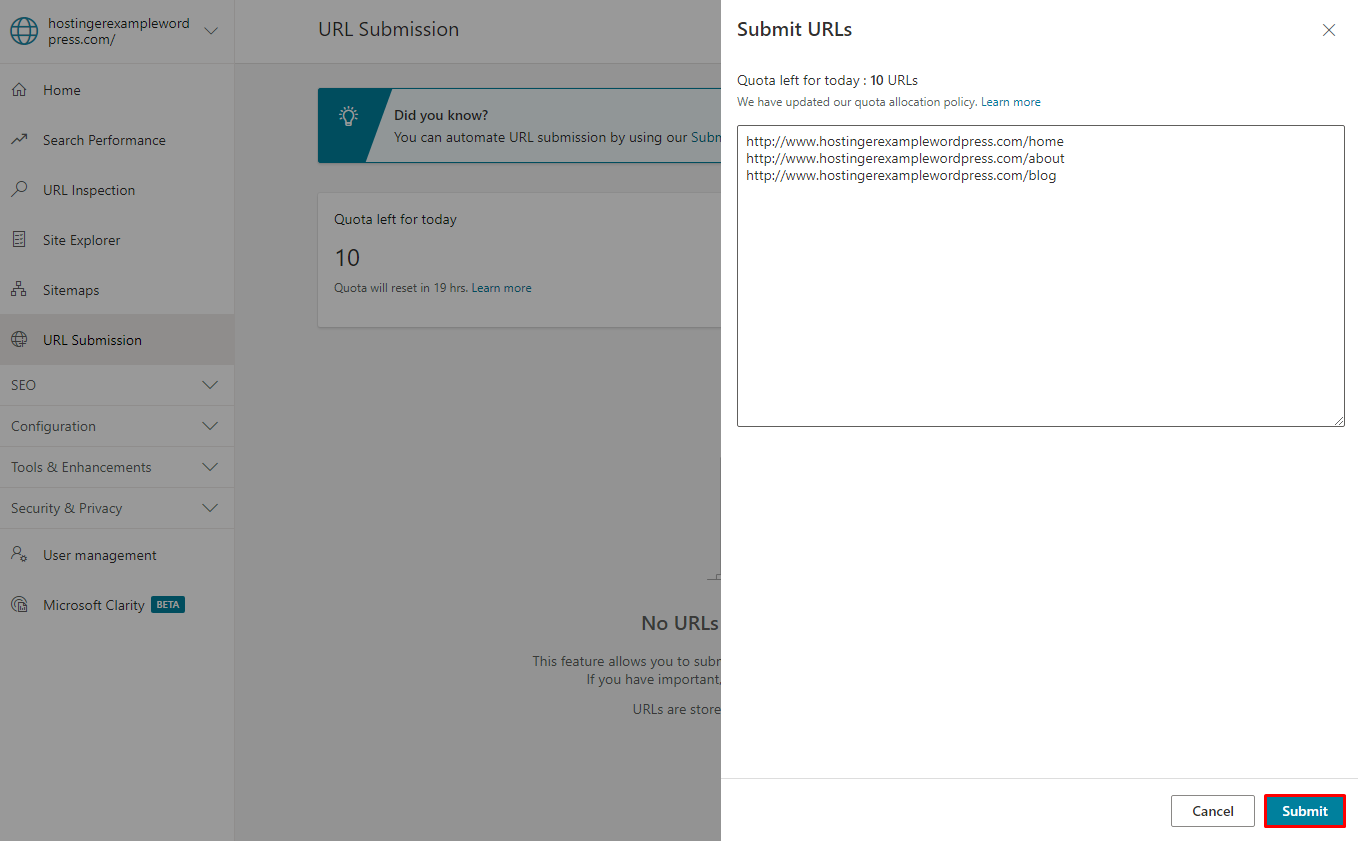
- You have 10 quotas for URL submissions to add multiple URLs at once. After you add the URLs, click the Submit button.
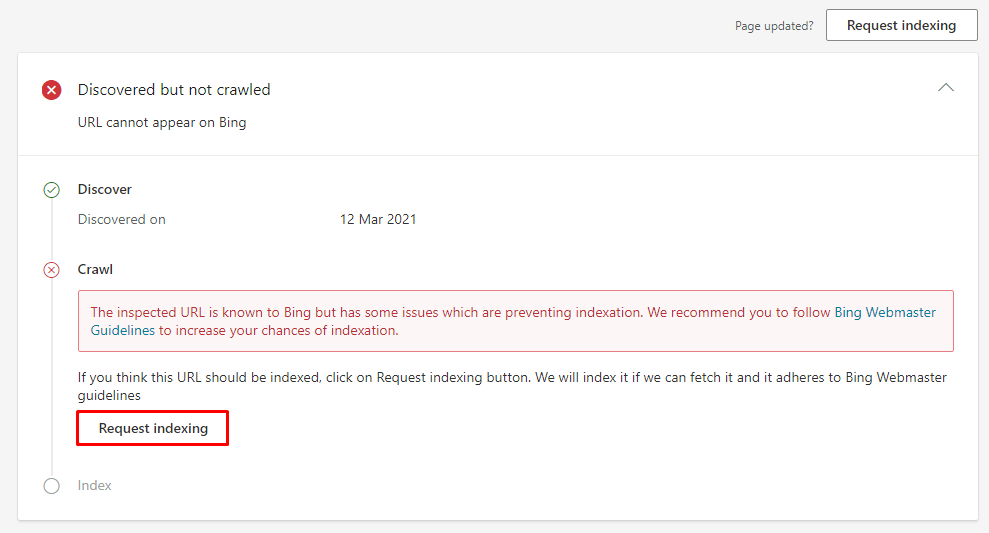
- Once you have submitted the URL, Bing will show further information about your URLs. If your website has not been crawled or indexed, click on the Request indexing button.
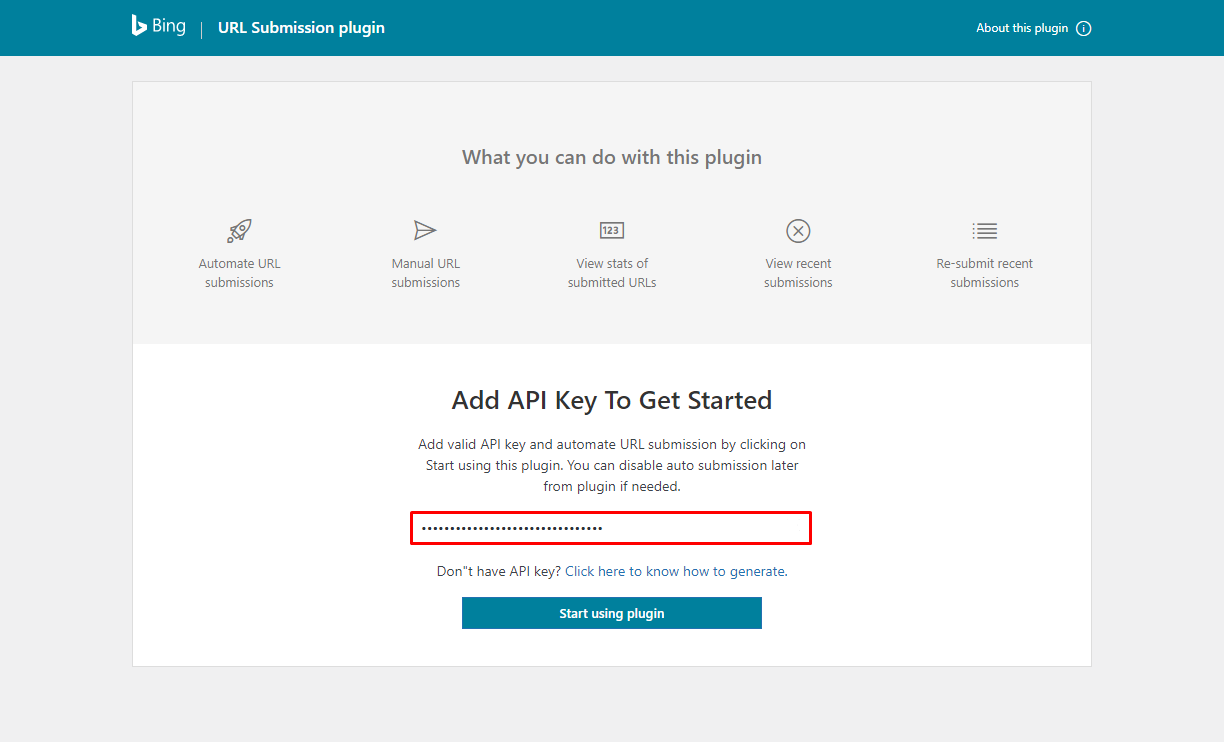
If you are using WordPress, there is also a Bing URL Submission plugin to submit URLs automatically. To use this plugin, you have to generate the API Key from Bing Webmaster Tools.
Follow these steps to use the plugin:
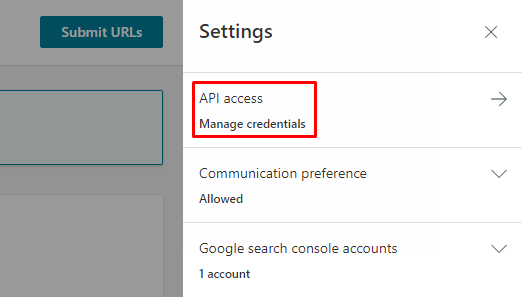
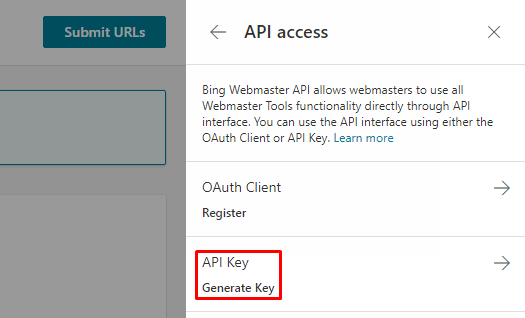
- Click on the Settings icon next to your profile on Bing Webmaster Tools. Under Settings, click on the API access to manage credentials.
- Click on API Key to Generate Key. After that, copy the API key and head back to WordPress.
- Go to Dashboard -> Bing Webmaster and paste the API Key there. Then, click the Start using plugin button. From there, you will be able to submit a URL manually or set up an automatic URL submission.
Bing Webmaster Tools also provides documentation and resources for optimizing your site.
Submitting a Website to Yandex
Yandex is the leading search engine in Russia, dominating 60% of the search market there. Therefore, if your target audience or market is mainly in Russia or knows Russian better than the English language, submitting your website to Yandex can be highly beneficial.
Yandex Webmaster also comes with many features that can help identify specific issues on your site. Here are the steps to submit your website to Yandex:
- Go to Yandex Webmaster Tools and log in or create an account.
- Click on the plus sign button to add your website.
- Add your URL and click the Add button.
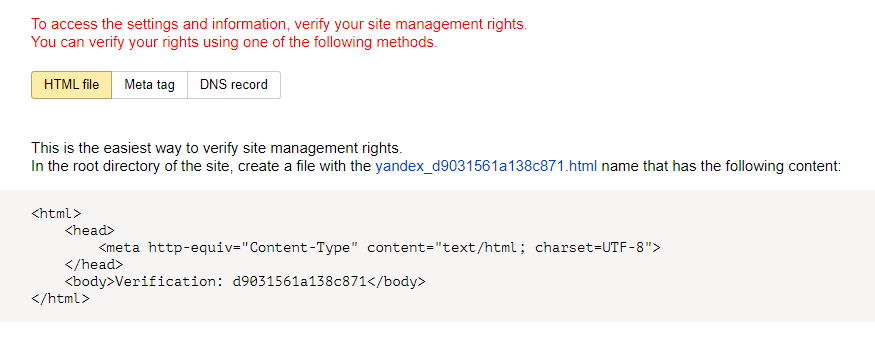
- Verify your site and click the Check button once you are finished. Follow the guidelines below to verify your site:
- Meta tag. Add a meta tag to the HTML code of your site. You will need access to your website’s core files via FTP.
- Root directory. Add an HTML file provided by Yandex into your site’s root directory. This option requires access to your site’s File Manager.
- DNS. Add a TXT record to the DNS of your domain.
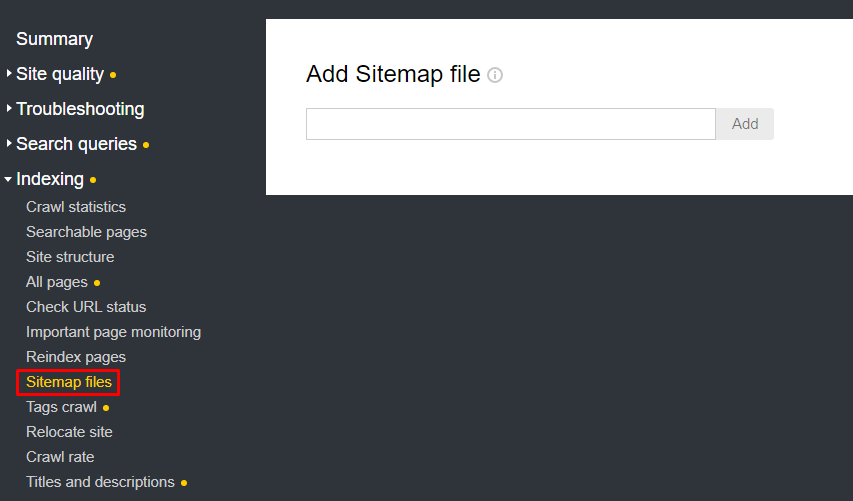
- Once your site is verified, head to Indexing -> Sitemap files. There, insert your XML Sitemap under the Add Sitemap file section and click the Add button.
To submit individual URLs to Yandex, follow the steps below:
- Head to Indexing -> Check URL status to add a page’s URL from your domain.
- Insert your URL and click the Check button. The status of your URL will be shown under the Checked and Page and results section. There is also a Track button to follow the indexing status.
Yandex will send a notification through an email if there are issues with your site that you need to fix.
Checking If a Site Is Successfully Indexed
Once you have submitted your site, check if it is successfully indexed. But don’t forget that search engines might take from several days to several weeks to index your site.
The simplest way to find out is by checking each tool where you submitted your site. Each tool has its way of sharing the index status for your website. The tools will also show if any errors require your action.
For Google Search Console, head to the left sidebar, and click on Coverage. Under the Details section, you will see whether your URL has been indexed by Google.
If you submit your website using Bing Webmaster Tools, click Site Explorer on the left sidebar menu. You can then explore all the pages on your site that are indexed.
As for Yandex Webmaster Tools, head to Indexing -> Check URL status to see if the search engine has indexed your URL.
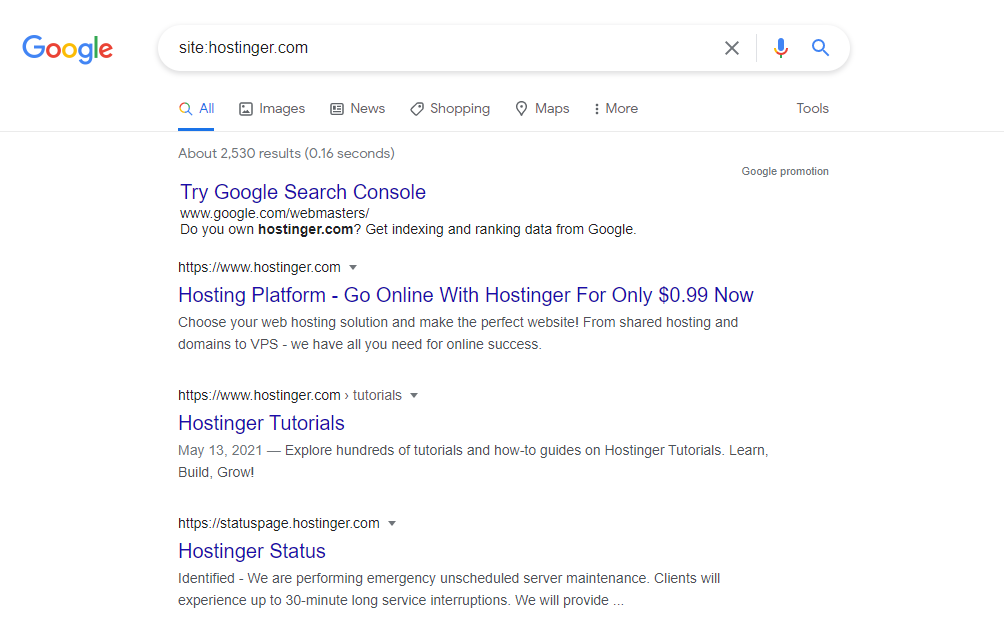
Another way to check is by going to the search engine and typing on the search query:
site:yoursitename.com
The search results page will show a list of your content with your homepage on top. If it doesn’t, then the search engine has not indexed your site.
Preventing a Site Getting Blocked With ‘NoIndex’
A website can block search engines from indexing its pages by using a NoIndex meta tag. If a web page has this tag on its HTML, search engines will not crawl and index the site, manually or automatically.
The NoIndex tag is on the <head> area of a page with the following format:
<meta name="robots" content="noindex, follow"/>
The NoIndex tag can help avoid crawling duplicate content or to test a page before going online. However, always remember to remove the tag before you submit your website.
To check whether your website contains NoIndex tags, use online tools such as SEO Site Checkup. If search engines cannot index your site, then remove the tag and resubmit your site.
We also recommend checking your .htaccess file to check if it contains a NoIndex or a NoFollow tag.
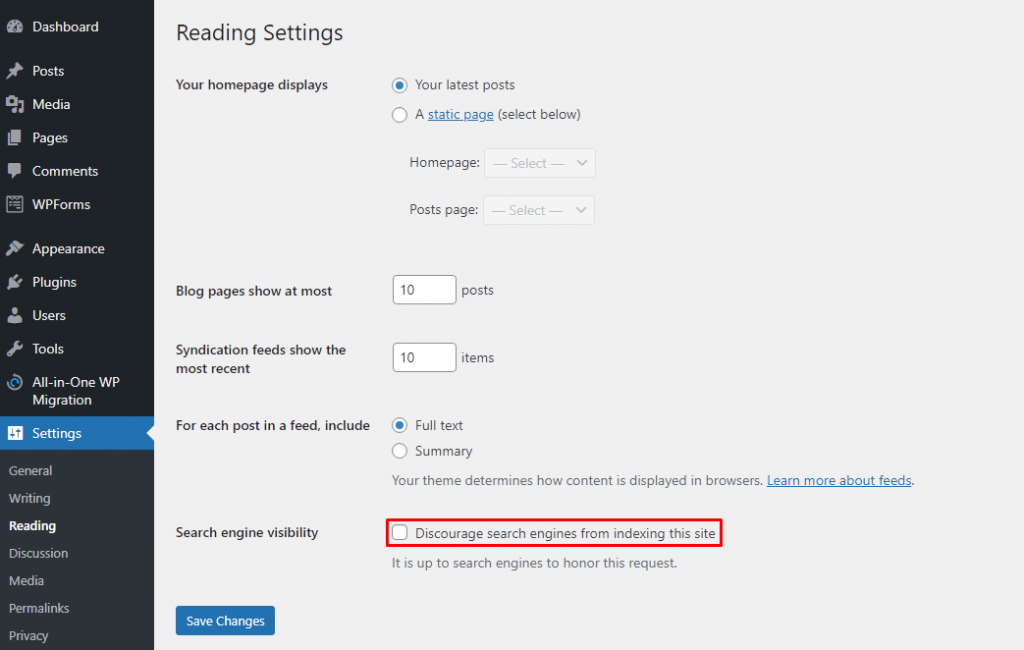
If you are using WordPress, head to Settings -> Reading and check the Search engine visibility. Make sure to uncheck the box next to it if you want your site to get indexed.
Other than the NoIndex tag, check other issues that can prevent search engines from indexing your site:
- Robot.txt file – use Google’s Robots Testing Tool to see if the file blocks search engines from crawling your site.
- Redirect pages – search engines can’t index redirect pages.
- Duplicate content – website pages shouldn’t have duplicate content as the search engines will only index one of them.
The Reasons to Submit Your Site to Search Engines
Search engines will still index and rank your site without submitting it. However, doing so will help search engines to discover your site faster. Here are some of the reasons for submitting your website to search engines:
- Free – submitting websites doesn’t cost anything.
- Organic traffic – increase search traffic as it is one of the most common ways for users to find news and information.
- Accuracy – include the most accurate and relevant data about your site.
- Visibility – increase the visibility and ranking of your business website in the search results of the major search engines. Raise awareness about products and services.
- Ranking – improve ranking by providing complete data of your site.
- Updates – search engines can index your new article or video faster once you have submitted a sitemap.
It is not mandatory to submit your website to search engines. However, it is highly beneficial to submit your site in the case of:
- A new website – by submitting your site directly after launching, search engines will be able to crawl and index your site sooner.
- Page updates – when you make substantial changes to your page, this will make sure the data search engines index is the most relevant.
- An incomplete index – check the search engine and find your website. If it is not there, submit it manually. There might be an error that you’ve overlooked beforehand, and by submitting your website, you will be more aware of the issues.
Increasing Visibility after Getting Indexed
Websites don’t automatically get higher traffic after search engines index them. A site also has to include high-quality and SEO-optimized content to increase visibility on SERPs. A higher ranking can improve traffic as the top 3 organic results get 75% of the search traffic.
Besides submitting your site to search engines, here are some guidelines for using some SEO services to optimize your site and increase its visibility:
- Social media – share your content to Facebook, Twitter, and Instagram to promote your website for free.
- Newsletter – send regular emails to your audience to drive clicks to your site and increase visibility.
- Keyword targeting – identify the keywords that will drive traffic and add them to your titles, URLs, and headings.
- Backlinks – besides internal linking, building backlinks can get search engines to index your site faster. Backlinks are the links added by other sites that direct users to your site.
- Meta description – optimize your meta titles, descriptions, and URLs as they are what search engines show on SERPs.
- Monitor competition – check the top competitors to see if your content is missing certain material that helps with rankings.
- Analytics – review monthly reports and data to see your top-performing post, audience demographic, and amount of engagement. By doing so, you will be able to create a better strategy for your site.
- Mobile-friendly – make sure your website is mobile-friendly as search engines take mobile responsiveness into account when determining rankings.
- Content updates – continue to update, make changes, and republish articles to keep them relevant and optimized.
- Visual content – add pictures, graphs, and videos to websites to attract more audience. Make sure to optimize the images to prevent your website from slowing down.

Conclusion
Submitting your website to search engines is one of the ways to increase website traffic. Search engines automatically crawl websites to index them. However, you can notice errors and optimize your website better when you submit your site to search engines manually.
This article shows you how to submit a website to search engines: Google, Bing, and Yandex, as well as both Yahoo and DuckDuckGo, which use Bing’s indexing data. We have also shared how to submit sitemaps and URLs for individual pages.
In case of an error with the website submission, we have shown how to check if you have succeeded in fixing the error.
Keep note that submitting your website to search engines is not enough to drive traffic, so this tutorial also included tips and tricks on optimizing the website content to rank higher on SERPs.
Now that you know how to submit your website to the major search engines, share your experience in the comments section below.
Learn more about website optimization
Core Web Vitals
Best SEO Forums
How to Perform a Website Speed Test
How to Find Long-Tail Keywords
