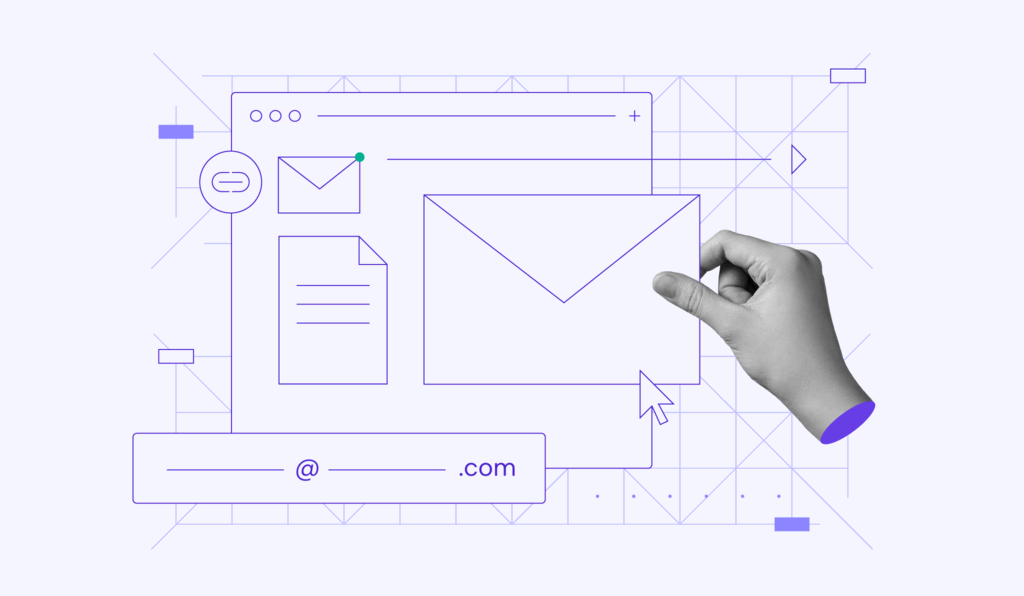
How to Migrate Emails from One Company to Another in 2024
Terminating your existing email services and transitioning to a new email provider can be daunting, requiring careful planning and execution. However, it is a worthwhile effort for businesses looking to scale their growth.
A domain-based email address goes beyond communication, helping businesses stand out from the competition by displaying professionalism, reinforcing brand identity, and building trust.
This email migration guide streamlines the process of switching accounts, ensuring you have a seamless transition to a new business email solution.
Download website launch checklist
Steps to Migrate Email Services
Let’s delve into the steps to transfer email accounts to a new provider. We’ll also share email service migration tips to help you get started.
1. Choose the Right Email Service
Before you transfer emails to another email provider, choosing the right service is crucial and depends on multiple factors. It’s not just about messaging but the entire ecosystem that supports and enhances your business communication.
Here are the essential criteria to consider when selecting a new provider:
- Reliability – the platform should guarantee uptime, ensuring you never miss a time-sensitive email.
- Security – with rising cyber threats, your new provider should have robust security measures, including end-to-end encryption and spam protection. This is also crucial for email data security during migration.
- Ease of use – the mail account interface should be user-friendly, facilitating smooth navigation even for non-tech-savvy users.
- Scalability – as your business expands, the email service should effortlessly adapt to your increasing storage space needs and offer additional features.
- Support – the platform should offer prompt and efficient customer service.
- Cost – when switching to a new email address, find a business email provider that ensures maximum value for money.
Considering these factors, Hostinger is a great choice for email hosting. We offer advanced anti-spam and anti-virus measures, robust data encryption, assured server uptime, and an intuitive user interface.
Coupled with 24/7 support, our email service is both dependable and user-friendly, making it an ideal choice for businesses.

2. Prepare for Email Migration
Proper preparation is the key to successful email migration. Ensuring that you have a backup and detailed documentation of your email settings before beginning the transition minimizes potential issues.
Here are some steps to prepare when transferring to a new provider:
Back Up Your Current Emails
Before migrating, it’s crucial to secure a backup of your emails. This ensures that no critical information is lost during the transition.
Different email providers have varying account backup processes.
For Apple Mail, open the Apple email app and select a Mailbox to back up from the top or left menu. Next, click Mailbox → Export Mailbox and select a destination to save the backup.
Gmail offers a dedicated backup tool called Google Takeout to back up all elements of your Google account.
For a Gmail account backup, open the application and select the Mail service. Then, click Next to choose a file type and delivery method. Finally, click Create export and wait for Google to prepare your Gmail account backup.
Microsoft Outlook offers an easy built-in backup process. Simply open Outlook settings and go to File → Open & Export → Import/Export, select Export to a file, and follow the prompts.
Document Email Settings
If you’ve configured specific settings in your email, it’s crucial to document these to recreate them in your new email service.
For Apple Mail, go to Preferences → Accounts and document the details under Account Information and Server Settings.
For Gmail, click on the gear icon in the top-right corner and go to See all settings. Document the details under General, Labels, Filters, and Blocked Addresses.
For Microsoft Outlook, go to File → Account Information → Account Settings → Server Settings and document the configuration details listed.
Notify Contacts
Before starting the migration, send out a notification to your essential email contacts. Let them know about the email transition period to ensure uninterrupted communication.
By laying this groundwork, you are prepared for a smooth migration process, reducing the chances of errors or data loss.
3. Create Email Accounts
In this section, we’ll go through email services available at Hostinger – Hostinger Email (free with hosting) and Titan Email (purchased separately from hosting plans). Both services come with their own parameters and management interfaces.
For consistency, we suggest creating the same number of accounts as you had with your previous email provider.
Important! Before setting up your domain-based email addresses, ensure your domain is pointed to the new provider’s DNS.
Here’s how you can create a new email address for the two types of email services:
Hostinger Email
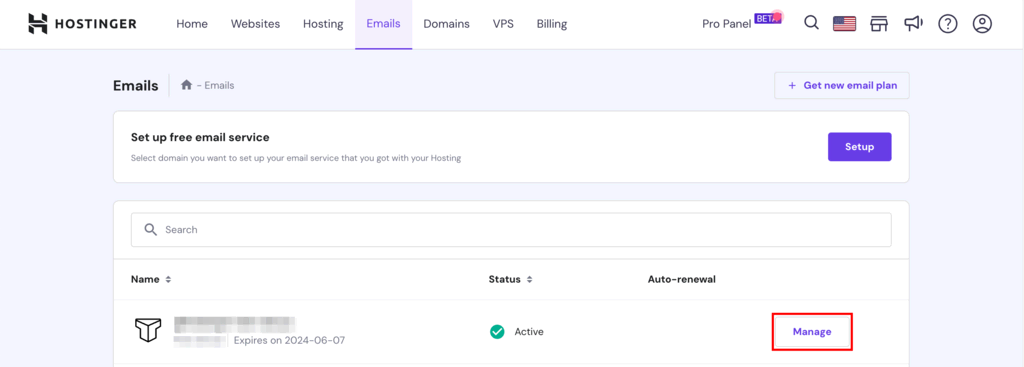
- Open the Emails section on hPanel and click Manage next to the relevant domain or subdomain to access the Email Accounts page.
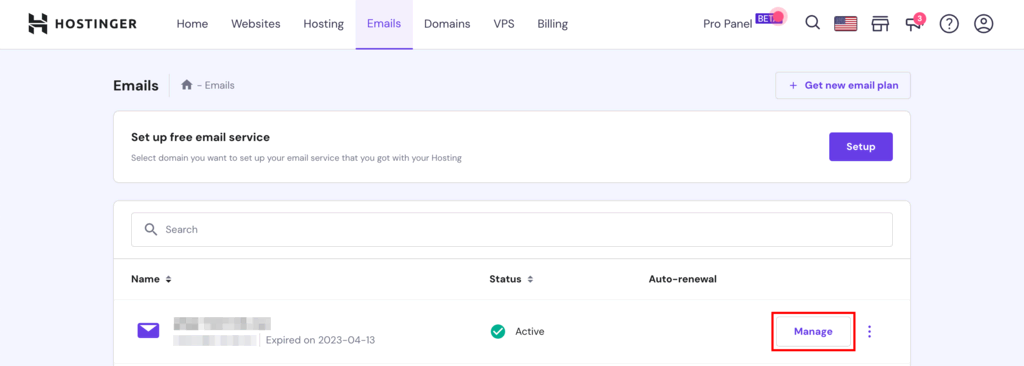
Important! For Hostinger Email, your domain will have a blue envelope symbol next to it.
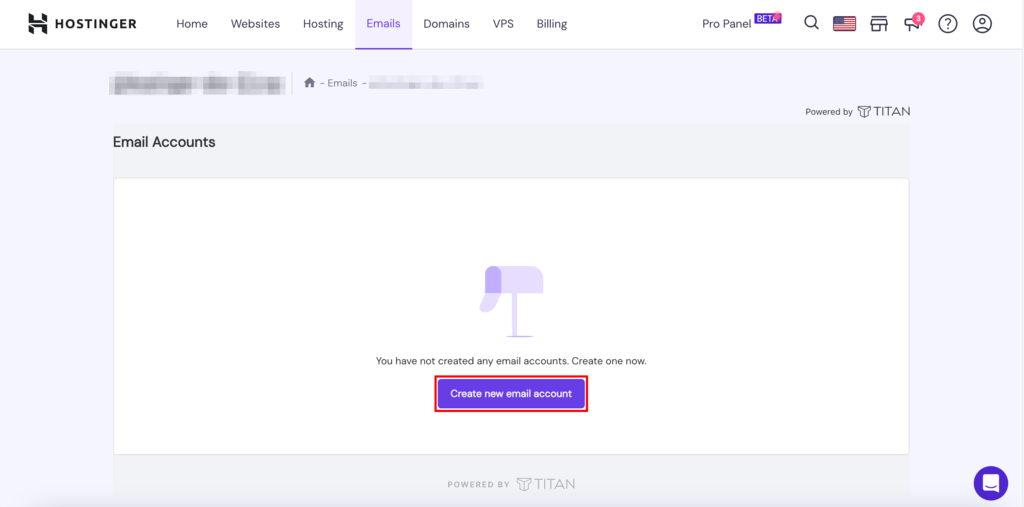
- On the Email Accounts page, click on Create email account to open the email setup window.
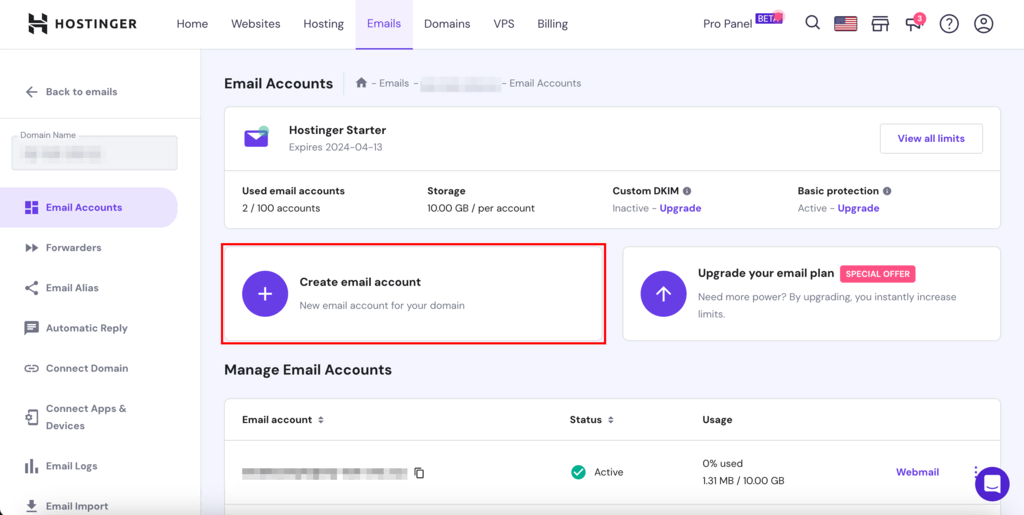
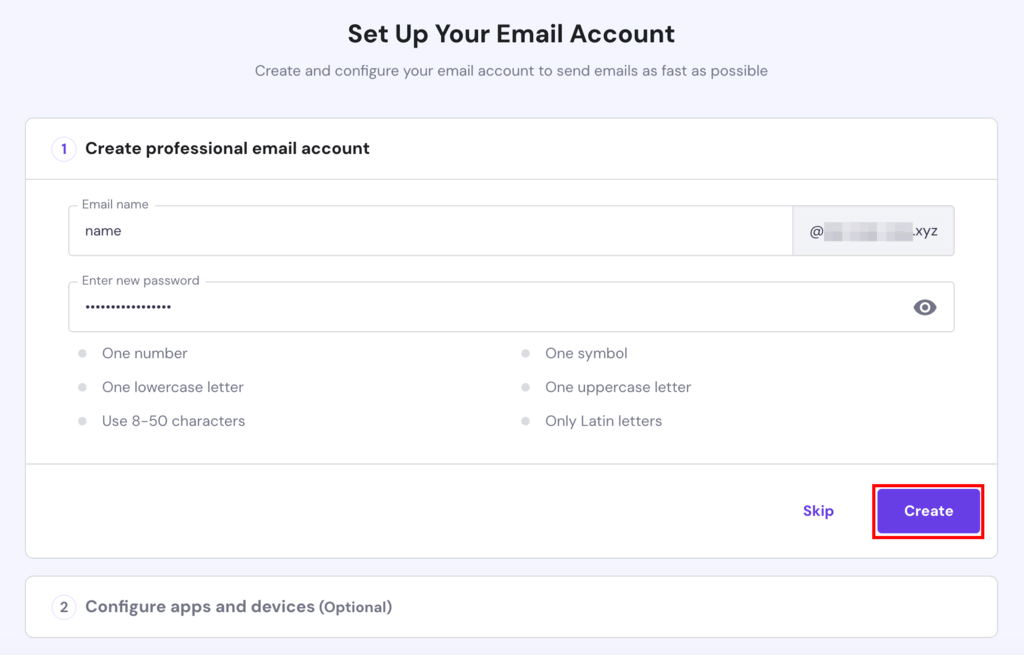
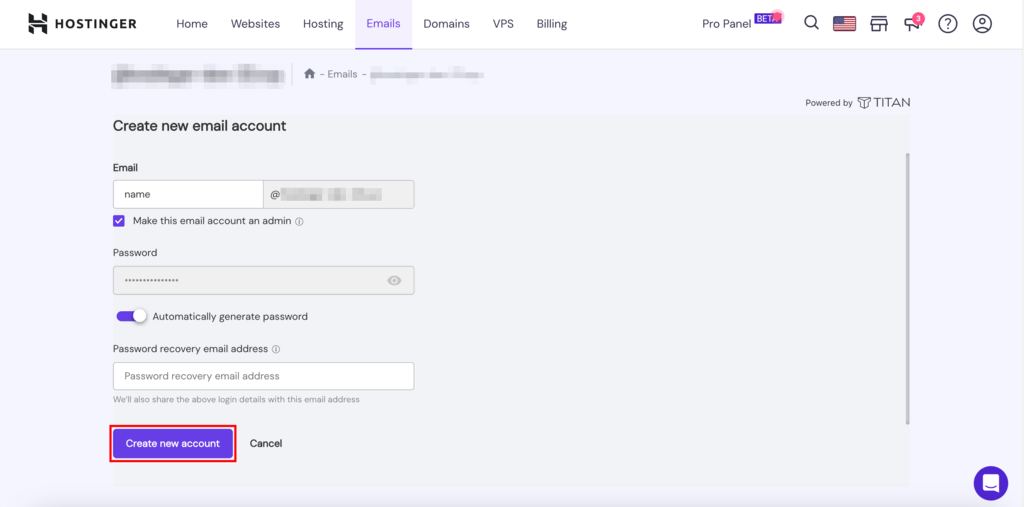
- Enter the email address, create a secure password, and click Create.
Titan Email
Before we begin, let’s look at the two plans available with Titan.
Business Email is designed to look professional and build trust for your brand. For $1.59/month/inbox, it includes 10 GB of email storage, a built-in calendar and contacts feature, web and native mobile apps, and auto-replies.
The Enterprise Email plan, priced at $3.99/month/inbox, offers a substantial 50 GB of email storage and all the features of the Business Email plan – but with enhanced capabilities. It includes unlimited contact groups, read receipts, and email templates.
- Open the Emails section in your Hostinger dashboard and click Manage next to the domain or subdomain.
Important! For Titan Email, your domain will have a Titan logo next to it.
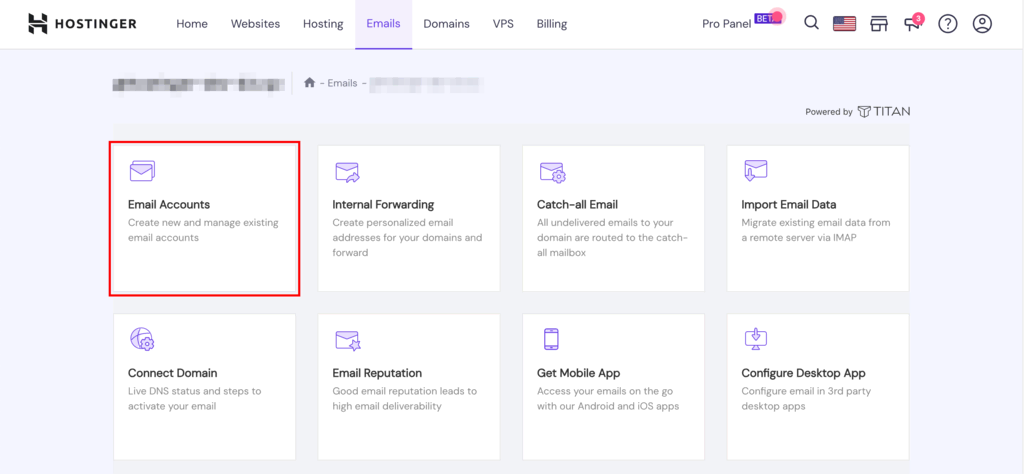
- In the new window, select Email Accounts.
- Next, click on Create new email account.
- Enter the email address, create a secure password, provide a recovery email, then hit Create new account. You also have the option to make the account an admin.
Once done, simply log in to use your professional email account.
Suggested Reading
For an in-depth guide on creating a professional email, check out our article on how to create an email account.
4. Recreate Previous Email Configurations
When you switch email accounts, a crucial step that is often overlooked is replicating your previous email configurations.
This ensures you can maintain your previous setup, facilitating a seamless migration and ensuring your emails operate as usual.
Here are some common solutions to keep in mind:
- Forwarders – if you previously used email forwarding, it’s a good idea to set that up again using your new provider. This tool helps you forward your emails to a different address, which is handy if you have several email addresses but prefer managing incoming mail in one inbox.
- Catch-alls – a catch-all email address is set up to receive all emails sent to invalid addresses on your domain. So, even if someone enters an email incorrectly, the message will land in the catch-all inbox.
- Autoresponders – recreate automated out-of-office replies or other autoresponder messages for your new Hostinger email account.
- Email filters and rules – set up specific filters or rules from your old account to organize your incoming mail, like directing particular emails to certain folders or auto-marking them as read.
5. Make Sure Your Email DNS Records Are Correct
You must ensure the correct DNS records are set for your email services to function correctly. DNS records link your custom domain with the email hosting, ensuring that all emails sent to and from your domain go through the proper email servers.
How to Add Hostinger’s Email DNS Records
- Navigate to the DNS management section on your Hostinger account by clicking Connect Domain.
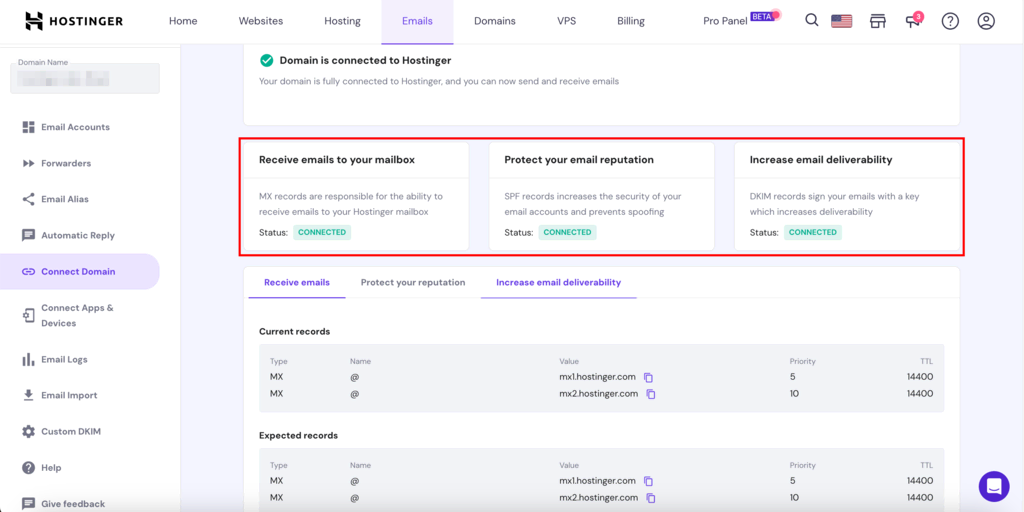
- Enter the required DNS records for Hostinger email services. You can find the values under the Expected records section of each tab. Once done, make sure to save the changes.
Usually, you’ll need to include these records:
- MX Records – Receive Emails
MX Records, or Mail Exchange Records, is a type of DNS record that determines which server is responsible for receiving email messages on behalf of a domain.
In simple terms, when someone sends you an email, the MX record points that email to the correct server for delivery.
Each MX record has a priority, determining the order of server usage and a Time to Live (TTL), specifying how long the record is cached.
- SPF – Protect your Reputation
Sender Policy Framework (SPF) must be entered as a TXT record type. This specifies which mail servers can send emails on behalf of a specific domain. The TXT record stands for “Text Record” and is used to store any text-based information within the DNS.
- DKIM – Improve Email Deliverability
To ensure your emails get to the right recipients and aren’t marked as spam, you must add DomainKeys Identified Mail (DKIM) using a CNAME record.
Important! Changes to DNS records can take anywhere from a few minutes to 48 hours to propagate worldwide. During this time, your email services may not function as expected.
6. Migrate Email Messages
Now, it’s time to transfer the content of your inboxes. Let’s go through the steps to execute this migration process for importing emails.
IMAP Email Migration
This method uses the IMAP protocol to sync messages between your old email service and your new account. Here’s how to do it:
Hostinger Email
- Access the Email Accounts page in your Hostinger account.
- Click on Email Import in the sidebar menu.
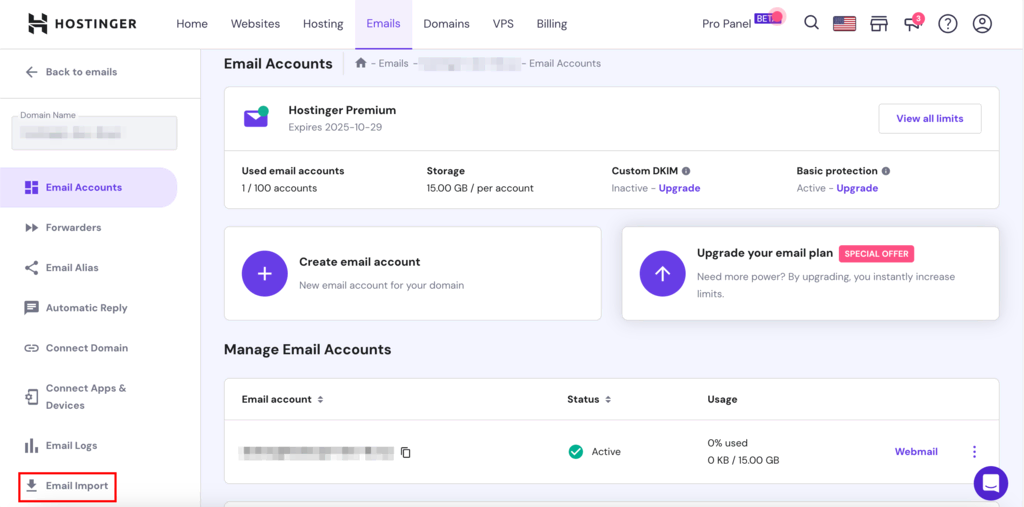
- In the next window, click on New email import request.
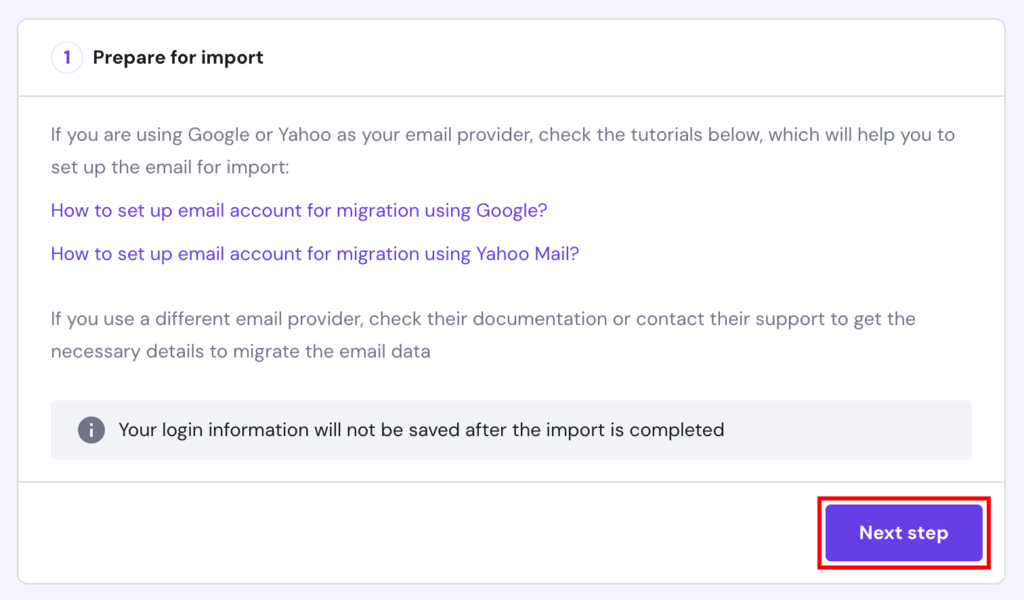
- Prepare for the import by reviewing the provided support articles.
- In the Import from window, enter the account and IMAP details of your old email service.
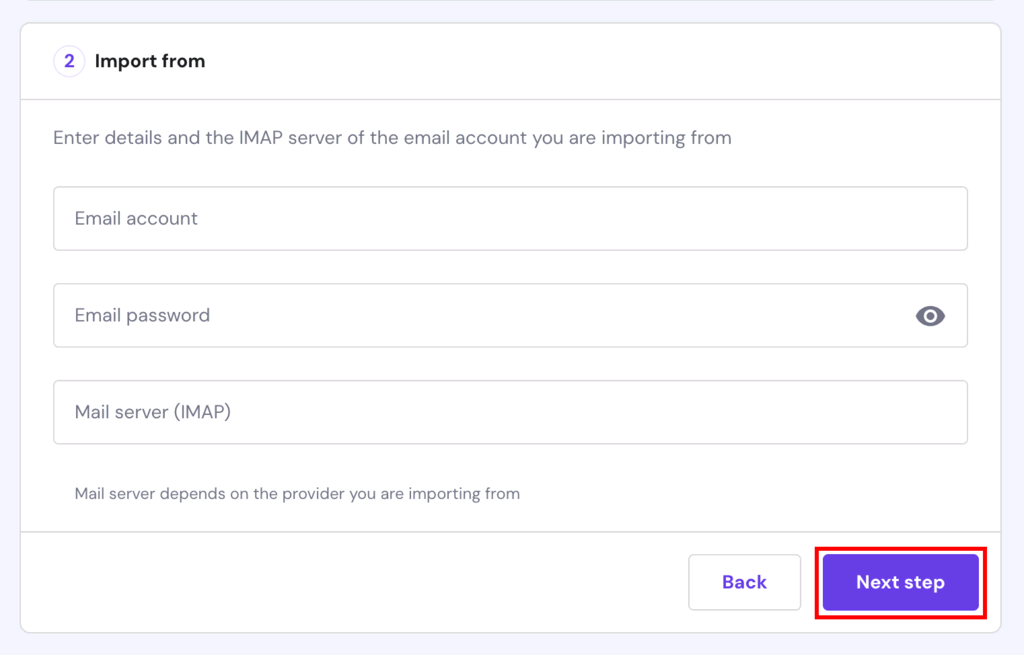
- Specify the import location and start the migration process.
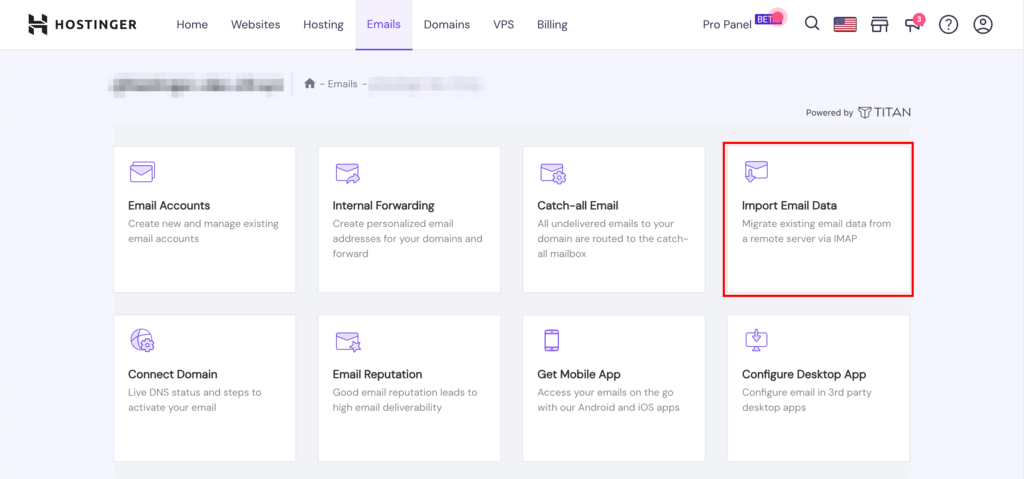
Titan Email
- Head to the Emails section on hPanel and click Manage next to the domain.
- In the next window, click on Import Email Data.
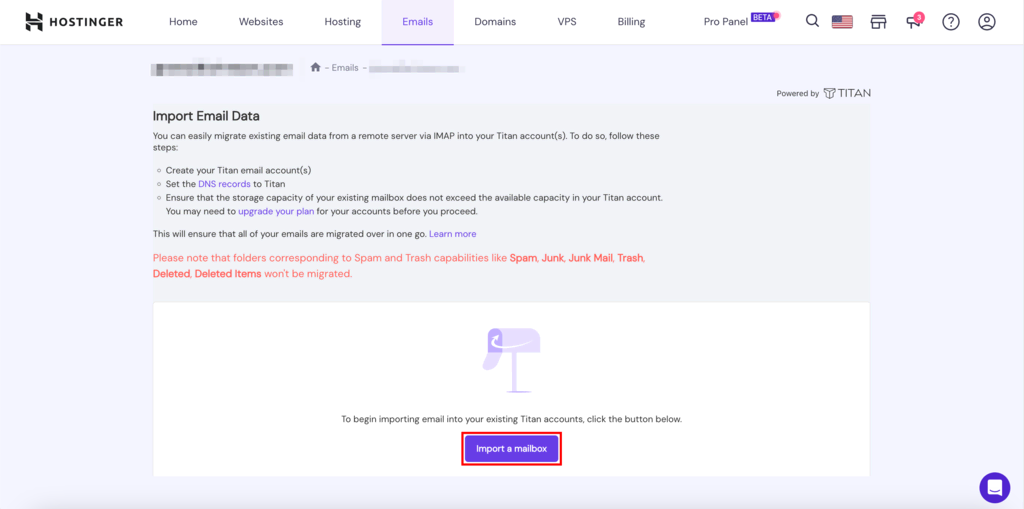
- Now, select Import a mailbox and follow the provided steps to transfer emails to your new Hostinger mail server.
Manual Email Data Backup and Restore
If you’d rather handle email imports yourself, follow these steps. In this example, we’ll be using Hostinger Email, but the steps should be similar to any other provider.
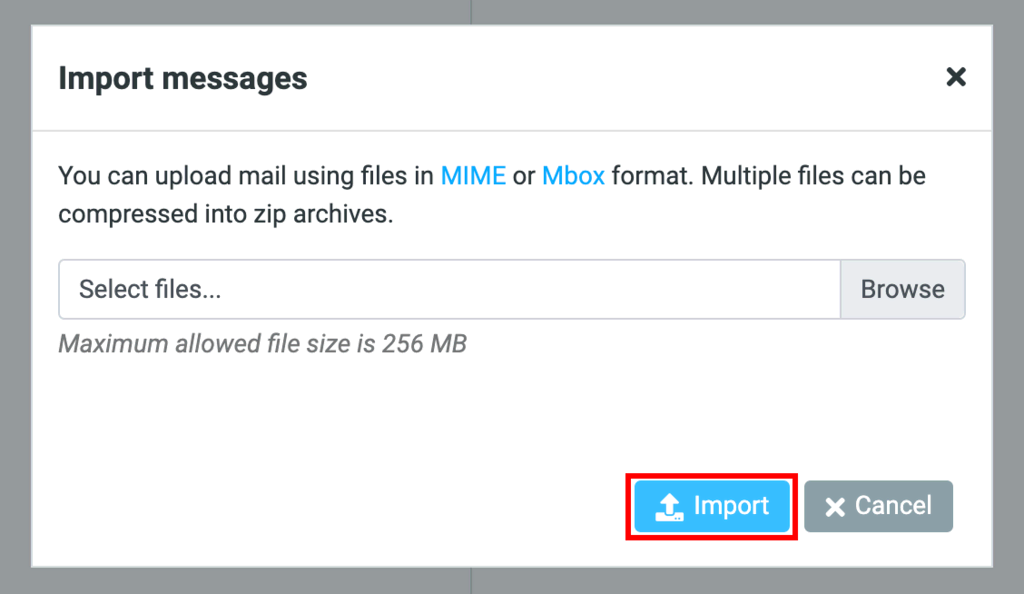
- Access your old email provider and export email messages in an MBOX or MIME format.
- Go to the Emails section on hPanel and click on Manage next to the domain name to open the Email Accounts page.
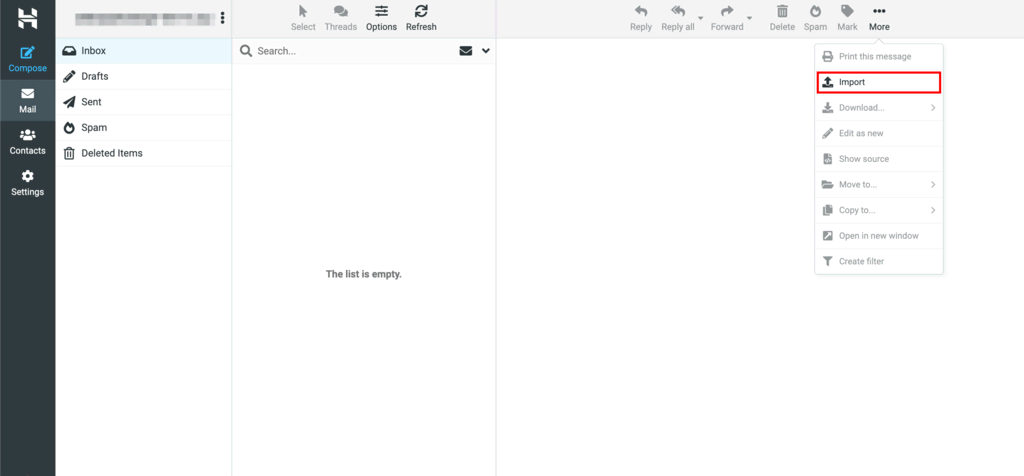
- Navigate to the Manage Email Accounts section and click on Webmail next to the listed account.

- This action will open your inbox. Here, click on More → Import.
- Select the MBOX or MIME file you exported from your old email account and click on Import.
Third-Party Email Migration Tools
There are several third-party tools like Mailvare Free PST Viewer or Aid4Mail that can assist in exporting email messages and migrating emails. Choose an email migration service supporting your previous provider and the new one, then follow the tool-specific instructions.
7. Import Contacts
A crucial aspect of migrating your email services is ensuring you don’t lose crucial contacts that you’ve collected over the years.
Before migrating, always create a backup of your contacts from your old email address. Most email providers offer an option to export your contacts, typically in a CSV or vCard format.
Here’s a guide on how to safely back up and import contacts:
Hostinger Email
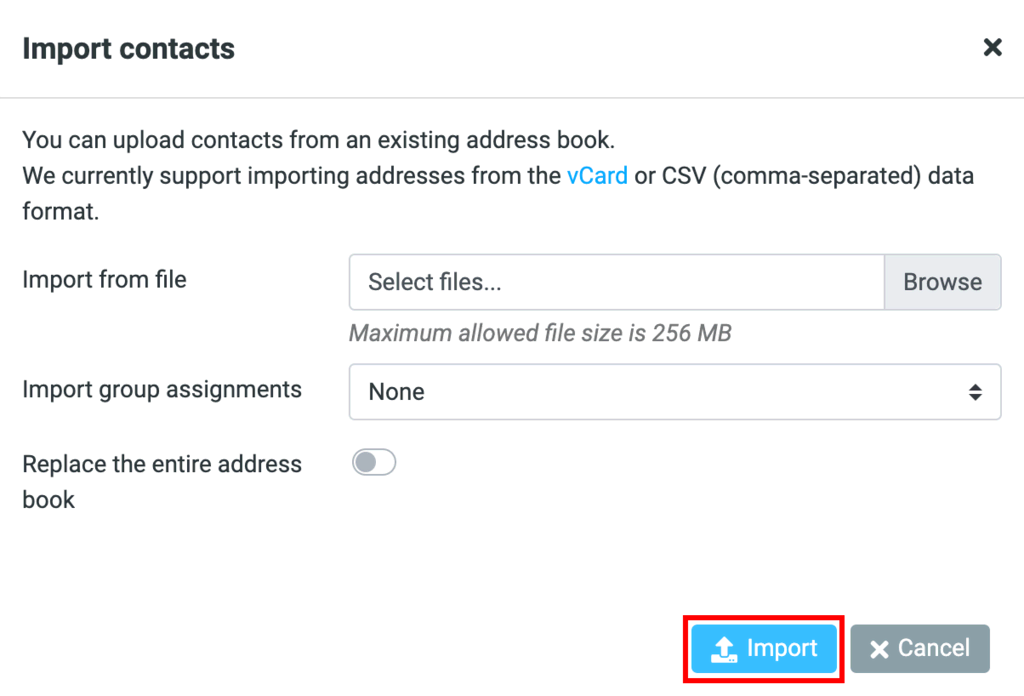
- Open Hostinger webmail and go to Contacts → Import.
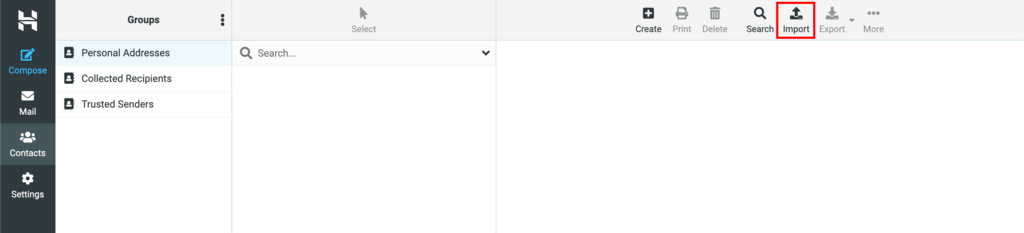
- Select the CSV file in the relevant field and click Import.
Titan Email
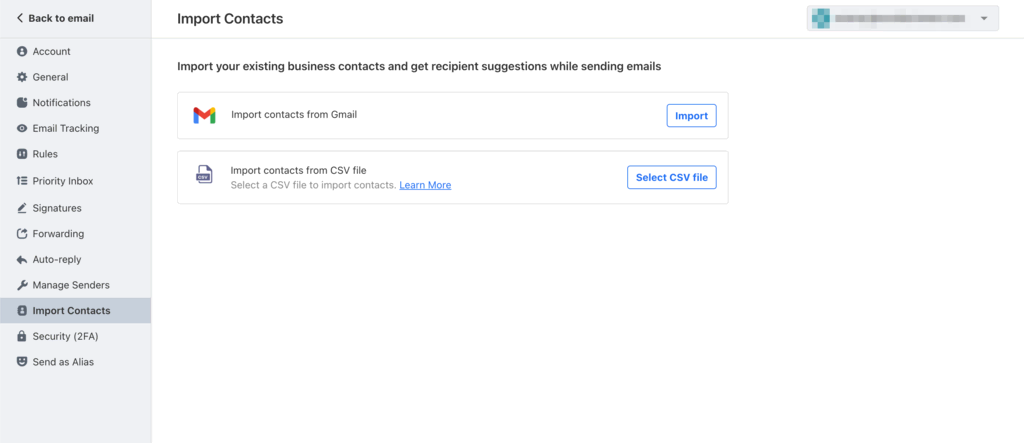
- Open Titan webmail and go to Settings → Preferences → Import Contacts.
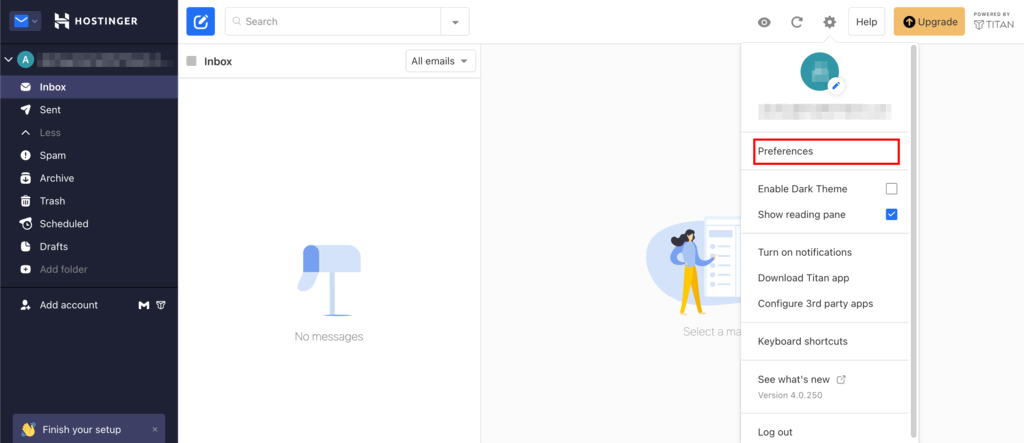
- In the Import Contacts window, you have the option to either import contacts from Gmail or from a CSV file.
8. Set Up Devices and Email Clients
Next, we’ll work on configuring your devices and email clients to work seamlessly with your new email services.
Email clients fetch email data from your hosting provider using specific parameters. When you switch to a new email provider, these parameters change. You need to update these settings to continue receiving and sending emails.
Steps to Reconfigure Your Email Clients
- Open the email client on your desktop, phone, or web application.
- Access the settings or account management section, usually found under Preferences or Settings.
- Replace the existing email server settings with your new host’s IMAP, POP3, and SMTP details. Here are the details for Hostinger Email:
| IMAP (Incoming) | POP3 (Incoming) | SMTP (Outgoing) |
| Host: imap.hostinger.com | Host: pop.hostinger.com | Host: smtp.hostinger.com |
| Encryption: SSL/TLS | Encryption: SSL/TLS | Encryption: SSL |
| Port number: 993 | Port number: 995 | Port number: 465 |
On the other hand, here are the details for Titan Email:
| IMAP (Incoming) | POP3 (Incoming) | SMTP (Outgoing) |
| Host: imap.titan.email | Host: pop.titan.email | Host: smtp.titan.email |
| Encryption: SSL/TLS | Encryption: SSL/TLS | Encryption: SSL |
| Port number: 993 | Port number: 995 | Port number: 465 |
- Ensure that your email client uses your full email address and password for authentication for both incoming and outgoing servers.
- Once you’ve updated these settings, save the changes and restart your email client.
- Test its functionality by sending and receiving an email.
Pro Tip
If you encounter SMTP encryption issues, you can use TLS or STARTTLS with port 587 instead. For a more in-depth explanation, check out our articles on which SMTP port you should use for email services and IMAP vs POP3 and SMTP protocols.
Note that these steps may vary based on your email client. Refer to the email platform’s official documentation or help section if you face any issues.
9. Conduct Post-Migration Checks
Running post-migration checks is a critical step to ensure the entire process was executed correctly and that all your email functionalities are working.
Here are some post-migration actions we recommend:
- Test email functionality – send test emails to and from your migrated account. Check for timely delivery and ensure that the attachments, formatting, and links are intact.
- Update email signatures – your email signature should include contact information, links, and branding. Update it with any new details, especially if you’re changing email addresses.
- Update email contacts – updating email contacts lets you revise any outdated information or add new details that might have been missed previously.
- Notify your contacts – inform your contacts about the change, especially if there may be disruptions or you no longer use the same email address. This helps avoid miscommunication or confusion.
- Review folders and labels – if you used folder structures or labels before, ensure they’ve been replicated accurately in your new environment.
- Check filters and rules – verify if your automated rules or filters, such as directing specific emails to folders, still function as intended.
Suggested Reading
Why Migrate Email to Hostinger?
Choosing Hostinger for email services ensures that businesses have access to comprehensive tools and features. Our servers are also built for optimizing email communication and ensuring it remains secure and efficient.
Some of the standout features of Hostinger’s email services include:
- Read receipts – get notified when a recipient opens an email to track email engagement.
- Custom email templates – save common responses as templates to streamline email communication.
- Follow-up reminders – set reminders to ensure timely responses to important emails.
- Email and contact import – transfer existing emails and contacts to Hostinger with minimal effort.
- Security protocols – benefit from our security measures to protect emails from potential threats such as spam, malware, ransomware, and phishing.
- Encryption – Hostinger encrypts all email data in transit and at rest, ensuring protection against unauthorized access.
- Custom DKIM – use DKIM to authenticate sent emails, ensuring their legitimacy to recipients.
- Reliability – Hostinger Email and Titan guarantee reliable email server uptime, data protection, and 24/7 support.
Conclusion
Migrating email services, especially for businesses, is a process that requires meticulous planning and execution. It also involves having a thorough understanding of both the origin and destination platforms.
This guide works as an email migration checklist that simplifies the email transition process. Let’s quickly recap the steps involved:
- Choose the right email service by understanding your business needs.
- Prepare for the move by backing up emails, documenting settings, and notifying contacts from your old address.
- Create your new email account.
- Follow the email configuration steps to replicate the previous settings of your old email address for a seamless email transition.
- Update the DNS records to ensure your new email address functions properly.
- Import the messages and contacts to your new address for a seamless email data transfer.
- Configure your devices and email clients for consistent access across platforms.
- Perform checks to confirm that the post-migration email setup works.
Following these email migration best practices ensures a smooth, efficient, and effective transfer to your new email service provider.
If you have any questions about making an email service provider change, let us know in the comments below.
Email Account Migration FAQ
Here are answers to some of the most frequently asked questions about moving email services.
How Do I Back Up My Emails Before Migration?
Most modern email clients, including Gmail, Outlook, and Apple Mail, offer built-in export functionalities to create backups of your emails. Alternatively, you can also use third-party tools for handling email attachments, archiving messages, settings, and other configurations.
Do I Need Technical Knowledge to Migrate My Emails?
Having some technical knowledge can make the migration process smoother, but it’s not essential. This step-by-step guide is designed to help all types of users migrate their email by making the process as hassle-free as possible.
What Common Issues Might I Encounter During Email Migration?
Challenges like synchronization issues, data loss, settings misalignment, or missing emails may arise, resulting in the need for troubleshooting email migration. However, following a guide and proper planning can make the process seamless for most users.
How Can I Test the New Email Setup to Ensure It’s Working Correctly?
Send and receive emails from your new setup, check attachments to ensure they open, ensure your email signatures are updated, and confirm that email sequences and folder structures remain unchanged. Regular testing for a few days post-migration is advisable.

Akshay is a Senior Content Writer who loves writing about technology. As a Computer Engineering graduate and a certified digital marketer, he aims to make tech easier for everyone. He also enjoys cooking, traveling, and learning new languages. Follow him on LinkedIn.