How to Successfully Locate and Edit Hosts File on a Mac Using Terminal

Users can emulate domain name system (DNS) changes by editing the hosts file. This includes overwriting DNS values set by the internet service provider (ISP) and setting custom IPs for a domain name.
By editing the Mac hosts file, you can easily preview your website on the local network. This helps if your domain is not yet registered, not pointed to a hosting account, or is still propagating.
This tutorial will teach you how to edit the Mac hosts file and flush the DNS cache.

What Is the Hosts File on a Mac, and Why Is It Important
A system’s hosts file maps hostnames to IP addresses. Users can override default DNS information for a given domain and specify their IP addresses.
Mac users can find the hosts file in the /private/etc/hosts directory. You can edit it with any text editor as long as you have root user privileges.
Important! Hosts file changes will only apply to the local machine. If you want a website to be visible to everyone, you must register a domain and point it to a hosting plan.
How to Locate and Edit the Hosts File on macOS
Let’s start by finding and opening the hosts file.
1. Open the Hosts File
Follow these steps to access your hosts file on a Mac:
2. Open Terminal by searching it via the spotlight search (Command + Spacebar keys).

3. Open the hosts file with your preferred editor program. In this tutorial, we will use the Nano text editor. To open it, enter the following:
sudo nano /private/etc/hosts
4. Since we use sudo to edit the hosts file, you will be asked to enter the administrator password of your macOS user account. Type your admin password and hit the Enter key.
Important! For security reasons, the cursor doesn’t work in the command line. Use the arrow keys to navigate between the lines inside the hosts file.
5. Edit the Hosts File on a Mac
To emulate DNS settings and point a domain name to an IP address, use the following syntax:
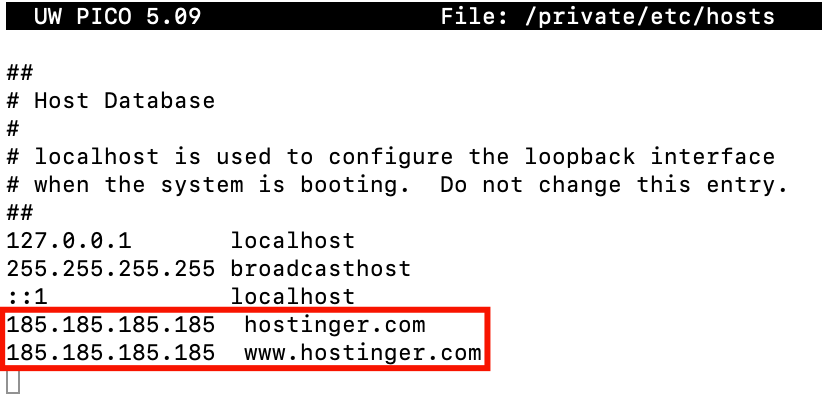
IP_Address domain.com

IP_Address www.domain.com
For example, to emulate the DNS change for hostinger.com and www.hostinger.com, you would have to include the following lines at the bottom of the hosts file.
185.185.185.185 hostinger.com

185.185.185.185 www.hostinger.com
This will emulate the IP address change of the hostinger.com domain and www.hostinger.com subdomain to 185.185.185.185.
Once you are done editing the hosts file, press Control + X on your keyboard. Enter Y to save the changes, and hit the Enter button.
Now, your Mac will resolve the hostinger.com domain using the given IP address instead of what is set at the DNS Zone.
Editing the hosts file can also help you see your new site content during the propagation period after connecting a domain to web hosting. Remember that after propagation is done, you should remove the new lines from the hosts file.
6. Flush DNS Cache
The hosts file changes may not apply instantly. You can flush the DNS cache to help speed up the process. To flush a Mac’s DNS cache, execute the following command:
macOS Monterey, Big Sur
sudo dscacheutil -flushcache; sudo killall -HUP mDNSResponder
macOS Catalina, Mojave, High Sierra, Sierra, Mountain Lion, Lion
sudo killall -HUP mDNSResponder

Conclusion
Editing the hosts file helps point your domain to a hosting plan without changing DNS records. This lets your personal computer resolve the domain to a preferred IP address.
In this tutorial, we’ve gone through editing the hosts file on a Mac and flushing the DNS cache to speed up the process.
We hope that you found this tutorial helpful. If you have any questions, let us know in the comments section below.

Domantas leads the content and SEO teams forward with fresh ideas and out of the box approaches. Armed with extensive SEO and marketing knowledge, he aims to spread the word of Hostinger to every corner of the world. During his free time, Domantas likes to hone his web development skills and travel to exotic places.

Ignas takes great satisfaction in helping people tackle even the most complex technical issues. His current goal is to write easy-to-follow articles so that these issues will not happen at all. During his free time, Ignas likes to play video games and fix up things around his house.
