How to Install Cassandra on Ubuntu and Learn The Basic Commands
Whenever users hear about database management systems, they likely immediately think about MySQL relational databases. However, such databases can fall short when presented with massive amounts of incoming structured data. That’s where NoSQL databases come in.
Cassandra is one of the most popular non-relational databases out there. Such companies use it as Instagram, Uber, Facebook, and Netflix.
In this Cassandra tutorial, we will provide you with a step-by-step guide on how to install the latest version of Apache Cassandra on Ubuntu. We will also explain how the Cassandra database management system works, compare it to other NoSQL databases, and provide some common commands you can use.
A Brief Overview of Installing and Setting up Cassandra on Ubuntu:
| Required Knowledge | Basic Ubuntu server management, familiarity with NoSQL databases |
| Privileges Required | Root or sudo user privileges |
| Difficulty | Intermediate to Advanced |
| Main Goal | Installation and basic configuration of Apache Cassandra |

What Is Apache Cassandra
Apache Cassandra is an open-source database management system that runs on Not Only SQL model and uses a partitioned wide column storage data model. It mainly focuses on speed, scalability, and performance.
Cassandra’s data model allows it to retrieve information very quickly. Additionally, it can perform thousands of write operations in seconds.
How Cassandra Database Works
Cassandra aims to enable users to work with high amounts of structured data while preventing any failure that might occur. Cassandra works with a peer-to-peer architecture data model, which means that each instance or node is connected to more nodes making up clusters. Such massively scalable architecture makes it easy to add additional nodes to suit anyone’s needs.
Cassandra allows communication between nodes and performs fault detection to reveal any damaged nodes in a cluster to prevent the risk of failure. If outdated data is detected in one of the nodes, Cassandra replicates data from healthy nodes and repairs the damaged ones.
Here’s the complete architecture of how Cassandra works:
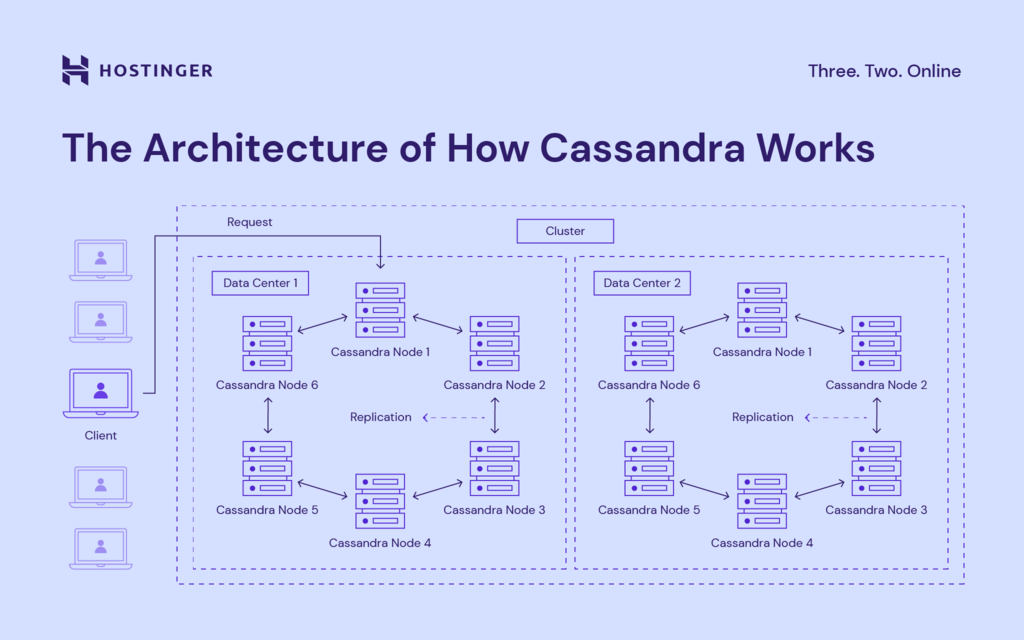
- Cassandra Node – it’s where all the data is stored.
- Replication – representation of how the replication model works in Cassandra.
- Data Center – group of related nodes.
- Cassandra Cluster – a group of one or more data centers.
- Request – client read-write operation request to Cassandra database.
- Client – user computer or another type of device.
How to Install Cassandra on Ubuntu
Users can easily install Cassandra with the help of the APT packages manager. Keep in mind that in order to install the latest version of Cassandra you will still need to include its package repository first.
1. Download and Install Java
First, access your VPS via SSH and determine if you have Java installed.
java -version
You might get the following output:

This means Java is not yet installed. If that’s the case, follow the steps below. Otherwise, proceed to the next step.
- Refresh the APT command to synchronize all repositories:
sudo apt-get update
- Install the newest Java JDK version:
sudo apt install default-jdk -y
3. Validate the installation with the same java -version command we’ve used before. Now, the output should look like this:

Sugested Reading
Check out our guide to learn how to install Java on Ubuntu.
2. Add the GPG Key
To avoid issues with the repository, add the GPG key and increase the security of the repository. First, install wget if it’s not present on the system:
sudo apt install wget
Then, add the primary key with the following command:
wget -q -O - https://www.apache.org/dist/cassandra/KEYS | sudo apt-key add -
3. Add the Cassandra Repository File
Add the Cassandra repository to the system’s repository file. To do that, type the following command in the command line:
echo "deb http://www.apache.org/dist/cassandra/debian 40x main" | sudo tee -a /etc/apt/sources.list.d/cassandra.sources.list deb http://www.apache.org/dist/cassandra/debian 40x main
4. Install Cassandra on Ubuntu
Refresh the repositories and then proceed to install Cassandra on Ubuntu:
sudo apt-get update
sudo apt install cassandra -y
5. Enable and Start Cassandra
At the end of the installation, enable the Cassandra service to start automatically when the system boots. In addition, start it manually for the first time with the following commands:
sudo systemctl enable cassandra
sudo systemctl start cassandra
6. Verify the Installation
To check if the installation has been successful, check the status of the service. To do this, run the following command:
sudo systemctl status cassandra
If successful and the Cassandra service is up and running, the output should look similar to the example below:

7. How to Configure Cassandra on Ubuntu
Cassandra’s default configuration applies when Cassandra is used on a single node. However, if Cassandra is used in a cluster or by multiple Cassandra nodes simultaneously, it’s handy to make some modifications to the configuration file.
The Cassandra configuration file is called cassandra.yaml and is located at /etc/cassandra/. Open it with your preferred text editor and modify some of its settings:
sudo nano /etc/cassandra/cassandra.yaml
Firstly, change the name of the cluster. Look for the cluster_name parameter and assign a name:
cluster_name: [cluster_name]

It’s preferrable to change the data storage port. To do this, look for the storage_port parameter and assign one.
Remember that it must be an available port in the Ubuntu firewall for everything to work correctly. In our case, the port is set as 7000.
storage_port :[port]

Finally, look for the seed_provider parameter and add the IP addresses of the nodes that make up the cluster, separated by a comma:
Seeds: [node_ip]:[node_port],[node_ip]:[node_port]...[node_ip]:[node_port]
Once done, save the file and reload Cassandra.
sudo systemctl reload cassandra
Now test out the connection with the following command:
nodetool status

Great, the cluster is up and running!
Suggested Reading
If you want to use an alternative database management system, check out our tutorial on how to install PostgreSQL on Ubuntu.
Learn Basic Cassandra Query Language (CQL) Commands
The following section will showcase Cassandra’s most popular basic CQL commands and provide some practical examples.
cqlsh
cqlsh, or Cassandra query language shell, is used to communicate with Cassandra and initiate Cassandra Query Language. To start cqlsh, use the following command:
root@myawesomevps:/# cqlsh
Connected to Test Cluster at 127.0.0.1:9042
[cqlsh 6.0.0 | Cassandra 4.0.5 | CQL spec 3.4.5 | Native protocol v5]
Use HELP for help.
cqlsh>
HELP
The HELP command lists out descriptions for all possible cqlsh commands:

For example, the output for HELP SHOW would look like this:
cqlsh> HELP SHOW

        SHOW [cqlsh only]

Displays information about the current cqlsh session. Can be called in the following ways:

        SHOW VERSION

Shows the version and build of the connected Cassandra instance, as well as the version of the CQL spec that the connected Cassandra instance understands.

        SHOW HOST

Shows where cqlsh is currently connected.

        SHOW SESSION <sessionid>

Pretty-prints the requested tracing session.

cqlsh>
SHOW
The SHOW command displays all the information about the current cqlsh session. You can choose between showing host, version, and session information:
cqlsh> SHOW VERSION
[cqlsh 6.0.0 | Cassandra 4.0.5 | CQL spec 3.4.5 | Native protocol v5]

cqlsh> SHOW HOST
Connected to Test Cluster at 127.0.0.1:9042
cqlsh>
CREATE KEYSPACE
A keyspace specifies data replication. In the following example, we will create a new keyspace and specify the replication factor:
cqlsh> CREATE KEYSPACE testingout
  WITH REPLICATION = {
   'class' : 'SimpleStrategy',
   'replication_factor' : 1
  };
USE
The USE command sets the current working keyspace:
cqlsh> USE testingout;
cqlsh:testingout>
CREATE TABLE
In order to create a table, users need to use the CREATE TABLE command. Here they will need to specify column names, data types, and primary key:
cqlsh:testingout> CREATE TABLE tabletest (
                     name TEXT PRIMARY KEY,
                     surname TEXT,
                     phone INT
                   );
INSERT
INSERT command is used to add an entire row into a table. Mind that missing values will be set to null:
cqlsh:testingout> INSERT INTO tabletest (name, surname, phone)
VALUES ('John', 'Johnson', 456123789);
cqlsh:testingout>

Comparing Cassandra NoSQL Database to Relational Databases
The following table will list the differences between relational databases such as MySQL and Cassandra:
| Relational databases | Cassandra | |
| Query language | Relational databases use complex and powerful SQL language | Cassandra, and NoSQL databases use elementary query language |
| Community | SQL databases communities are huge | Cassandra and NoSQL communities are still growing |
| Scalability | A relational database is scaled vertically by increasing hardware | Cassandra is scaled horizontally by adding additional servers |
| Data storage | Data structures is stored in tables with fixed rows and columns | Structured data is stored in documents |
| Best use cases | Relational databases are usually meant for general public usage | Cassandra is used in projects that need to handle big data workloads |
| Schema | A relational database schema is fixed | Cassandra schema is flexible |
Cassandra suits big enterprises the most, as it’s specifically designed to handle big data workloads. The fact that it’s scaled horizontally also makes it truly versatile. Here’s a more comprehensive look at the main technical features of Cassandra:
- Scalability – business owners or users can add more resources as the demand increases without much hassle.
- Data storage – Cassandra stores all types of data structures.
- Efficiency – this NoSQL database system was designed to run quickly while using minimal resources.
- Data transfer – Cassandra supports easy replication, which makes it effortless to transfer data between data centers.
- No single point of failure – Cassandra doesn’t have a single point of failure (SPOF). It makes it invulnerable to any malfunction.
Conclusion
Choosing a suitable database management system can seem challenging, especially if you have high demands for it. A great solution is Apache Cassandra as it’s one of the best NoSQL database management systems used by thousands of international companies.
In this tutorial, we have covered the Apache Cassandra installation process for Ubuntu. We’ve also gone through the architecture of Cassandra, compared it to a relational database management system, and provided seven popular Cassandra Query Language commands.
We hope that you found this tutorial helpful. If you have any questions, leave them in the comments section down below.

Ignas takes great satisfaction in helping people tackle even the most complex technical issues. His current goal is to write easy-to-follow articles so that these issues will not happen at all. During his free time, Ignas likes to play video games and fix up things around his house.