How to Make a TeamSpeak Server: For Linux, Windows, macOS + Pointing Domain to the Server

TeamSpeak 3 is a voice-over-internet protocol application that lets users communicate and collaborate using voice in real-time. It’s a reliable and lightweight tool with unique features, such as AES-256 encryption, minimal latency, and high audio quality.
People use the TeamSpeak VoIP application for various purposes. Usually, it’s used as a gaming-oriented communication app, where users are able to use voice chat while playing games to communicate and coordinate with their friends.
In this tutorial, we will show you how to make a TeamSpeak server on the most popular systems, Linux, Windows, or macOS.

How to Make a TeamSpeak 3 Server on Linux
To begin, let’s set up a TeamSpeak server on Linux VPS running Ubuntu 22.04 operating system.

Start the process by accessing your VPS via SSH. This procedure can be broken down into six simple steps:
- Create a new user in the system.
- Using the wget command, download and extract the TeamSpeak server.
- Accept the TeamSpeak 3 license agreement.
- Instruct the TeamSpeak server to start when the system boots up.
- Get the privilege key.
- Connect via the TeamSpeak client.
Before continuing, check if your system is up-to-date by entering the following command into the terminal:
sudo apt-get update && apt-get upgrade
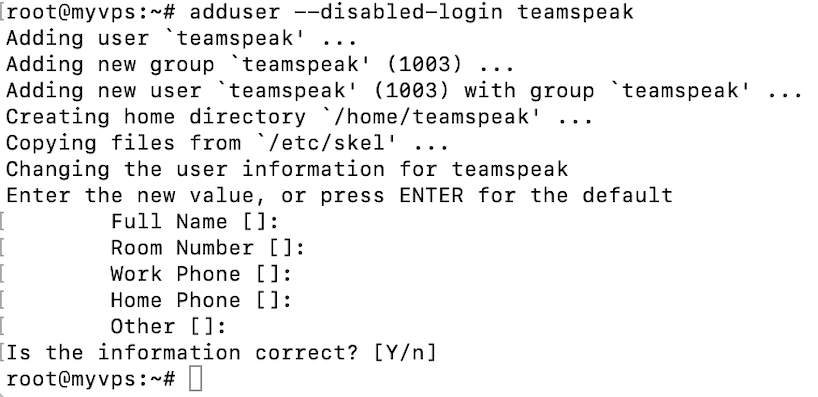
1. Create a New System User
First of all, add a new user by executing the following command:
adduser --disabled-login teamspeak
You will be requested to enter personal user details and confirm the information is correct. Keep in mind that all fields can be left blank.
Switch to the newly created user:
sudo su teamspeak
Pro Tip
If you end up in the root directory after running the sudo su teamspeak command, use cd .. before running the command again.
Lastly, navigate to the home directory:
cd /home/teamspeak
2. Download and Extract TeamSpeak 3 Server
Next, use the download link to get the latest TeamSpeak server software. Choose the 64-bit version. We recommend using the wget command to download TeamSpeak software directly to the VPS:
wget https://files.teamspeak-services.com/releases/server/3.13.7/teamspeak3-server_linux_amd64-3.13.7.tar.bz2
Once finished, extract the file:
tar xvf teamspeak3-server_linux_amd64-3.13.7.tar.bz2
All of the contents will appear in the teamspeak3-server_linux_amd64 folder. We can then safely remove the unnecessary archive:
rm teamspeak3-server_linux_amd64-3.13.7.tar.bz2
Check your TeamSpeak software version and enter the commands accordingly. If you enter an incorrect version number, TeamSpeak will simply not run.
Execute the ls command. You should see an output similar to the example below:

3. Accept the TeamSpeak 3 License Agreement
Since the release of TeamSpeak server version 3.1.0, it’s mandatory to accept the license agreement. The quickest way to do that is by running the following command. However, make sure you are in the teamspeak3-server_linux_amd64 directory first:
touch .ts3server_license_accepted
This will create a new empty file called .ts3server_license_accepted, meaning you have accepted the license terms.
4. Start the TeamSpeak Server on Startup
Now, it’s time to set up the TeamSpeak server to start when the server boots up. We will need to create a file called teamspeak.service in the /lib/systemd/system directory. Use the following command to switch to the root user:
su -
Then, create a new empty file using the preferred text editor. We will use nano in our example:
sudo nano /lib/systemd/system/teamspeak.service
Here’s an example of what the file should consist of:
[Unit]
Description=TeamSpeak 3 Server
After=network.target
[Service]
WorkingDirectory=/home/teamspeak/teamspeak3-server_linux_amd64
User=teamspeak
Group=teamspeak
Type=forking
ExecStart=/home/teamspeak/teamspeak3-server_linux_amd64/ts3server_startscript.sh start inifile=ts3server.ini
ExecStop=/home/teamspeak/teamspeak3-server_linux_amd64/ts3server_startscript.sh stop
PIDFile=/home/teamspeak/teamspeak3-server_linux_amd64/ts3server.pid
RestartSec=15
Restart=always
[Install]
WantedBy=multi-user.target
Paste the content into the newly created file and save it. Next, we will activate the script for TeamSpeak Server to start on server startup:
systemctl enable teamspeak.service
systemctl start teamspeak.service
To double-check the script was added successfully, run the following command:
systemctl | grep teamspeak.service
If the TS 3 server is running correctly, you should see the following result:

You may also obtain a detailed TeamSpeak server status report by executing this command:
service teamspeak status

5. Retrieve the Privilege Key
While the TeamSpeak server is now running, you still need the privilege key. You will need to paste it when connecting to the server for the first time. First, switch to the teamspeak user:
sudo su teamspeak
Then, view the privilege key using the following command:
cat /home/teamspeak/teamspeak3-server_linux_amd64/logs/ts3server_*
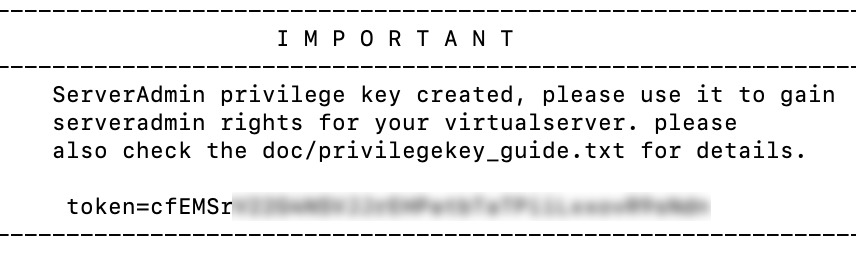
Find the ServerAdmin line and copy the token. It will look something like this:
ServerAdmin privilege key created, please use the line below
token=ZyQqAIGrZyQqAIGrZyQqAIGrZyQqAIGrZyQqAIGr
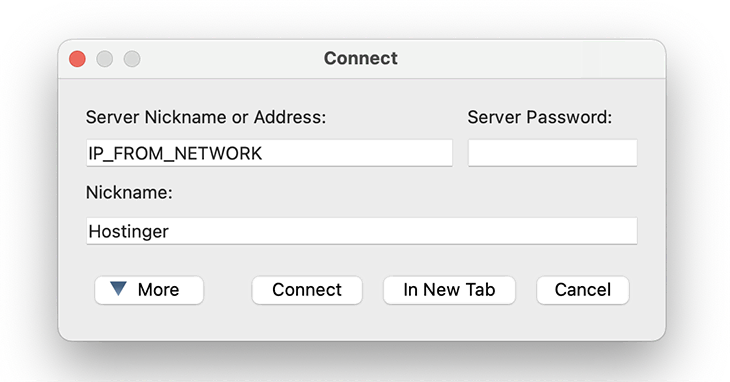
6. Connect via the TeamSpeak Client
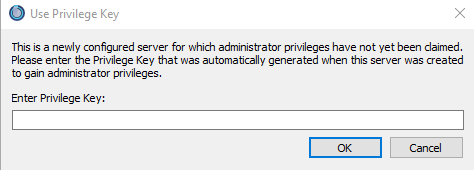
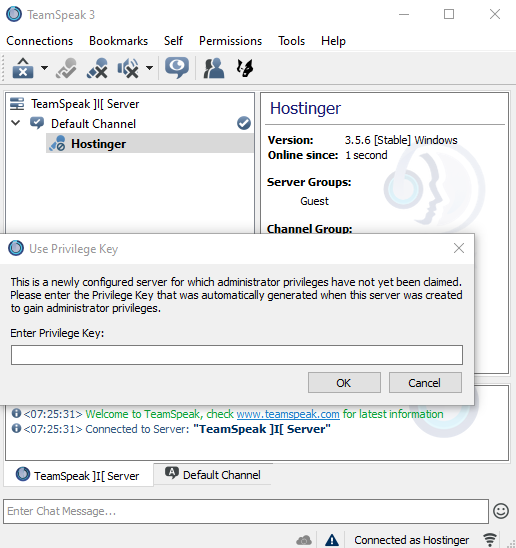
The last step is to connect to the newly created TS3 server and apply the privilege key. Use the server address of your dedicated VPS when connecting.
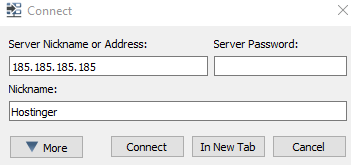
You will be immediately prompted to enter the server admin token:
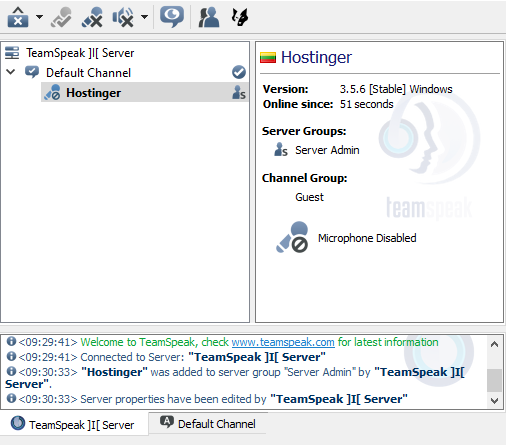
Great work – you have successfully created and connected to a TeamSpeak server on Ubuntu.
How to Make a TeamSpeak Server on Windows
Setting up a TeamSpeak server on Windows is easy. In fact, it can be done in three easy steps:
- Download and extract the TeamSpeak server from their website
- Initiate the TeamSpeak server installation
- Use the TeamSpeak client to connect
Let’s start with the TeamSpeak server.
1. Download and Extract the TeamSpeak Server
First of all, download the TeamSpeak server files for Windows. Then, extract it in the desired location.
2. Run the TeamSpeak Server Installer
Open the extracted TeamSpeak server files and run the ts3server.exe executable file.
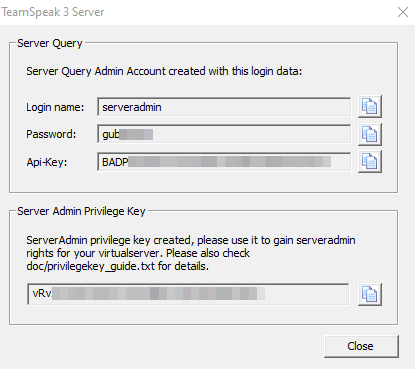
You will be prompted to accept the license agreement and asked if the Windows firewall should safelist the software. After that, you will receive your login name, server password, API key, and server admin token. Copy all four values to an empty .txt file for later use.
3. Connect via the TeamSpeak Client
Once the installation process is finished, the last step is connecting to the TS3 server.
Download the TeamSpeak client from the official website and run the .exe installer.
Next, open the client and go to Connections -> Connect.
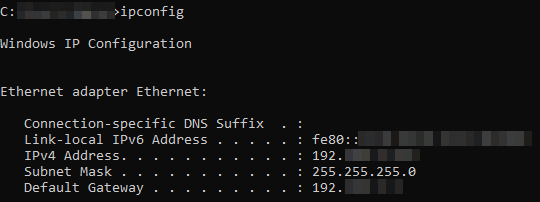
In case you’re not sure what IP address to use for connecting, open the Command Prompt and execute the following:
ipconfig
Look for the IPv4 Address value, as we will use it when connecting.
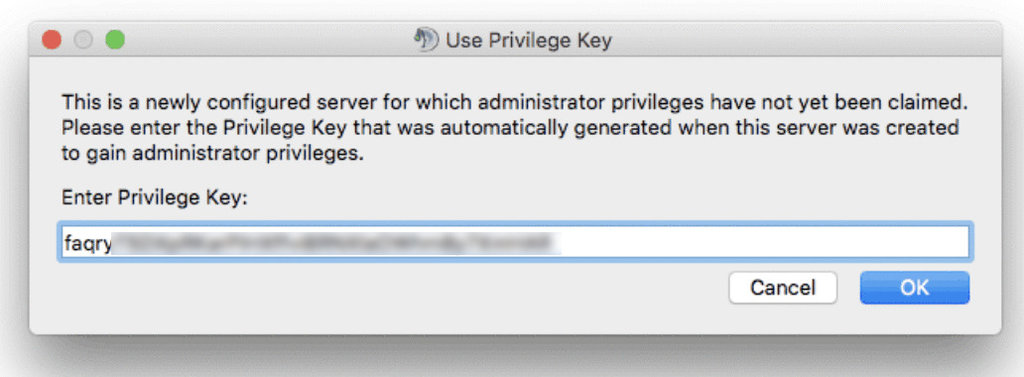
Lastly, you will need to paste the privilege key to gain admin rights.
That’s it – you have successfully set up a TeamSpeak server on Windows.
How to Make a TeamSpeak Server on macOS
Making a TeamSpeak 3 server on the macOS operating system is also possible. The whole setup can be completed in four simple steps:
- Download and extract the TeamSpeak server
- Accept the license agreement for TeamSpeak 3
- Launch the TeamSpeak server and obtain your privilege key
- Use the TeamSpeak 3 client to connect
Let’s proceed with the steps.
1. Download and Extract the TeamSpeak Server
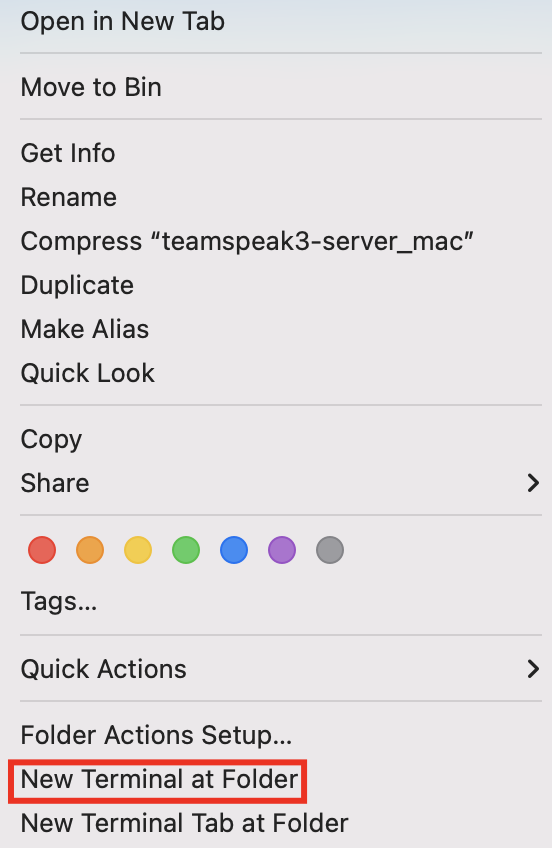
Start by downloading the TeamSpeak server software setup file for Mac. Once finished, double-click to extract it.
2. Accept the TeamSpeak 3 License Agreement
Open the terminal and execute the following command to accept the license agreement:
touch .ts3server_license_accepted
3. Start the TeamSpeak Server and Retrieve Your Privilege Key
Start the server by entering the following:
./ts3server
If you get a warning about TeamSpeak not being recognized as an identified developer, make sure to override the security settings in System Preferences temporarily.
Wait a few moments for the process to finish. You will receive your privilege key:
4. Connect via the TeamSpeak Client
You’re now ready to use the TeamSpeak server. When connecting, use the IP shown in the System Preferences -> Network section. You might have to override your security settings once more to launch the TeamSpeak application.
Don’t forget to paste the privilege key to gain server admin rights.
Congratulations, you have created a TeamSpeak server and connected to it on macOS operating system.
How to Point a Domain to a TeamSpeak Server
This section will teach you how to point your existing domain to the TeamSpeak server you created.
This will make the process of logging into the server easier because you won’t have to remember the IP address and port combination – just the domain name.
Before proceeding with the next step, go to the DNS Zone Editor on your domain registrar account. In this example, we will use a domain name registered via Hostinger. However, the steps should be similar using other registrars as well.
The process can be completed in two simple steps:
- Create a subdomain with A records
- Create an SRV record
Let’s start with a subdomain.
1. Create a Subdomain Using A Records
Log into hPanel and navigate to Domains. Click on the desired domain name and select DNS / Nameservers.
Next to the Manage DNS records section, create a subdomain and point it to the TeamSpeak server.
- Type – choose A.
- Name – specify the subdomain name.
- Points to – enter the IP of your TeamSpeak 3 server, removing the sample 185.185.185.185 address.
- TTL – this stands for time-to-live, which limits the lifetime of the record. Leave the default value.

Finally, click Add Record.
Ensure that the A record is pointed correctly and propagated well before proceeding to the next step.
2. Create an SRV record
Under the same Manage DNS records section, add a new SRV record.
- Type – choose SRV.
- Name – specify the service name _ts3 and protocol _udp, separated by a full stop mark. The final result should look similar to the following:
_ts3._udp.teamspeak.domain.tld
- Weight – for records with the same priority, set it to 5.
- Port – enter your server’s port. Alternatively, the default TeamSpeak 3 server port is 9987.
- Target – instead of teamspeak.yourdomain.com, enter the subdomain you created in Step 1.
- Priority – set the value to 0.
- TTL – leave the default value here.
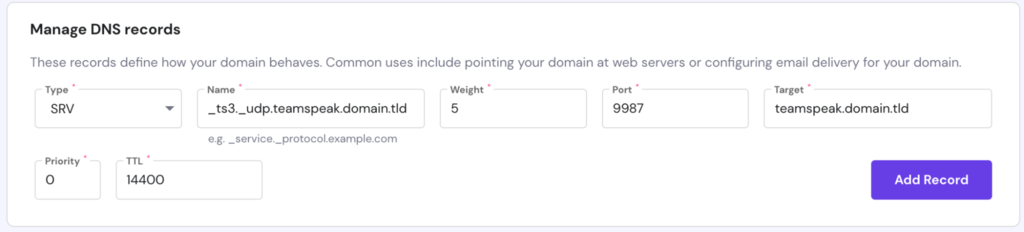
Finally, click Add Record.
Important! Note that it can take up to 24 hours for the new DNS records to propagate worldwide. You can also try to clear your DNS cache.
That’s it – you have pointed a domain to the TeamSpeak 3 server via the DNS SRV record. You can easily connect to your server using a simple subdomain.
Suggested Reading
Check out our guide on how to point a domain name to VPS.
Conclusion
TeamSpeak 3 is a popular voice chatting application among gaming enthusiasts and IT professionals. It provides a convenient-to-use interface and allows users to quickly set up a server in minutes.
This guide taught you how to create a TeamSpeak 3 server on three different operating systems – Ubuntu, Windows, and macOS.
We also provided a guide on how to point a domain to a server and use it instead of an IP address to connect.
If you have any tips, tricks, or ideas, don’t hesitate to share them in the comments section.
Discover Other Types of Servers You Can Set Up With VPS Hosting
How to Create a Counter-Strike 2 Server
How to Set Up a Rust Server
How to Create a Minecraft Server
How to Make an Unturned Server
How to Set Up a Linux VPN Server
How to Make a TeamSpeak Server FAQ
Here are some of the most frequently asked questions about the TeamSpeak server.
What Do You Need to Run a TeamSpeak Server?
A TeamSpeak server can be set up on pretty much any machine, whether that would be a virtual private server (VPS) you own or your personal computer using Windows, Linux, or macOS operating systems.
You only need to download the server files from TeamSpeak’s official website, install the server, and you’re good to go.
Is a Server Required to Use TeamSpeak?
A TeamSpeak server can run on most operating systems, which means that you don’t explicitly need to have a server. An ordinary computer will do.
However, it’s highly recommended that you set up a TeamSpeak server because it will be much easier to manage. If that is not possible, you could consider a virtual server.

Ignas takes great satisfaction in helping people tackle even the most complex technical issues. His current goal is to write easy-to-follow articles so that these issues will not happen at all. During his free time, Ignas likes to play video games and fix up things around his house.


Comments
April 20 2020
For the Ubuntu version of the instructions you also need to run a command to give the teamspeak user access to the folder where teamspeak is stored. In my case it was. sudo chown -R teamspeak:teamspeak /home/teamspeak
April 20 2020
I also had to add the line. After=multi-user.target to the [Unit] section of /lib/systemd/system/teamspeak.service To make it all work properly