How to Install MySQL on CentOS 7

MySQL is one of the most widely used database management systems for websites and server applications. It’s an essential tool that every webmaster should learn. That’s why in this tutorial, we will show you how to install MySQL on CentOS 7 through an SSH connection.

How to Install MySQL on a CentOS 7 Server?
There are three steps needed when you want to install MySQL on CentOS 7 — download the MySQL repository, install it, and check its status. We’ll go through each step in greater detail.
Important! CentOS Linux 8 has reached it’s End of Lifetime (EOL) on 2021-12-31. While CentOS Linux 7 is still supported, it will reach EOL on 2024-06-30. We recommend keeping that in mind when choosing this OS. You can read more about it in their official website.
1. Download and Prepare the MySQL Repository
Before we begin learning how to install MySQL, make sure that either your VPS or dedicated server is running on CentOS 7 and you have root access to it. You can learn how to connect to your server via SSH by following our tutorial.
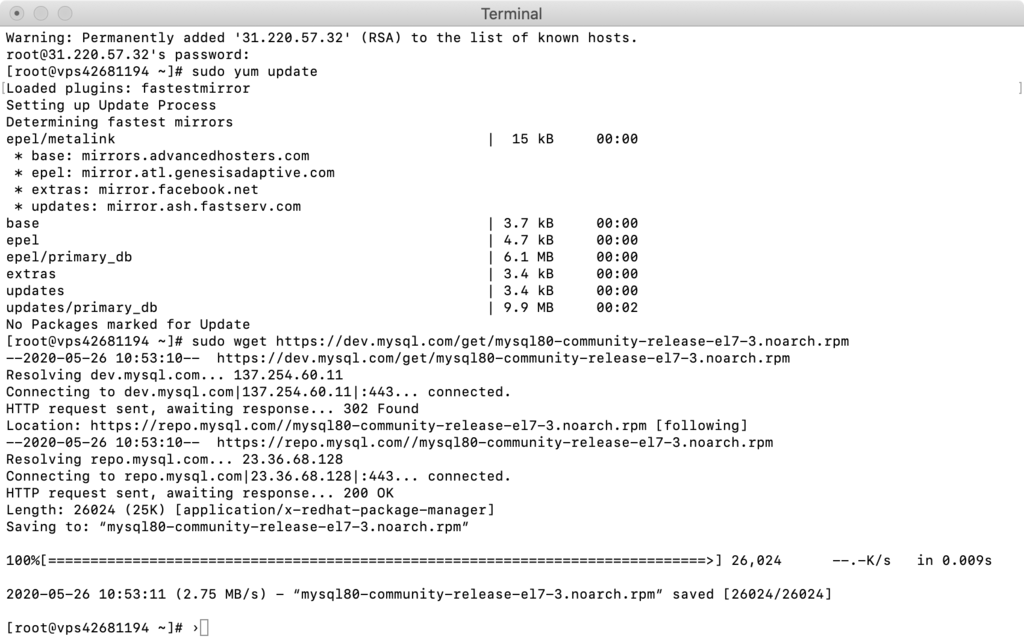
- We need to update our system by typing in the following command:
sudo yum update
- After the system is updated, it is time to download the MySQL repositories. You can also view other repository versions here.
sudo wget https://dev.mysql.com/get/mysql80-community-release-el7-3.noarch.rpm
- At the end of the download, you should see a confirmation message that .rpm file was saved.

- Now, we need to prepare the repository so we could later install MySQL packages from it. Simply enter:
sudo rpm -Uvh mysql80-community-release-el7-3.noarch.rpm
- Once the output indicates that the update and installation are complete, you will be able to install MySQL.
2. Install MySQL
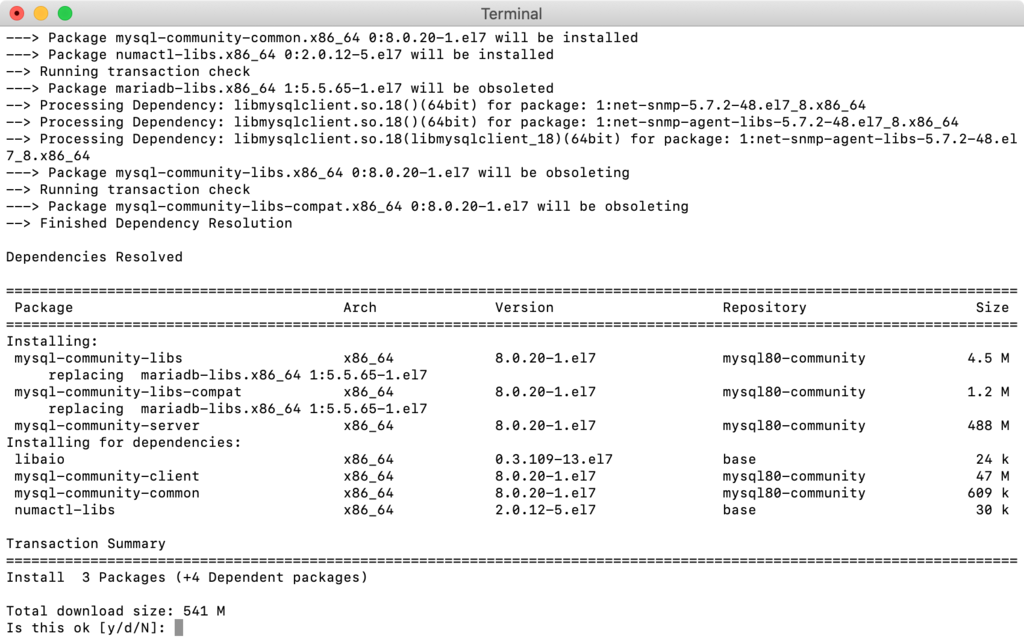
- Use the following yum install command to install MySQL:
sudo yum install mysql-server
- The script will return with a list of packages and ask you for confirmation to download and install them. Type y and press ENTER for each of the requests.
- You’ll need to do this a few times, but you’ll eventually see the Complete! message at the end of the installation — it means that you have successfully installed MySQL on your server.
3. Start MySQL and Check its Status
- Once you have MySQL ready on CentOS 7, it does not automatically start right after the installation. Therefore, you need to start it manually through the following command:
sudo systemctl start mysqld
- You will get no response once MySQL starts so to check if it is working properly, use the command below:
sudo systemctl status mysqld
- It will output the information about the MySQL process:
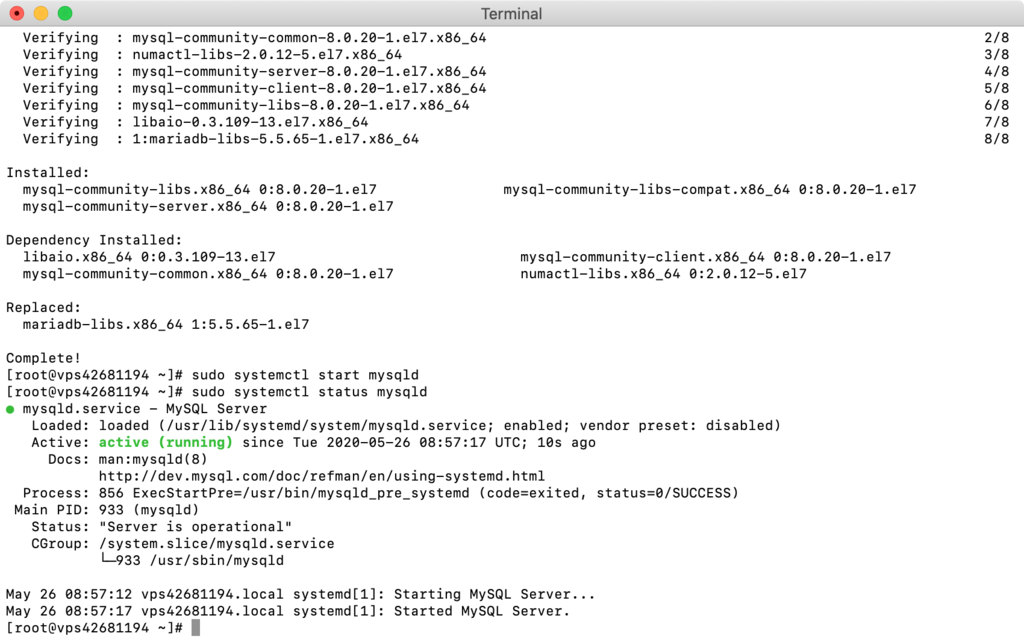
If you see that MySQL is active and running like in the screenshot above, you have successfully installed and started MySQL on your server.

How to Configure MySQL?
Now that you’re all set up, we’re going to show you some useful commands and tweaks you should know when working with MySQL.
Changing MySQL Root User Password
When installing MySQL on CentOS 7, a temporary root password is generated. Issue the command below to see it:
sudo grep 'password' /var/log/mysqld.log
In order to change it, follow these steps:
- Firstly, run the following command:
sudo mysql_secure_installation
- Enter the temporary password, and the following message will pop up:
The existing password for the user account root has expired. Please set a new password.
New password:
Re-enter new password:
- Now, type in a new strong password.
Pro Tip
A strong password is 8-12 characters long and includes numbers, special characters, uppercase, and lowercase letters.
Checking Current MySQL Version
Once you’ve MySQL installed on CentOS 7, you can test if everything was set up correctly by checking its version. Type in the following command:
mysql -u root -p
Enter the root password that you’ve created, and the response will be as below:
Welcome to the MySQL monitor.  Commands end with ; or \g.
Your MySQL connection id is 22
Server version: 8.0.20

Copyright (c) 2000, 2020, Oracle and/or its affiliates. All rights reserved.

Oracle is a registered trademark of Oracle Corporation and/or its affiliates. Other names may be trademarks of their respective owners.

Type 'help;' or '\h' for help. Type '\c' to clear the current input statement.
Resetting the MySQL Root Password
If you want to reset your password, the process is pretty straightforward. Follow the steps below to change your MySQL root password:
- Stop the MySQL server with this command:
sudo systemctl stop mysqld
- Restart MySQL in safe mode, or without a password by typing in:
sudo mysqld_safe --skip-grant-tables
- Press ENTER if the MySQL server has started but seems to be hanging.
- Use the following command to reconnect to MySQL as root:
mysql -uroot
- To change the root password, use the following commands:
USE MYSQL;
UPDATE USER SET PASSWORD=PASSWORD(“newpassword”) WHERE USER=’root’;
FLUSH PRIVILEGES;
EXIT
- Replace the newpassword with a strong password of your own.
- Finally, restart MySQL using:
sudo systemctl start mysqld
- You can now login to MySQL with your new password.
Creating a New MySQL User, Database
As the root user in MySQL, you have full access to all of the databases.
However, if you work with a team, there are cases where you might need to apply some restrictions. You’d either have to build a new database or create users with custom permissions.
Here’s how to quickly solve this issue:
- Use the following command to create a new database:
CREATE DATABASE newdb
- Change newdb with the name of the database.
- Create a new user by typing the following line:
CREATE USER 'username'@'localhost' IDENTIFIED BY 'password'
- Change the variables for both username and password to create your new user.
- If you want to delete a certain user instead, use the command:
DROP USER ‘username’@‘localhost’
Managing MySQL User Permissions
Grant the new user access to a database with by typing in:
GRANT ALL PRIVILEGES ON newdb.* TO 'username'@'localhost'
You can also grant privileges individually, including:
- SELECT – users can read through the database using the select command
- CREATE – they can generate new tables
- DROP – allows users to remove tables
- DELETE – users can take out rows from tables
- INSERT – lets users add in rows into tables
- UPDATE – enable them to update the rows
- GRANT OPTION – they can grant or remove the privileges of other users
For example, to grant the CREATE privilege, you’d need to type:
GRANT CREATE ON newdb.* TO 'username'@'localhost'
On the other hand, if you want to remove someone’s access, use the following:
REVOKE permission_type ON newdb.* TO 'username'@'localhost'
You can also check what current privileges a user has:
SHOW GRANTS username
Finally, once you’ve finished managing your users, it’s a good idea to reset all the privileges by using this command for your changes to take effect:
FLUSH PRIVILEGES
Other Useful MySQL Commands
MySQL also has a list of other helpful commands. Simply enter \h or help to view the list shown below:
List of all MySQL commands:
Note that all text commands must be first on line and end with ';'
?         (\?) Synonym for `help'.
clear     (\c) Clear command.
connect   (\r) Reconnect to the server. Optional arguments are db and host.
delimiter (\d) Set statement delimiter. NOTE: Takes the rest of the line as new delimiter.
edit      (\e) Edit command with $EDITOR.
ego       (\G) Send command to mysql server, display result vertically.
exit      (\q) Exit mysql. Same as quit.
go        (\g) Send command to mysql server.
help      (\h) Display this help.
nopager   (\n) Disable pager, print to stdout.
notee     (\t) Don't write into outfile.
pager     (\P) Set PAGER [to_pager]. Print the query results via PAGER.
print     (\p) Print current command.
prompt    (\R) Change your mysql prompt.
quit      (\q) Quit mysql.
rehash    (\#) Rebuild completion hash.
source    (\.) Execute an SQL script file. Takes a file name as an argument.
status    (\s) Get status information from the server.
system    (\!) Execute a system shell command.
tee       (\T) Set outfile [to_outfile]. Append everything into given outfile.
use       (\u) Use another database. Takes database name as argument.
charset   (\C) Switch to another charset. Might be needed for processing binlog with multi-byte charsets.
warnings  (\W) Show warnings after every statement.
nowarning (\w) Don't show warnings after every statement.

For server side help, type 'help contents'
mysql>
Conclusion
You have learned how to install MySQL on a CentOS 7 server. By installing MySQL, you are able to store your databases and manage them efficiently on your server.
Be sure to check out our other VPS hosting tutorials and leave a comment down below if you have any questions.
Learn More About Database Management on CentOS
How to Install PostgreSQL on CentOS 7
How to Install PhpMyAdmin on CentOS 7

Linas started as a customer success agent and is now a full-stack web developer and Technical Team Lead at Hostinger. He is passionate about presenting people with top-notch technical solutions, but as much as he enjoys coding, he secretly dreams of becoming a rock star.

Comments
April 18 2017
I have a Ubuntu 14.04 server. Can I follow these same steps to install MySQL there?
April 18 2017
I have a VPS account with Ubuntu 14.04 installed. Do we install mysql on it the same way shown above?
March 26 2018
Thank you very much. Very simple, nice and clean tutorial. Worked for me.
June 06 2020
Thank you, this was a simple guide to follow and worked like a charm. Had me running in minutes, now I can play around.
April 24 2021
thank very good
July 19 2021
Thank you so much! it has worked for me. Do u have a video for ngnix configuration as proxy server?
September 17 2021
Hi! While we don't have a video yet, we do have this step-by-step guide on How to Set Up an Nginx Reverse Proxy :)
March 15 2022
It should now be updated to reflect the new versions: Versions are updated here: https://dev.mysql.com/downloads/repo/yum/ wget https://dev.mysql.com/get/mysql80-community-release-el7-5.noarch.rpm rpm -Uvh mysql80-community-release-el7-5.noarch.rpm
March 16 2022
Hi Andy, thanks for sharing!
April 25 2022
Thanks Andy! Saved me here