How to Host Your Own Podcast on a Virtual Private Server
While there are various podcast hosting services out there, setting up a private server lets you upload significantly larger files and have more freedom in how you run things. You also have the flexibility to publish the content on different platforms and get complete control over the data.
To help you get started, this tutorial will explain how to host your own podcast using a virtual private server (VPS). You will learn the procedures from preparing the hosting environment to making your content discoverable online.
Note that this tutorial will use Apple Podcasts to publish the episodes. If you are using other platforms or a dedicated podcast website, the steps might slightly differ.

Prerequisites for Hosting Your Podcast
Since this tutorial will focus on setting up a hosting server, ensure you already have your content ready before proceeding. You should ideally have the first few podcast episodes in an MP3 format.
You must also write the episode title in a specific format to allow the podcast software to detect it. Here’s an example:
yourpodcastname_episodename_episodenumber.mp3
Moreover, ensure you have acquired a domain name. It will allow you to access the podcast hosting server without using its IP address during the testing and URL submission to help simplify the setup process.
How to Host a Podcast on a Server
Once you prepare the audio file and other prerequisites, let’s dive into the steps to start a podcast hosting server.
1. Choose a VPS Host
Using a hosting service is more beneficial than using a personal device due to its built-in features and reliable infrastructure. To choose the right VPS for podcasting, consider the plan’s resource allocations, support, security, and compatibility.
Hostinger’s VPS platform is an excellent choice because it is compatible with various software and supports full root access. Moreover, our Customer Success team is available 24/7 to assist you when setting up or managing the server.
All our VPS plans also implement an automatic regular backup and a snapshot for optimal data protection. Moreover, our robust security features, like the built-in Monarx malware scanner, help safeguard your server from malicious software infection.
Since MP3 files are relatively smaller and lightweight, podcast audio storage and bandwidth requirements are relatively low. We recommend starting with our KVM 1 plan and upgrading as needed.

2. Set up Your Server for a Podcast
After purchasing a plan from Hostinger and completing the onboarding process, let’s prepare the hosting environment by installing the required software. Before doing so, point your domain name to your VPS.
To begin, connect to your server using an SSH client like PuTTY, macOS Terminal, or Hostinger’s Browser terminal feature. You can find the login credentials under the SSH access tab in hPanel’s VPS overview menu.
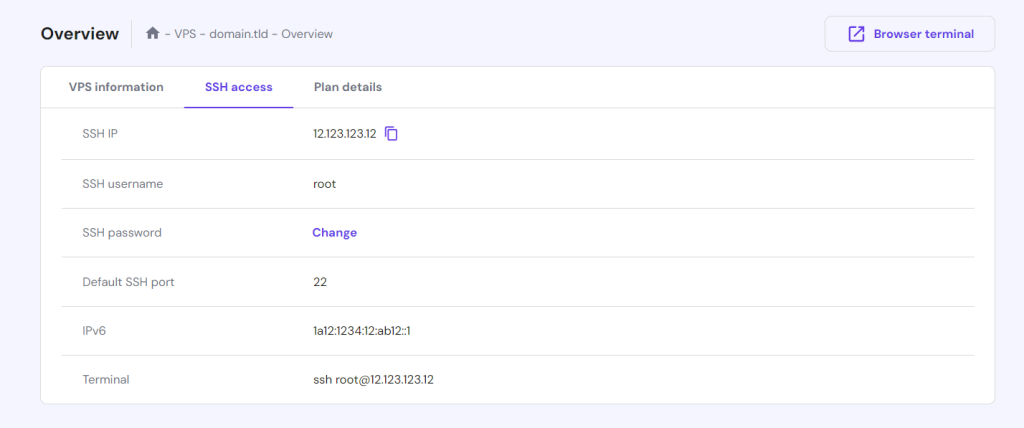
By default, you will connect as root. However, we recommend using another superuser account during the podcast server setup to avoid accidental destructive command executions. To create a new user, run:
adduser your-username
Enter a new password and other account details. Next, add the user to the sudoers group to grant the superuser privilege using this command:
usermod -a -G sudo your-username
Now, let’s switch the new user by entering the following command:
su your-username
Once switched to the new user, update your system repository to get the latest package version. Here’s the command for Ubuntu:
sudo apt update
If you use other Linux distributions, replace apt with their corresponding package manager command. For example, Red Hat-based operating systems like CentOS and AlmaLinux use yum or dnf for the later version.
Next, install a web server, which takes and processes client requests. There are various options, but we will Apache since it is one of the most popular. Here’s the command:
sudo apt install apache2
Run the following command to allow Apache to start automatically during the system boot:
sudo systemctl enable apache2
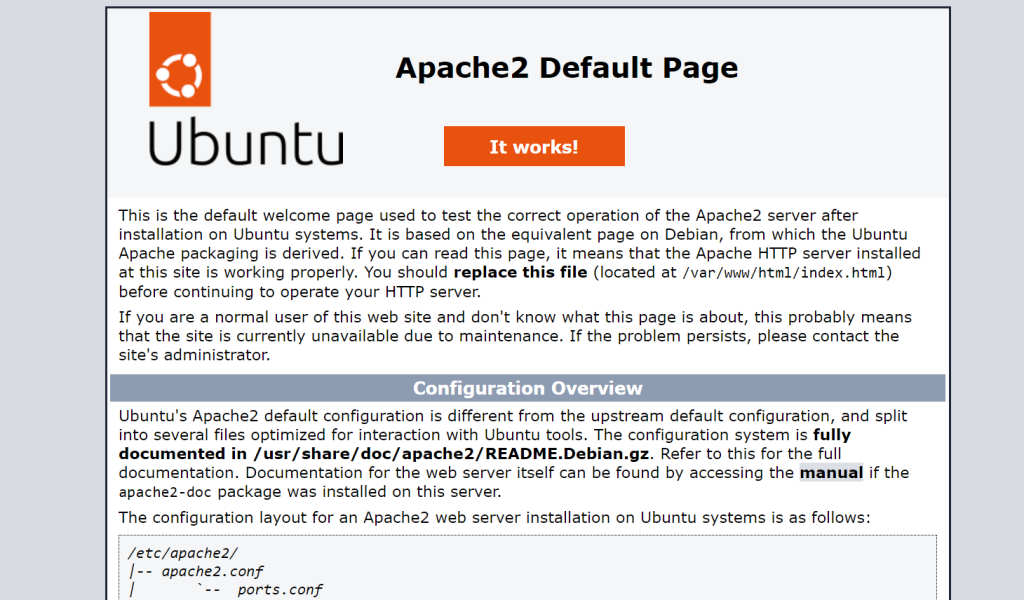
Visit your VPS domain via a web browser to check if Apache works correctly. If so, you should see a welcome page like in the example shown below:
3. Install Podcast Management Software
There are various tools that let you turn your podcast files into streamable episodes. In this tutorial, we will use dir2cast as it is open-source and relatively up-to-date.
Start by installing the Git utility in your server, which we will use to fetch the dir2Cast repository. Here’s the command:
sudo apt install git
Next, install the PHP and XML extensions since dir2cast requires these dependencies. Use the following command:
sudo apt install php php-xml
Now, create a new folder for your podcast in the Apache root directory. You can use any name, but we will use Podcast:
sudo mkdir /var/www/html/podcast
Note that the path can be /var/www/html or /var/www/domain.tld depending on your system configuration. The domain.tld placeholder is the domain name pointed to your VPS. Once created, switch to the new directory:
cd /var/www/html/podcast
Download the dir2cast repository using the Git clone command:
sudo git clone https://github.com/ben-xo/dir2cast.git
Verify that dir2cast.ini and dir2cast.php exist in the folder by opening the dir2cast folder using cd and listing its content with ls:
cd dir2cast && ls dir2cast.ini dir2cast.php
4. Upload and Organize Your Podcast Episodes
Now that the software is set upload the first episode to your server. Before doing so, create a new folder called MP3 within the podcast directory:
sudo mkdir MP3
Switch to the new folder using cd MP3 and start uploading your episodes. There are different ways to do so, such as using the rsync command, git repository, and secure file transfer protocol (SFTP).
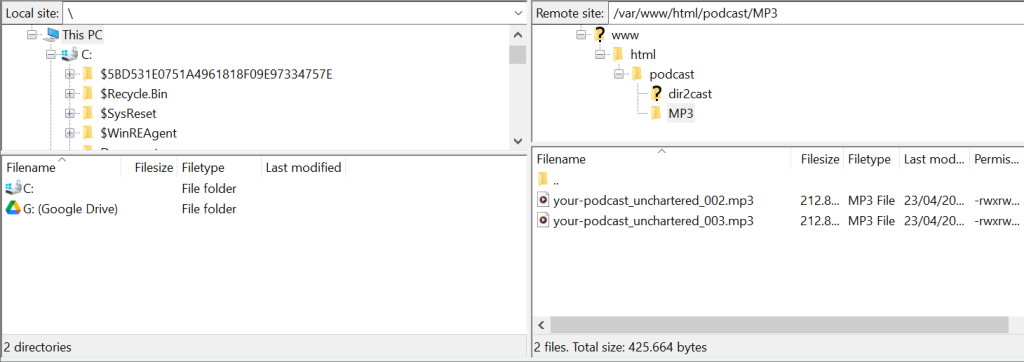
We will use SFTP since it is the most convenient and compatible with all major operating systems, like Windows, MacOS, and Linux. Note that the steps will differ depending on the application. In this tutorial, we will use the FileZilla client.
Once you have FileZilla installed on your local system, follow these steps:
- From the top bar, enter your VPS IP address as the Host, root as the Username, and the SSH password. Use 22 as the port number and click Quickconnect.
- On the Remote site window, navigate to the /var/www/html/podcast/MP3 directory.
- In the Local site window, access the folder that contains your MP3 file.
- Drag and drop the MP3 file from the left window to the right one.
Wait until the copying process is complete, which you can check from the Successful transfer tab on the bottom bar.
dir2cast will automatically retrieve the episode title and author from your audio file, but you can show additional information if the streaming platform supports it.
To do so, create a TXT file containing the details and upload it to the same MP3 folder. One file applies to a single episode and must have an identical name.
5. Configure Dir2Cast
The dir2cast.ini file contains settings that define your podcast server behavior. All of the configuration parameters are inactive by default, meaning you must remove the semi-colon comment symbol (;) to apply them.
However, dir2cast can automatically figure out several configuration parameters and work correctly out of the box. You can use the default settings if the MP3 files are in the same folder as the dir2cast.php.
That said, users might need to manually change the settings if they encounter an error or use a custom path. For example, we must change the MP3_BASE directive since we made a dedicated MP3 folder to organize the podcast content.
To do so, open the file with the nano text editor. Before proceeding, enter cd to ensure you are in the home directory. Then, run the following:
sudo nano /var/www/html/podcast/dir2cast/dir2cast.ini
Find the MP3_BASE directive and remove the semicolon symbol. Within the quotation marks, enter your MP3 directory path like the following. Once finished, press Ctrl + X → Y, and Enter to save the changes.

If you want to adjust other settings, dir2cast.ini already provides an explanation of each parameter within the file.
6. Set up RSS Feed
The RSS feed defines the location of your podcast description, cover art, and episode files. It enables streaming platforms like iTunes to automatically update information about your show when you upload new episodes to your server.
The RSS feed is in an XML format. For most podcast management software, you should write it manually. There are various examples out there for reference, such as one from Rody Davis’ GitHub page.
dir2cast lets you generate the XML podcast RSS feed automatically based on the episodes uploaded to the MP3 folder. Before doing so, create a new folder inside /var/www/html/podcast/ to store the temporary RSS files.
Return to the main home directory and create the folder using mkdir. To do so, run the following commands subsequently:
cd
sudo mkdir /var/www/html/podcast/dir2cast/temp/
Then, change the temp folder permissions to allow the dir2cast.php script to write the temporary RSS data. Here’s the command:
sudo chmod 777 /var/www/html/podcast/dir2cast/temp/
To generate the XML script, open the dir2cast.php script using a web browser. You can do so by opening this address:
http://domain.tld/podcast/dir2cast/dir2cast.php
If you encounter an error, check whether the audio files directory in the dir2cast.ini is correct and the MP3_BASE is uncommented. Also, ensure you have assigned the correct permissions to make the temp folder writable.
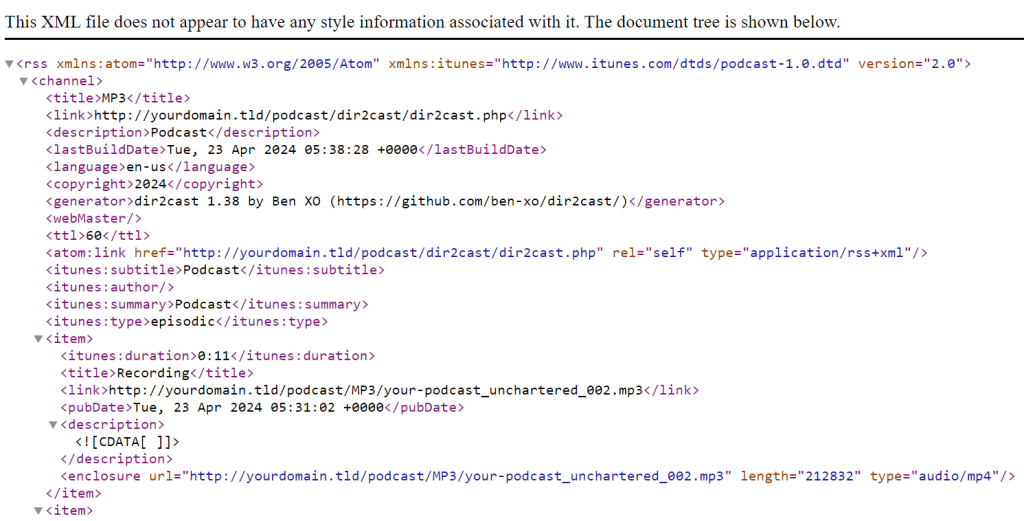
You should see an XML file like the following once the script successfully runs.
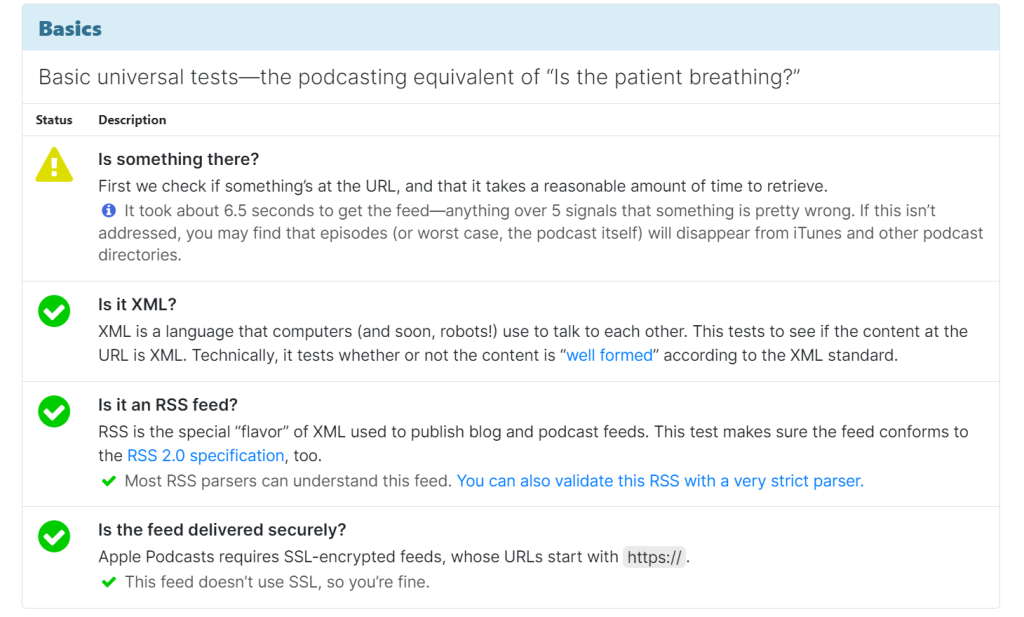
7. Test Your RSS Feed And Check Compliance
The podcast RSS feed must adhere to your streaming platform’s requirements. For example, Apple Podcast requires your feed to use RSS 2.0 URLs and incorporate <enclosure> tag for each episode.
Since podcast players might have different requirements, check whether dir2cast’s auto-generated XML file complies with them. To edit the RSS feed, adjust the dir2cast.ini settings based on your preferences.
Need Help With Your VPS?
Use Hostinger’s VPS AI Assistant to help generate commands and instructions for managing your server.
In the file, don’t forget to enter such information as your podcast’s copyright, webmaster’s IP address, and explicit content warning to ensure your show adheres to legal requirements.
Now, let’s check whether the RSS feed works by entering the URL into the Podbase validator. This tool also determines whether your podcast complies with the Apple Podcasts and Podcast Standards Project requirements.
8. Make Your Podcast Discoverable
The last step is submitting your RSS feed URL to podcast directories to make the audio files discoverable online. Since the steps differ depending on the platforms, check their documentation for more information.
In this tutorial, we will show you how to do so via Apple Podcasts. After creating an account and logging in to the Apple Podcasts Connect website, follow these steps:
- Click the plus icon and select New Show.
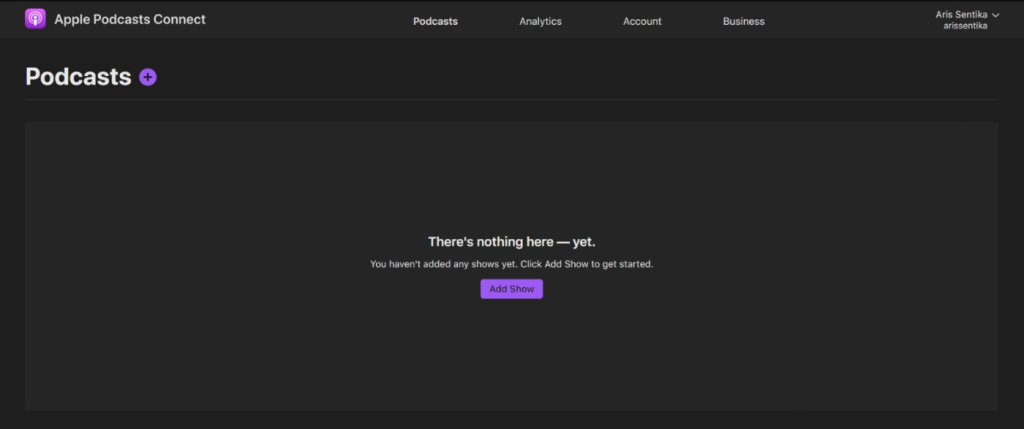
- Select the Add a show with an RSS feed option.
- Enter your XML file URL in the following format. Replace the domain name and path with the actual value:
http://domain.tld/podcast/dir2cast/dir2cast.php
- Click Add.
- On the podcast information page, configure your content rights, contact details, and user access. Once finished, scroll up and click Save.
- Wait until Apple Podcasts retrieves your podcast data. Once the information shows up on the Show Details page, click Publish.
That’s it! Click Listen on Apple Podcasts to launch the application and listen to your podcast online.
Steps After Configuring Your Podcast Server
After your podcast host is online, expand your show by adding more episodes. To do so, simply upload the new audio files and their TXT files into your MP3 folder via SFTP.
Then, open this address in your web browser to rerun the dir2cast.php script:
http://domain.tld/podcast/dir2cast/dir2cast.php
Well done! The PHP script will generate an updated XML file containing details about the new episodes. Remember to repeat the steps every time you add a new episode.
However, there are other important steps for maintaining a podcast server. A crucial measure is applying proper VPS security practices, like installing a secure sockets layer (SSL) certificate to encrypt the connection between the host and clients.
In addition, monitor your server performance to ensure your podcast remains online and responsive. Regularly update all software and back up your VPS files to ensure data safety.
Lastly, periodically audit your podcast copyright or other disclosures to avoid compliance and legal issues. If content regulations change, adjust those details accordingly.
Conclusion
Self-hosting your podcast on a virtual private server gives more flexibility than using a third-party platform. In addition to allowing you to upload larger files, you have more control over the data.
After purchasing a VPS hosting plan from a provider like Hostinger, connect to the system via SSH. Then, create a new superuser account, install a web server like Apache, and download the dir2cast podcast management software via its GitHub repository.
Once set, upload the audio files and adjust dir2cast.ini based on your needs. For example, change the settings to ensure your RSS XML file adheres to your podcast platform requirements. For more information, read the instructions in the file and the GitHub repo.
Run the dir2cast.php script using your web browser to generate the RSS feed, which will allow streaming platforms to fetch your podcast content. Lastly, upload it to platforms like Apple Podcasts to make your show discoverable.
How to Host a Podcast FAQ
In this section, we will answer several questions about how to start a podcast using a VPS.
Why Should I Host My Own Podcast on a Linux Server?
Hosting your own podcast provides more flexibility and reliability. Third-party platforms might limit the maximum number or size of the uploaded audio files, which can cause issues in the future. A private server provides more storage and control over your data.
What Are the Key Considerations When Choosing a VPS Provider for Podcast Hosting?
The ideal podcast hosting service should provide a high uptime guarantee and extensive compatibility with various software like Apache. It must also have reliable customer support to simplify troubleshooting in case of errors.
Can I Switch My Podcast From Another Platform to a VPS?
Absolutely! However, check with your podcast hosting platform since they might have different policies regarding migration. As long as you can retrieve the podcast cover art, audio files, description, and playlist information, you should be able to migrate the content to VPS.

Aris is a Content Writer specializing in Linux and WordPress development. He has a passion for networking, front-end web development, and server administration. By combining his IT and writing experience, Aris creates content that helps people easily understand complex technical topics to start their online journey. Follow him on LinkedIn.
