WordPress SEO: 30+ Best Practices to Dominate Search Engines

Search engine optimization (SEO) helps your WordPress site rank higher on the search engine results pages (SERPs) and, naturally, bring in more organic traffic. While WordPress is designed with SEO in mind, you can still optimize your website further to achieve better results.
Not sure how? This WordPress SEO guide will walk you through the process. You’ll find actionable steps to get your site noticed by both search engines and potential leads through on-page, technical, and off-page SEO best practices.

What Is Search Engine Optimization and Why Is It Important?
Every day, search engines like Google employ crawler bots to find fresh pages and posts. After, they will rank each content piece based on multiple factors, including its overall quality.
Google recommends creators make content based on the E-E-A-T framework, which stands for Experience, Expertise, Authoritativeness, and Trustworthiness.
However, WordPress SEO is much more than creating high-quality content. Technical SEO best practices like optimizing website performance, improving page speed, and delivering a seamless user experience are just as important.
By getting your website at the top of search results, you’ll get more visibility, drive more traffic, and, eventually, increase conversions. In fact, the top three search query results get more than 50% of the total click-throughs.
Expert Tip
Why is WordPress SEO important?
1. It is low cost compared to paid traffic sources. Treat it as an investment that delivers great returns.
2. It provides actionable data for a long-term strategy.
3. Organic search is one of the biggest traffic sources.

How to Configure WordPress Settings for SEO
From checking your site settings to installing an SSL certificate, we’ll go through several WordPress configuration steps that are crucial for your WordPress SEO efforts.
1. Check the WordPress Visibility Settings
The first step is to check your WordPress site’s visibility settings.
WordPress has a feature to prevent search engines from indexing a certain website. This setting should be disabled by default, but it’s best to double-check.
Log in to your WordPress Dashboard and head to Settings → Reading. Find the Search engine visibility checkbox and ensure it’s unchecked. Don’t forget to click the Save Changes button.
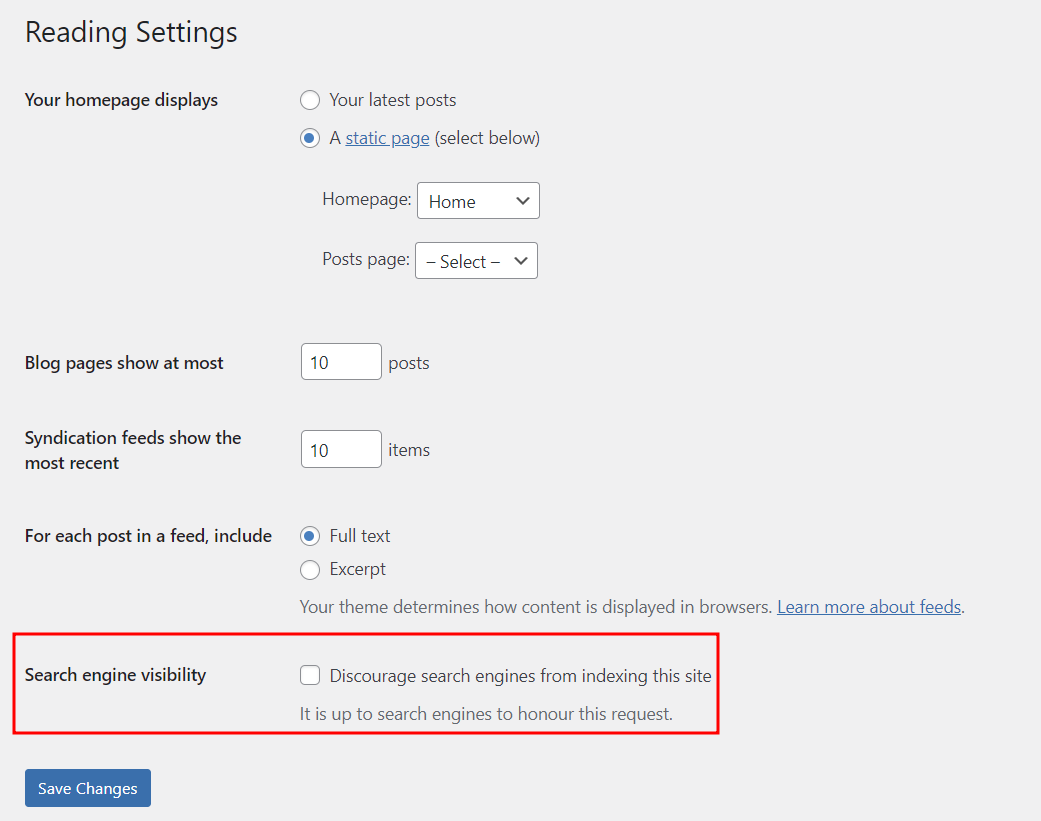
Important! Don’t check this box if you find it unchecked. You may lose all search engine rankings for the website, even if it’s just checked temporarily.
2. Use a WordPress SEO Plugin
WordPress SEO plugins take the complexity out of site optimization. They provide tools to enhance various aspects of your site, including on-page analysis, a sitemap generator, and schema markup.
Many WordPress SEO plugins are available, such as AIOSEO, Yoast SEO, and Rank Math SEO. Check out our best WordPress SEO plugins article to learn more about your options. To avoid conflicts, it’s best to install only one SEO plugin at a time.
Here are some elements to consider before installing a WordPress plugin for your website:
- Cost. Check the plugin’s pricing plans to see if they suit your budget.
- Notable features. Look into each function to learn how it can help your site’s SEO efforts.
- User-friendliness. Beginners should avoid plugins that require advanced technical knowledge to operate. Choose one that offers a user-friendly interface instead.
In this tutorial, we will use AIOSEO to demonstrate how an SEO plugin can help you optimize your website. It is a freemium WordPress SEO plugin that you can install easily from the WordPress dashboard.
Here are some of the most helpful AIOSEO features:
- Automatic SEO sitemaps generation. Easily generate XML and HTML sitemaps to submit to search engines.
- Built-in schema markup support. Create appealing rich snippets that appear on Google search results.
- Competitor site analysis. Evaluate other websites’ optimization strategies and get suggestions to outrank them.
- Site audit. Analyze your website’s SEO performance and get suggestions to improve it.
- Link assistant. Manage both internal and external links.
3. Install an SSL Certificate
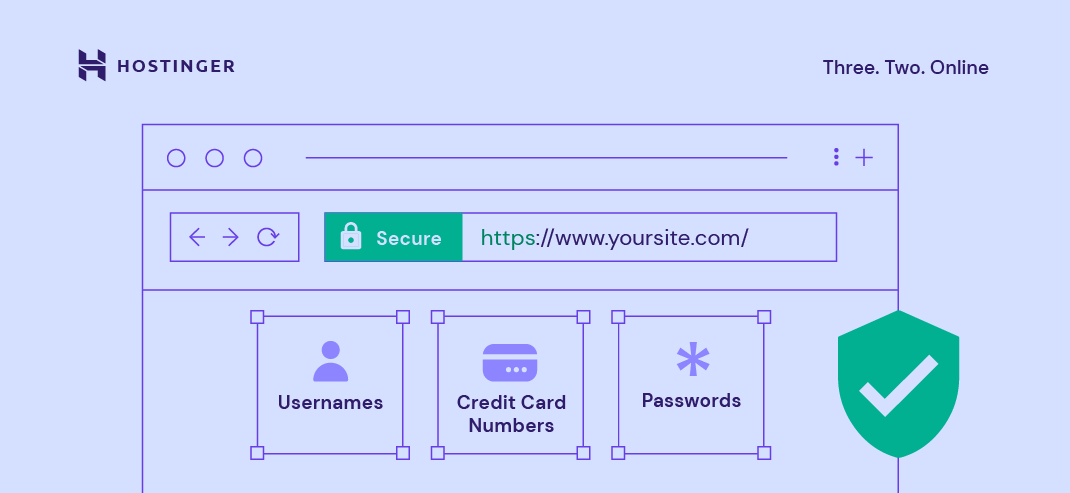
Secure Sockets Layer (SSL) is a security technology that encrypts the connection between a website and a browser. By installing an SSL certificate, data transferred between your website and its users is encrypted.
This makes it difficult for hackers to intercept and read the information being exchanged, such as personal details, login credentials, and payment information.

When a domain is SSL-certified, its URL starts with https:// instead of http://. Browsers like Google Chrome will also display a padlock icon and a message that says “Connection is secure” when you click the site information.
But why is SSL important for SEO?
For starters, Google considers HTTPS when determining a website’s page experience, which is another important ranking factor. Some web browsers also label sites without SSL certificates as not secure, advising visitors against opening them.
That’s why having an SSL certificate is essential to avoid driving away potential traffic and hurting your website’s conversion rate.
The prices of SSL certificates vary depending on factors such as the validation type and the Certificate Authority.
At Hostinger, you can get unlimited SSL certificates for free by purchasing one of our web hosting plans. An SSL certificate will be automatically installed every time you create a new website.
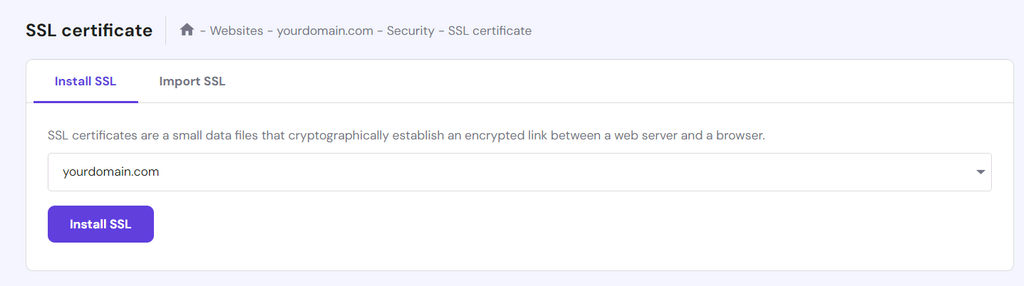
You can also manually install an SSL certificate by following these steps:
- Log in to your hPanel account.
- Head to Websites at the top menu, and click Manage next to your domain name.
- On the left sidebar, select Security → SSL.
- Under the Install SSL tab, select your domain from the dropdown menu and click Install SSL.
The installation process can take up to an hour. Once finished, your domain will automatically use HTTPS.
4. Set Up a Permalink Structure
Each web page has its own permanent URL structure called a permalink. A clean permalink structure helps users and search engines navigate your WordPress site, improving its search engine optimization.
Website URLs appear in search results, and most visitors trust clean and readable permalinks more than suspicious ones with random letters and numbers.
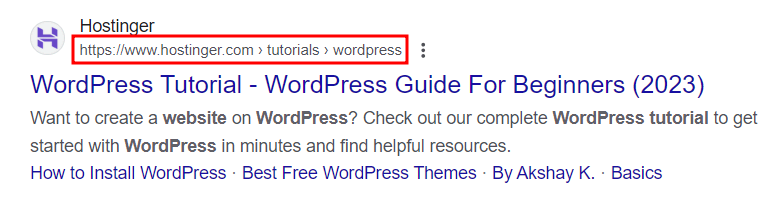
WordPress uses the default ID number as the permalink for a page, such as https://example.com/?p=123. You can change your WordPress website’s permalink structure to other pre-defined ones or custom SEO-friendly URLs.
Head to Dashboard → Settings → Permalinks to change the default permalink structure. Then, select the Custom Structure option and include the necessary tags.
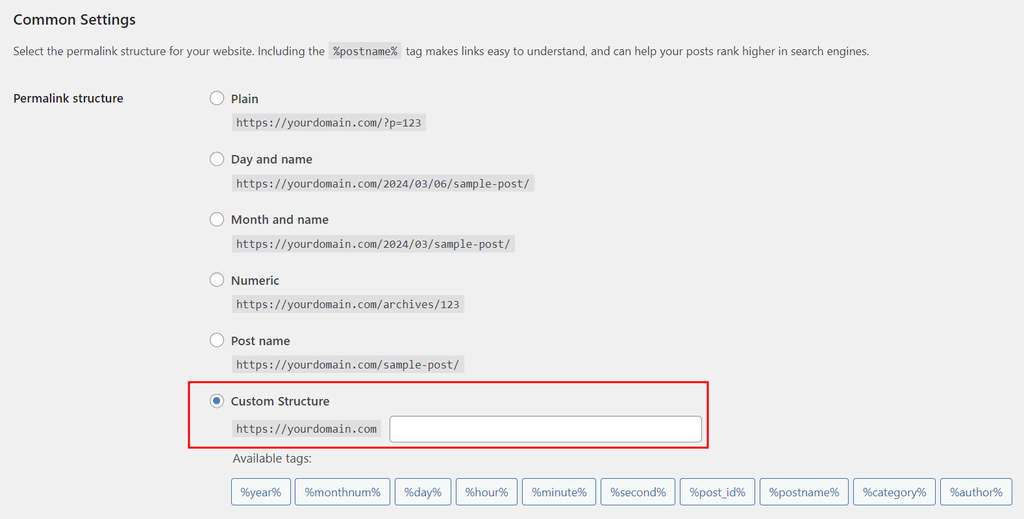
Choose the tags based on your website type. For example, news sites often include the date and title in the site’s URL. Meanwhile, online stores’ permalinks usually have the category and post name.
If your website is already online, remember to redirect your old URLs after changing the permalink structure. This way, you can prevent losing existing referral links on your live WordPress site.
Expert Tip
When working on a new website or optimizing an existing one, start with internal links and overall site structure:
1. In a spreadsheet, write down all the categories and pages the website might have. This way, you’ll know what internal link structure to choose. For example, if the website has three main categories, include their names in permalinks to create physical silos.
2. Avoid random strings and numbers in your URLs. Don’t use dates unless your content is highly time-sensitive. Having the post name just after your domain is usually the best solution.
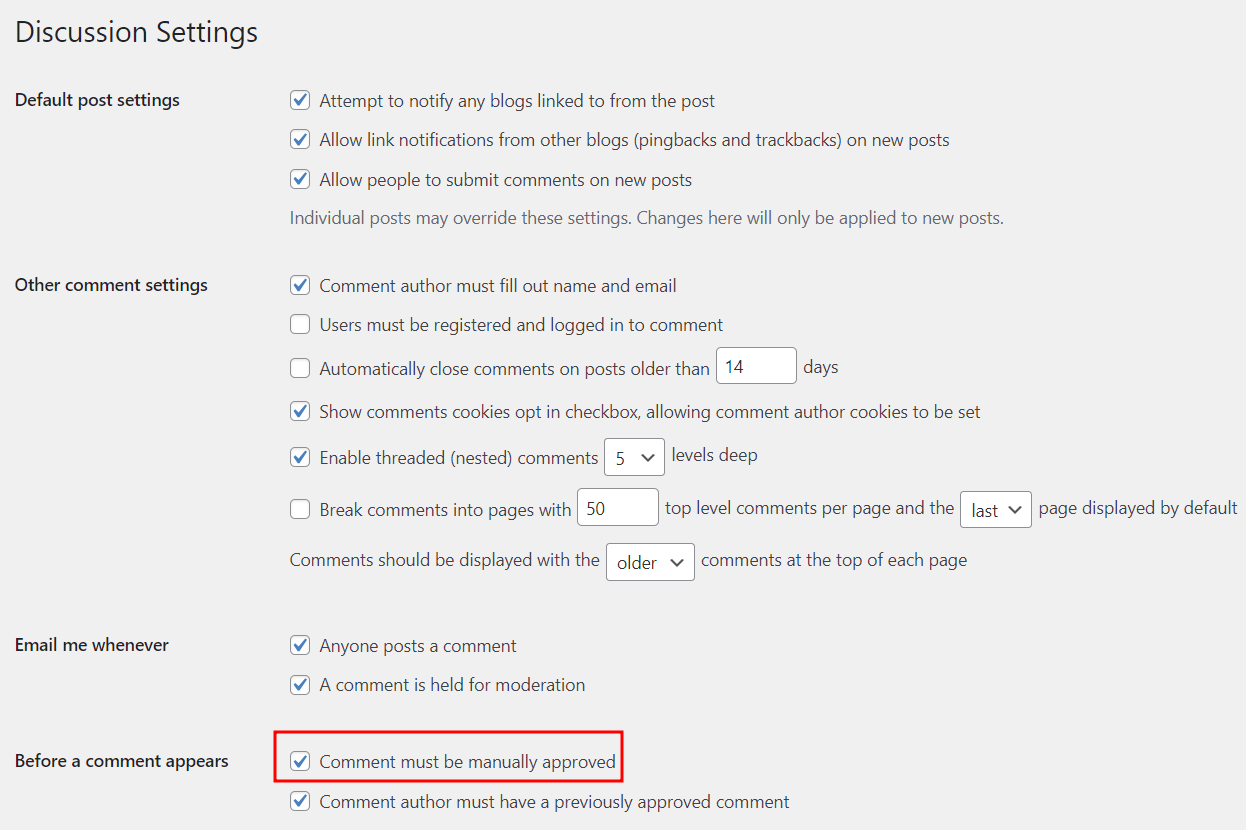
5. Manually Approve Comments
Spam comments often include links to malicious sites that can hurt your rankings. Enabling manual comment approval will help secure your WordPress website and protect its reputation.
We recommend reviewing each comment to avoid unwanted messages on your site. Fortunately, WordPress makes this easy with its Discussion Settings.
Head to Dashboard → Settings → Discussions from the WordPress dashboard to enable manual comment approval. Check the Comment must be manually approved box, scroll down, and click Save Changes.
Here are the main elements to consider when screening comments:
- Message content. Check the content of every comment and only approve the ones that are relevant to the page or post.
- Username. Make sure the username represents a real user and does not contain offensive or inappropriate language.
- Site links. Remove comments that include links to other websites, even non-spam messages.
You can also install a WordPress anti-spam plugin to help filter comments that may harm site security. We recommend Akismet, a plugin that scans your blog posts, comments, and contact forms for spam.
WordPress SEO Best Practices for On-Page
After setting up an SEO-friendly WordPress website, you should put effort into the site’s content. This step is called on-page SEO – the practice of optimizing website elements for search engines and visitors.
Let’s take a look at important WordPress on-page SEO tips you should know.
1. Conduct Extensive Keyword Research
Most people find content online by entering specific keywords into search engines. Optimizing your content with those particular keywords is a must to make it appear in the top results.
So, how do you find the keywords your target audience is searching for? This is where keyword research comes into the picture. But before we get into the steps, let’s understand the two main types of keywords:
- Short-tail keywords. Typically one to three words long, they are broad and generic terms that cover a wide topic area. Examples include “books”, “coffee”, and “digital cameras.”
- Long-tail keywords. More specific phrases that are longer, usually over three words. They often resemble short sentences or questions, such as “How to make a coffee.”
Long-tail keywords tend to have less competition, making them easier for new websites. Meanwhile, short-tail keywords are much harder to rank for since all the established websites are targeting them.
The first step of conducting proper keyword research is to evaluate the search intent – what users want to achieve with their query. Understanding the search intent helps determine the best type of content for a keyword. Here are the most common search intent categories:
- Informational. Users want to gain knowledge or find a solution by asking questions, such as “how to tie a shoe” or “what are common symptoms of flu.”
- Navigational. Instead of general information, users are looking for a specific site or page. For instance, someone looking to access their Facebook account might type “Facebook login” into a search engine.
- Commercial. The intent to buy is there, but users still want to research their options. Searches like “best smartphones 2024” and “top-rated electric toothbrushes” are good examples of the commercial intent.
- Transactional. At this stage, users are ready to make a purchase. Examples include “buy iPhone 13 online” or “renew Netflix subscription.”
Once you have established the search intent, the next step is to find the right keyword. Use a keyword research tool, like Ahrefs, to find the following information:
- Search volumes. The number of keyword searches.
- Trends. The trend over time, interest by region, and related search queries.
- Difficulty. How hard it is to rank with a particular keyword.
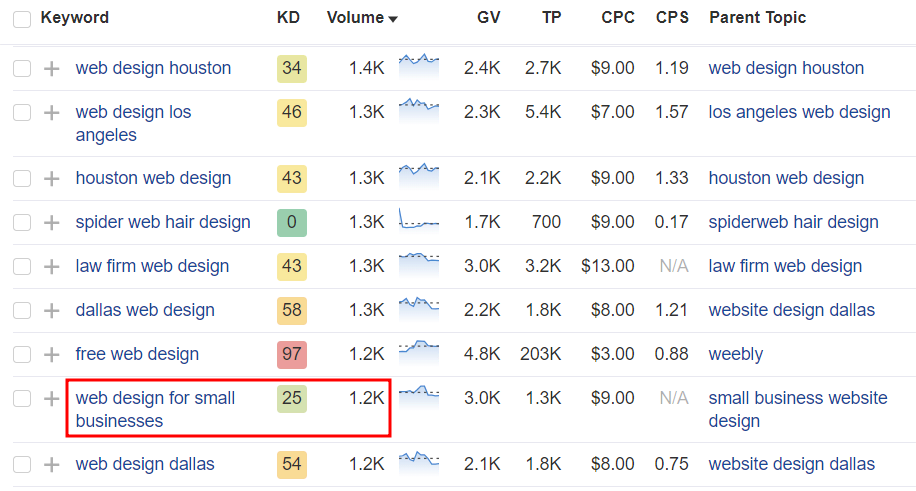
For example, if you want to find content ideas for a web design agency, head to Ahrefs → Keywords Explorer. Enter “web design” into the search field, choose your target location, and click Search.
As you can see, this particular query has a stable volume of around 55,000 searches per month and a keyword difficulty of 85, which is “Super hard.”

Thankfully, you can find less competitive keywords by navigating to Keyword Ideas → Matching terms on the left sidebar. Choose keywords with a low difficulty number but a decent search volume, like “web design for small businesses.”
2. Publish SEO-Friendly, High-Quality Content
Writing SEO-friendly content can improve your website’s authority and increase its rankings on Google search results.
When creating blog posts or content pieces, ensure they are:
- In-depth and well-researched. Every content piece should accurately answer a specific search intent and cover all essential points.
- Original. Instead of repeating what’s already said by others, offer a unique perspective and advice users can’t find anywhere else. You can either write based on your own experience or interview subject-matter experts.
- Readable. Use simple language, short paragraphs, and bullet points when necessary for better content scannability.
- Well-structured. Use clear headings to separate your content into sections, and make sure they flow well.
- Optimized length-wise. The ideal post length depends on the keyword and competing articles. Use content optimization tools like SurferSEO to get word count suggestions.
- Published and updated regularly. Visitors are more likely to return to websites that consistently publish new blog posts. Also, schedule regular audits to make sure the information in your content is accurate and up-to-date.
Expert Tip
A content piece’s word count should depend on the keyword you are targeting. The best way to determine it is to search the keyword and calculate the average word count of the top five ranking pages.
On top of that, write content with the focus keyword in mind. This way, you would have a better direction when writing and optimizing it for that specific query.
However, avoid keyword stuffing – a practice of adding too many keywords in the content, which can lead to a lower rank in SERPs.
If you need help producing high-quality content, here are some useful tools to try:
- Hostinger WordPress AI Assistant. Say goodbye to the infamous writer’s block and generate content faster with AI.
- Semrush SEO Writing Assistant. This WordPress plugin will evaluate your text based on its readability, keyword-friendliness, originality, and tone.
- Grammarly. Find and fix typos, grammatical errors, and unnecessarily complex sentences to improve your content quality.
3. Create WordPress Tags and Categories
As you publish more and more articles, use categories and tags to simplify navigation.
In WordPress, categories are used to group relevant posts in a hierarchical structure. They help organize your content pieces into parent categories and subcategories so that readers can find what they need quickly.
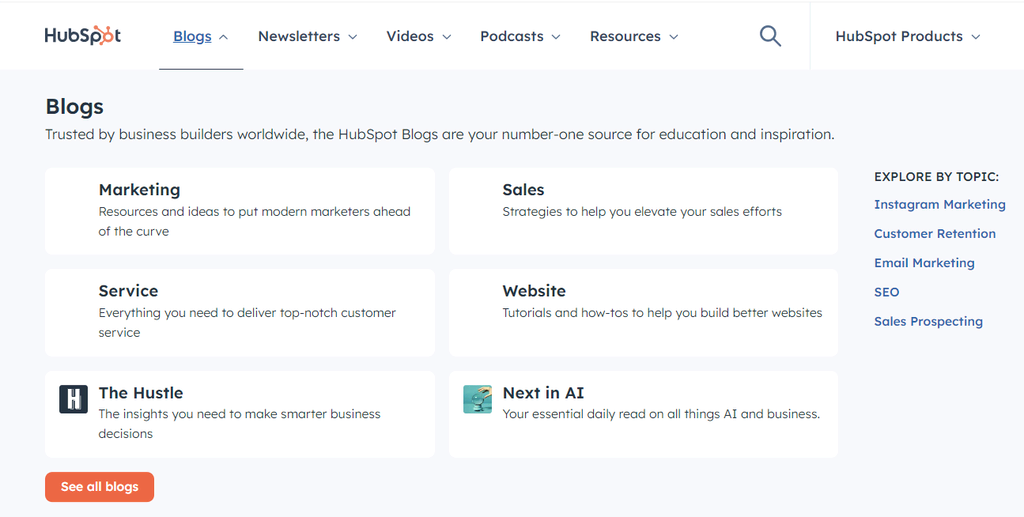
For example, HubSpot’s blog section includes a category menu that makes it easier for visitors to navigate between different content types.
When users hover over one of the parent categories, its subcategories will appear. This is called a WordPress mega menu, and it’s often used by websites with many pages and posts.
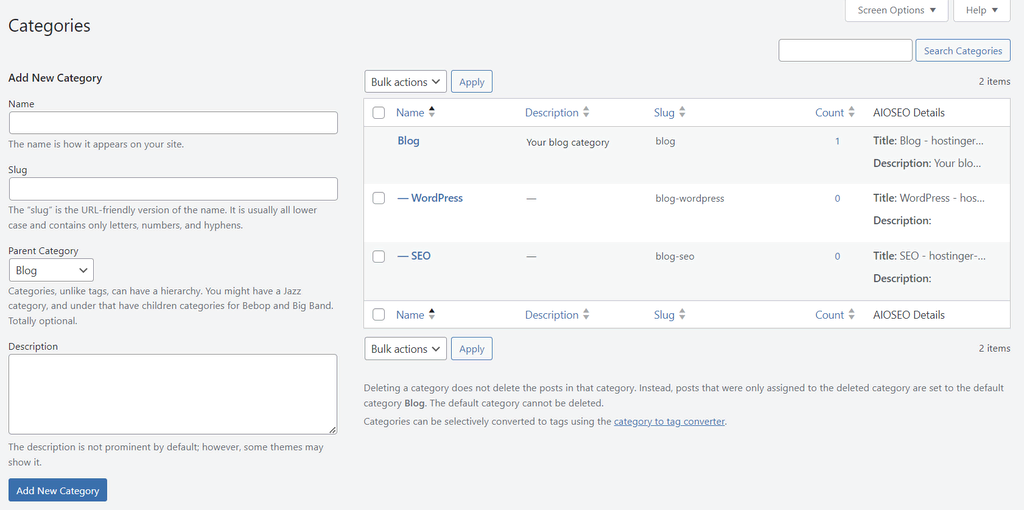
To create categories, open your WordPress dashboard and head to Posts → Categories.
Fill in the Name, Slug, and Description fields. If it’s a subcategory, assign a parent category for a more organized website structure. Save the changes by clicking Add New Category.
After adding several of them, you will see the list of all existing categories on the right side of the screen.
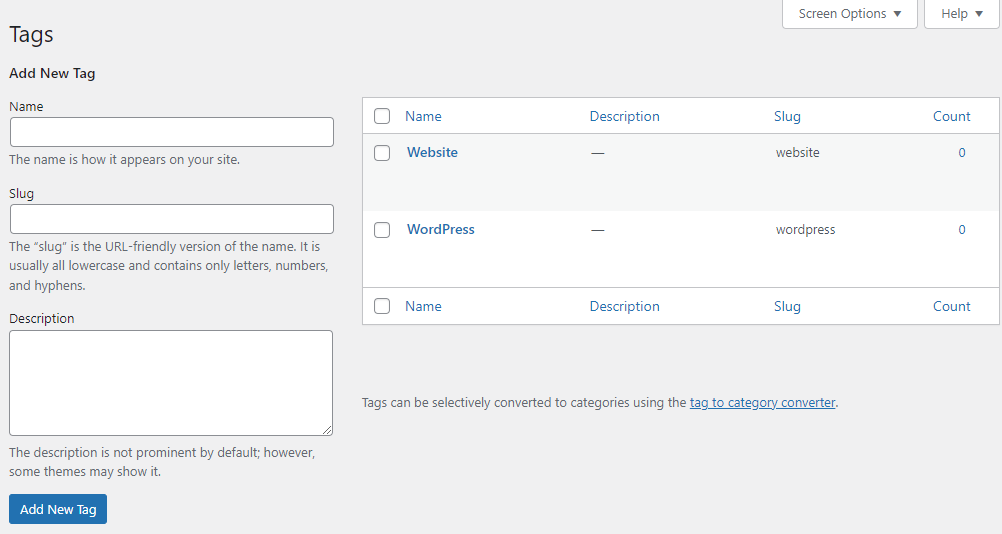
Unlike categories, tags are entirely optional, and there’s no hierarchy to them. You can assign multiple tags to describe various aspects of a blog post. For instance, an article about healthy meals may have tags like “vegan,” “gluten-free,” and “30-minute meals.”
Users can simply find content by clicking a particular tag that interests them, which will lead them to all posts tagged with that term.
To create tags, navigate to Posts → Tags, fill in the relevant fields, and click Add New Tag when finished.
You can also use the WordPress editor to add new categories and tags. From the WordPress block editor, you can find the options to create categories and tags on the right sidebar under Post. However, this method does not let you insert descriptions.
While there isn’t a strict limit to the number of categories you can assign, each post should have no more than two. Too many categories can overwhelm visitors, making it difficult to navigate your site and find the content they’re interested in. The same can also be said for tags.
4. Enable the “Last Updated” Date
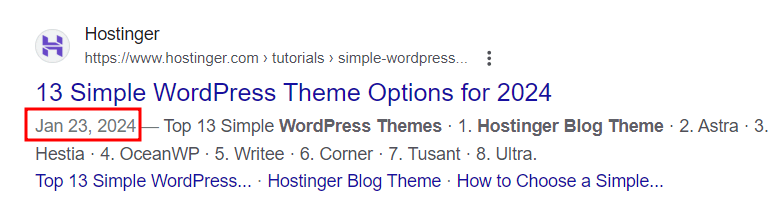
Users tend to look for articles with the most recent information. Enabling the Last Updated date on WordPress posts signals to readers that your content is regularly updated, making them more likely to click.
Even though the publishing date of a blog post does not affect a website’s search engine rank, it is still visible on Google search results.
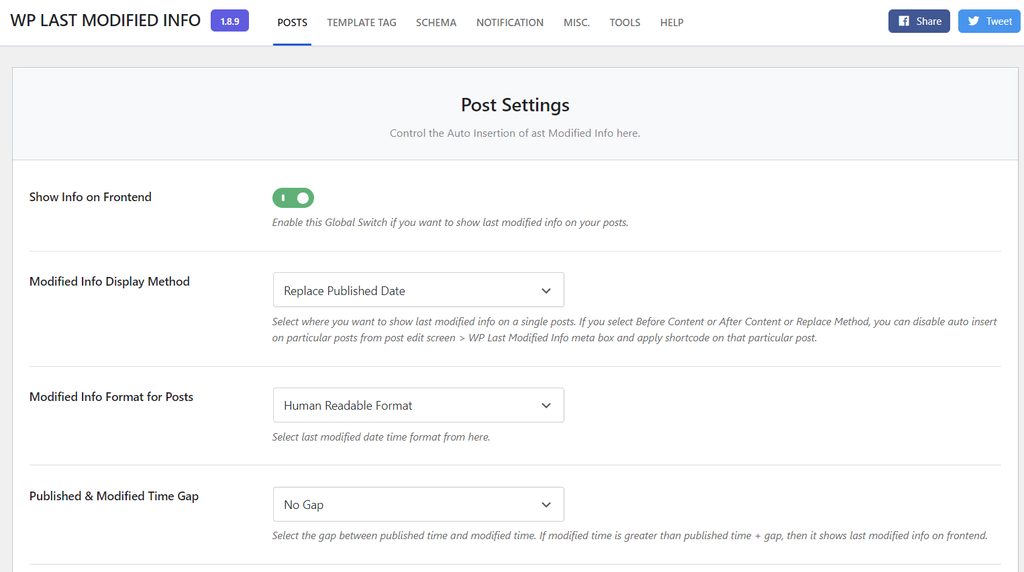
Some WordPress themes, such as GeneratePress, use filters to show the last updated date. If your theme does not have that feature, enable it using a WordPress plugin like WP Last Modified Info.
Once you’ve installed the WP Last Modified Info plugin, activate the last updated info settings:
- Head to Settings → WP Last Modified Info → Posts.
- Toggle the button next to Show Info on Frontend to turn on the last updated info feature.
- Change the rest of the settings accordingly and click Save Settings.
Next, head to your posts and pages and check if your WordPress site shows the last updated date.
To change the date on the block editor, click the Settings icon and scroll down to Discussion. Finally, adjust the date and settings on the Last Updated and Modified Info sections.
5. Optimize Meta Titles and Meta Descriptions
While not a direct ranking factor, optimizing your metadata is still important to improve click-through rates.
When users come across your content in search results, a clear meta title and description will give them an idea of what it’s about. If the information seems useful, they will be more likely to visit your page.
For instance, the following metadata might be enticing for people looking to learn more about a web server.
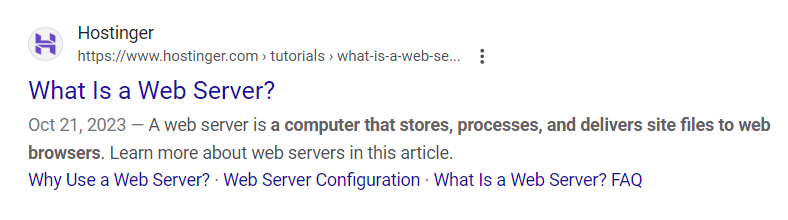
Making the Most Out of Meta Titles
A meta title, also known as a title tag, is an HTML element that specifies the title of a web page. This headline is shown in search results, a browser’s title bar, and certain social media platforms, helping users identify the content of a page quickly.
Follow these tips to make the most out of your meta titles:
- Keep it short. Search engines will cut off an overlong title tag, so keep it under 60 characters.
- Include the focus keyword. This lets search engines know which SERPs your post or page fits best.
- Make it unique. Every post or page should have its own meta title. If it differs from the page title, your meta title should still be relevant to the content.
- Avoid clickbait. Never use a deceptive tactic to attract users to visit your page. Misleading meta titles can frustrate users and leave a poor impression. Google may also remove pages with clickbait titles from the SERP.
If the search engine doesn’t find enough relevance between the meta title and the search query, it may generate alternative title tags. Therefore, customizing your title tag will give you more control over your pages’ appearance on Google search results.
Optimizing Meta Descriptions
A meta description is an HTML element that briefly summarizes your content. Since it’s longer than a meta title, you can use it to give more context about your page.
Here are ways to optimize your meta descriptions:
- Include the focus keyword. Search engines highlight keywords in meta descriptions when presenting them on SERPs. Although including keywords does not affect ranking, it helps drive more traffic.
- Use the active voice and calls to action. Make your meta description sound direct by using active voice and call-to-action phrases. Also include the benefits of reading your post or page to inspire users to take the suggested steps.
- Keep it short. Aim for 50-160 characters since search engines may cut overlong descriptions.
- Avoid quotation marks. Search engines tend to cut off a description after quotation marks, so use apostrophes instead.
- Make it unique. Do not copy your meta descriptions from other websites. Every post and page should have an original meta description.
- Ensure its relevancy. Your meta descriptions should be relevant to your content. Failure to do so may force search engines to generate their own snippets.
Pro Tip
Use tools like ToTheWeb to test the acceptable lengths for your meta titles and descriptions.
Unfortunately, search engines often rewrite meta descriptions with excerpts they find within the post.
When that happens, what you need to do is enter your focus keyword on search engines and look at the meta descriptions of the top 10 ranked websites. This simple research helps you get a grasp of what Google thinks is a good description for a particular keyword.
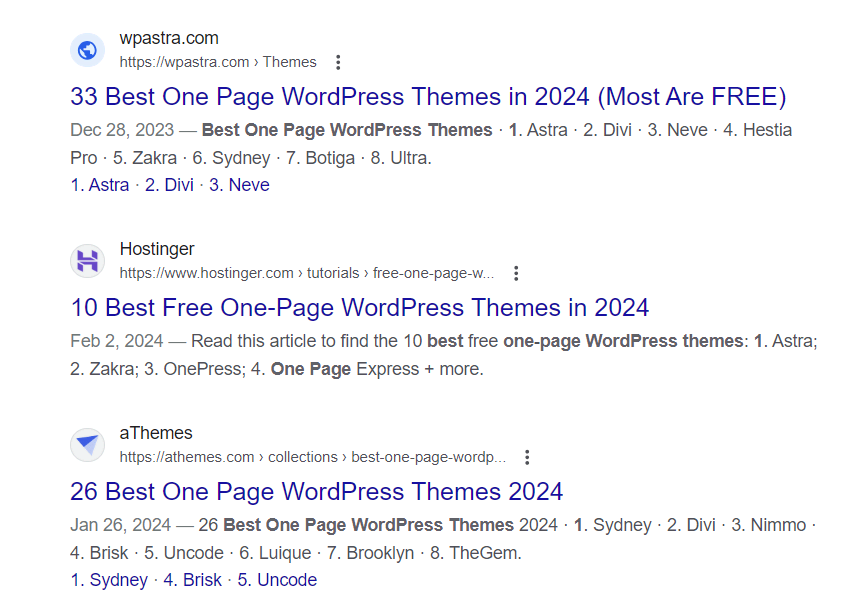
For example, articles formatted as lists or listicles often feature some of their items within the meta description, giving readers a preview of what they’ll find inside.
Numerous WordPress SEO plugins have tools to optimize meta titles and descriptions.
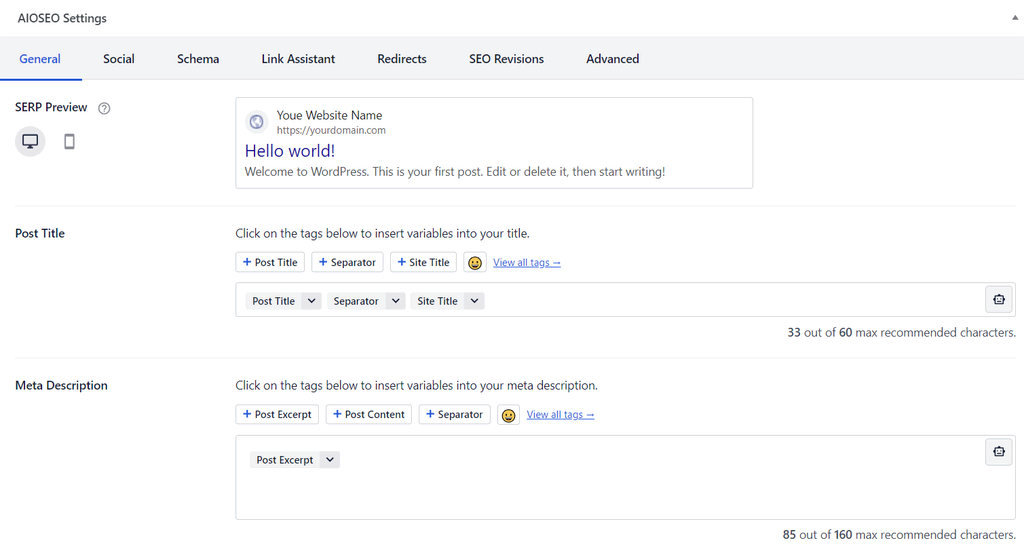
AIOSEO lets you configure each page and post’s meta title, meta description, and recommended character count.
It also comes with SERP Preview, so you’ll know what the title and description will look like in search results. These features are accessible at the bottom half of the block editor.
6. Use the Proper Heading Tags
Heading tags create a clear and accessible content structure.
With headings, screen readers can achieve better in-page navigation for users with visual impairment. Search engines also use heading tags to understand the content better.
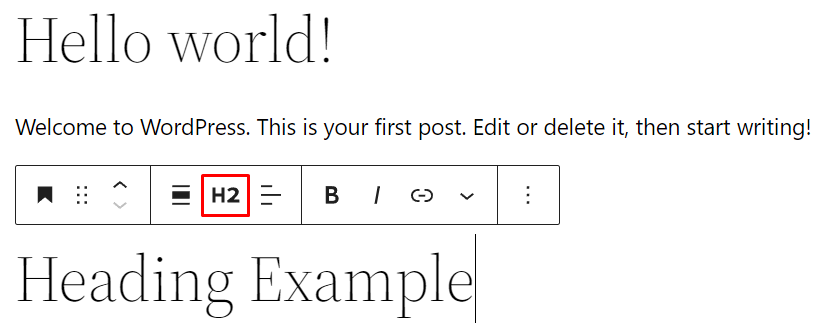
Heading tags start from H1 to H6. The best practice is to use one H1 tag per content piece. Since the H1 is often the title, it should include the focus keyword to rank better on search results.
The rest of the article can use the H2 and H3 tags to separate sections. Even though H4 to H6 heading tags can be helpful, they usually contribute to a poor reading experience. We recommend using regular, bold text instead.
Add headings by editing a page or post with the block editor. Select the Heading block and choose the appropriate tag on the toolbar.
Here are some of the best practices to consider when adding headings:
- Follow the numerical order. Use the tags in descending numerical order. For example, H2 tags should come after H1 and H3 after H2.
- Make it concise. Write headings and titles that are 50-70 characters long.
- Use a question sentence. This format will increase your chances of getting a position in Google’s Featured snippet and People also ask sections.
- Include keywords. To improve rankings, include the main and secondary keywords in headings.
Google’s search results may feature heading tags under the meta description. Therefore, the right phrasing can encourage users to visit your page.
7. Implement an Internal Linking Strategy
Internal links are hyperlinks that direct website visitors to pages or posts on the same site. There are two main types of internal links – navigational and contextual.
Navigational internal links typically contain the website’s main menu or structure, helping users find the page they need. These are typically located on the navigation bar, sidebar, or footer.

Meanwhile, contextual internal links are embedded in the content pieces. For example, on a product page, the description has internal links to pages that explain the features in detail.
Another common internal linking practice is adding internal links in blog posts and directing users to related topics. For instance, a post about “Installing a WordPress theme” can link to “What is a WordPress theme” and “The 10 best free WordPress themes.”
Both navigational and contextual internal links contribute to a site’s SEO. They help build an information hierarchy and establish authority. Contextual links also signal to Google that your website has high-value content.
Internal links are very important in SEO as they bring the following benefits:
- Search engines understand your site better. Internal links help search engine crawlers discover related URLs and understand the relationship between your pages and posts.
- Builds authority. If a page has authoritative inbound links, the authority can be passed to another page on the website using internal links. This is called link juice – the value given from one page to another.
- Easier navigation. Internal links encourage visitors to stay on the website. These links may lead to other pages where visitors can perform specific tasks or learn about a new concept.
Although creating internal links may seem simple, it’s crucial to do it correctly. Here are some SEO tips for a good internal linking strategy:
Create Hub Pages and Topic Clusters
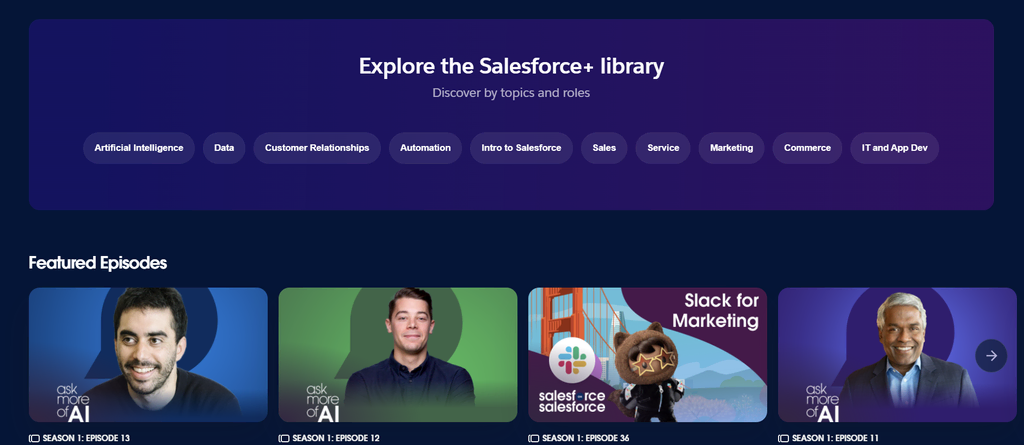
Hub pages, in the context of content strategy and SEO, refer to a website’s central pages that provide an overview of parent topics and contain links to related, more detailed content.
These pages are designed to be comprehensive resources on a particular subject, making them valuable both for users seeking information and for search engines organizing content.
The Salesforce+ page is a good example of a hub page. It lets users explore Salesforce’s library of blog posts and podcast episodes from one place.
Follow these steps to create hub pages and topic clusters for your site:
- Identify the core topics that are relevant to your audience and business. These should be broad enough to generate multiple related articles but specific enough to be relevant to your target audience.
- Create a hub page for each topic. These pages should introduce subtopics without going into granular detail.
- Ensure that each hub page is optimized for SEO, with a focus on a primary keyword that represents the core topic.
- For each subtopic related to your core topic, create detailed content pieces, including blog posts, articles, whitepapers, and videos.
- Each content piece focuses on a specific aspect of the core topic, targeting long-tail keywords related to the main keyword of the hub page.
At Hostinger, we have dedicated hub pages for broad topics like WordPress tutorials. Each page contains articles that fall under the main category.
Use Descriptive Anchor Text to Link Between Pages
Link each content piece in the cluster back to the hub page using descriptive anchor text. This helps users navigate back to the broader context and allows search engines to understand the relationship between the hub page and the cluster content.
Good anchor texts contain keywords that represent the page content, but they don’t have to be an exact match. For instance, if your post talks about “How to create a WordPress site,” then using “make a WordPress site” as the anchor will do the trick.
Regularly update your hub pages and cluster content to keep them current and comprehensive. As new trends emerge or new questions arise within a topic, create additional content pieces to address them and add them to the relevant cluster.
Use a WordPress SEO Plugin
A WordPress SEO plugin like AIOSEO can also help your internal linking strategy. The plugin has a link assistant feature that can identify orphan pages or pages with no internal links to optimize your SEO effort:
- Head to All in One SEO → Link Assistant from your WP dashboard.
- Click Activate Link Assistant. After that, hit Scan Now if your posts haven’t been crawled yet.
- The linking overview will appear, showing how many internal, external, and affiliate links your site has.
To check individual posts, click See a Full Links Report. You’ll be redirected to the Links Report tab, which has three main sections:
- All. It contains all of the posts you’ve published, along with their linking summary.
- Linking Opportunities. This section shows all missed internal linking opportunities in your content.
- Orphaned Posts. Articles with no inbound links are listed here.
8. Include Reliable External Links
Besides linking to your own content, external links to other websites also benefit the readers and your search engine rankings. External links allow readers to explore a topic further, especially if your site doesn’t already have a content piece that covers it.
That said, only link to reliable and trusted sources. Check the external website’s domain authority (DA) to determine its trustworthiness.
Moz has a free domain SEO analysis tool to check a site’s DA score. If the score is between 70 and 100, it is a good source to link externally. This tool also shows the number of backlinks a website has and how many keywords it ranks for.
Here are some WordPress SEO tips on adding external links:
- Avoid paywalled links. Readers should be able to immediately access the content you’re linking to without subscribing or signing up.
- Open the links in a new tab. By doing so, readers can navigate between your site and the external link more easily.
- Reach out to the website owner. Inform them that you have included links to their content and ask whether they’d like to link to yours.
- Check the published or last modified date. Avoid referring to content older than two years, as the information will likely be outdated.
- Prioritize internal links. Check your content first, and only provide links to information visitors cannot find on your website.
If you use an external link to a website you do not want to be associated with, include the nofollow rel attribute. It will prevent search engines from crawling the link, therefore saving your link juice. You can easily add nofollow external links using the WordPress code editor:
- Select the anchor text to which you want to add a link.
- Click the link icon or press CTRL + K.
- Enter the URL in the relevant field, and enable the Add nofollow to link option.
- Press Enter to insert the nofollow link.
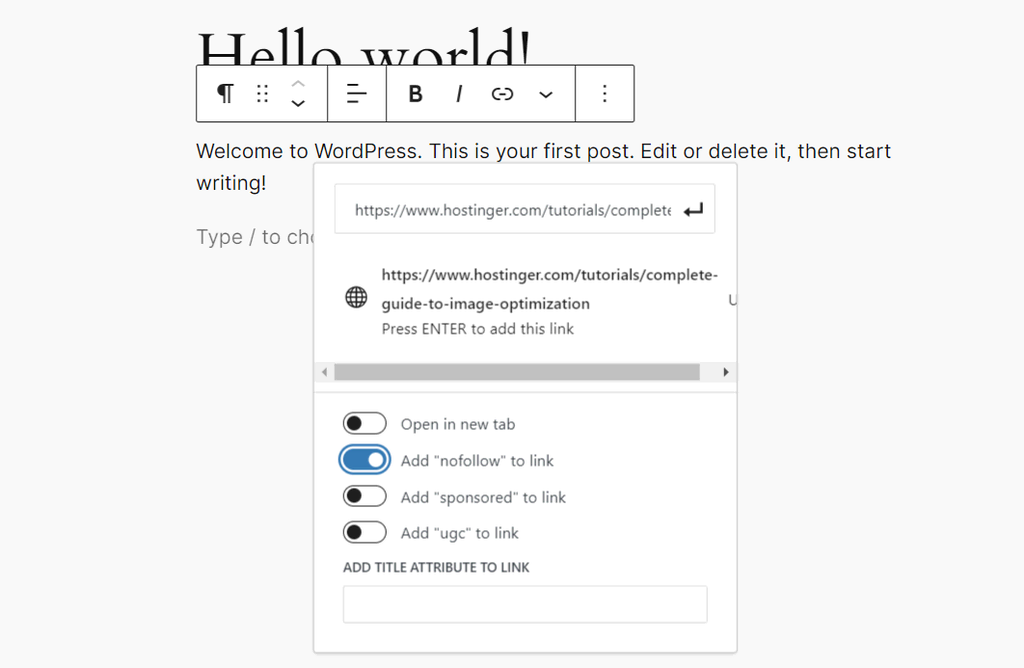
If you add affiliate links or user-generated content, use the rel sponsored and rel ugc attributes, respectively.
9. Keep UX In Mind
UX or user experience is what users feel and perceive when interacting with your website.
Your website should provide a great experience, especially on mobile devices, where users spend most of their time.
Here’s how to create a mobile-friendly website:
- Install a responsive WordPress theme to keep your website running smoothly on all screen sizes.
- Set up AMP on your WordPress site. Short for Accelerated Mobile Pages, it boosts the loading speed of your website’s mobile version by simplifying the HTML, implementing strict layout constraints, and leveraging the AMP Cache.
- Use Google’s Lighthouse tool to check if your website is up to standard.
You also need to create a clear navigation menu so visitors can easily move between different pages on your site. Consider creating a WordPress mega menu if you have many pages and posts.
Moreover, avoid adding too many pop-ups, subscription form banners, or advertisements that distract users from the main content and ruin their experience.
Smooth navigation should apply to your blog posts as well. Ideally, your content should quickly answer the search intent without requiring visitors to scroll too far down the page. If visitors can’t find the information they’re looking for immediately, they may leave your site.
10. Implement Breadcrumb Trailing
Breadcrumb trailing, or simply breadcrumbs is another important strategy to improve your site’s navigation system and user experience. It allows users to understand their current location within a site and easily trace their path back to the starting point.
Breadcrumbs appear as a row of links, usually at the top of a web page, just under the navigation bar or header.
They typically follow a structure that starts with the homepage, followed by subsequent sections leading up to the current page, separated by a delimiter like a forward slash (/), greater than sign (>), or another symbol.
There are different types of breadcrumbs:
- Hierarchy-based. The most common type, hierarchy-based breadcrumbs, show visitors where they are within the WordPress website structure. They feature the sequence of individual pages from the homepage.
- Attribute-based. Such breadcrumbs are popular on eCommerce websites. They show product categories, like size and color.
- History-based. This breadcrumb type is an alternative to your browsing history, showing the previous pages you have visited.
If you run a content-heavy website with many pages and blog posts, enabling breadcrumbs can significantly improve user experience and navigation.
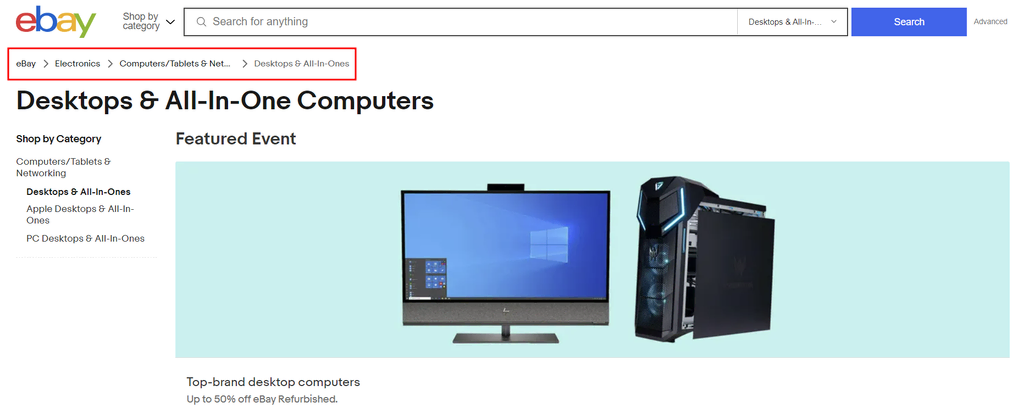
eBay features a great example of how breadcrumbs help visitors navigate their website. Users can click on previous categories within the breadcrumbs to find related items when looking for a product.
Breadcrumb trailing also helps search engines understand the relationship between pages while also encouraging visitors to explore more pages on your website, reducing bounce rates.
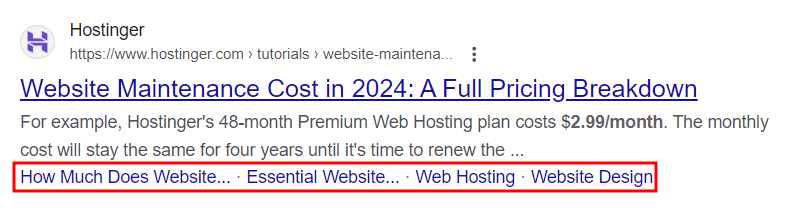
For certain queries, Google displays breadcrumbs on SERPs instead of the page’s URL. This helps users know the page’s location or category on the website, allowing them to decide whether the page fulfills their search intent.

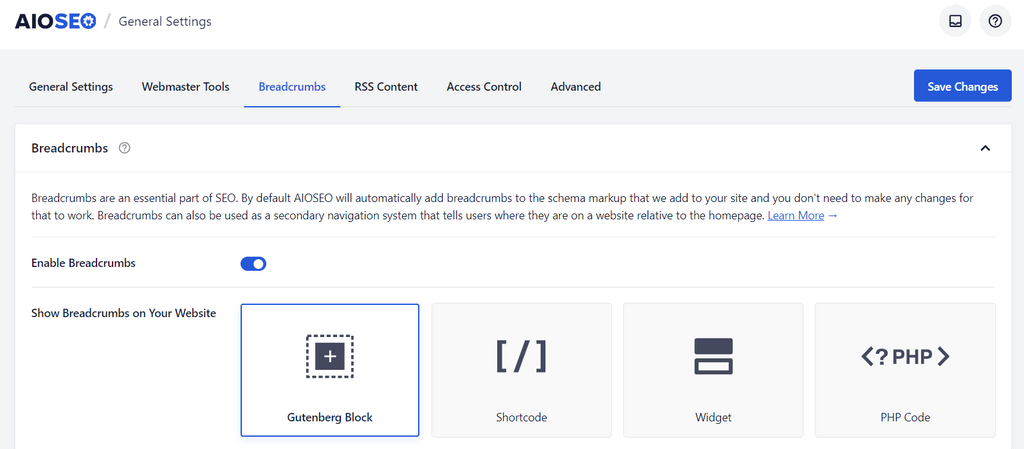
Here’s how to add breadcrumbs on your WordPress website using AIOSEO:
- Navigate to All in One SEO → General Settings.
- Open the Breadcrumbs tab.
- Switch the Enable Breadcrumbs toggle on and select how you want to embed breadcrumbs on your website.
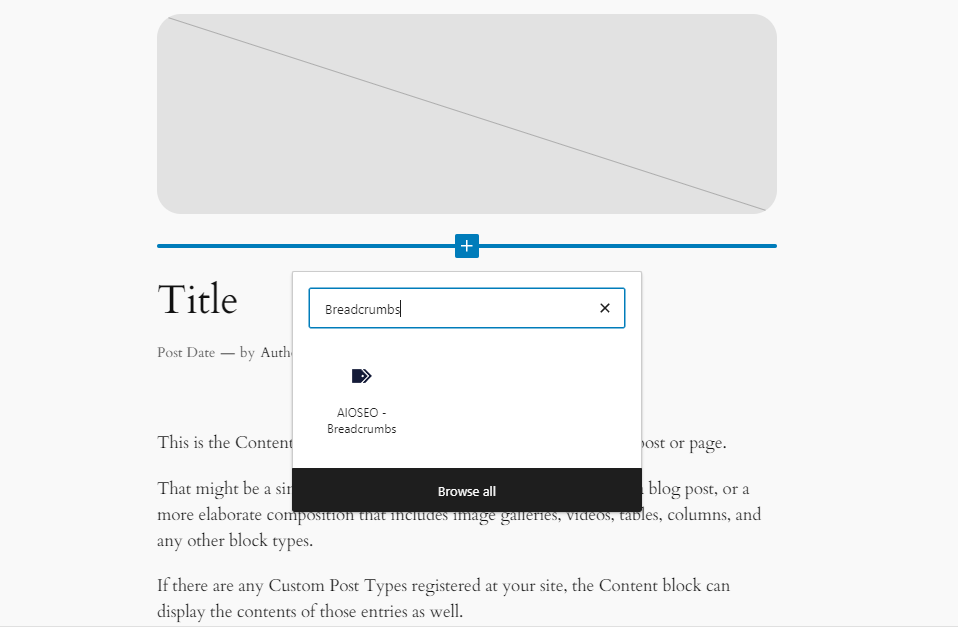
Once it’s enabled, you can add the breadcrumbs on any WordPress template or page. In the example below, we use the AIOSEO Breadcrumbs block on the single post template, so that the breadcrumbs will appear on every blog post.
11. Optimize WordPress Images
Images help capture the audience’s attention and reinforce the ideas you want to convey. However, they can also take up a lot of resources and slow down your site.
Optimizing images can improve your site’s loading times and accessibility, which may improve rankings on SERPs.
Let’s discuss three ways to perform image optimization.
Compress Your Images
Image compression can reduce your image’s file size and keep your site lightweight.
You’ll have to choose between lossy and lossless image compression. The best choice will depend on the type of images you feature on your site.
For JPEG files without too many details, use lossy compression. Meanwhile, lossless is more appropriate for PNG images with a lot of text.
Check out our in-depth guide on WordPress image optimization for the complete steps and best practices.
Add Alt Text for Images
Alt tags or alt text (alternative text) describe what your images look like to search engines. Screen readers also use alt text to help visually impaired users understand what the images convey.
In WordPress, you can add alt text to images via the media library and the block editor. We recommend adding alt text directly via the media library so that it can be attached to the image whenever you want to reuse it.
To do so, head to the Media Library and enter the Alt Text under ATTACHMENT DETAILS.
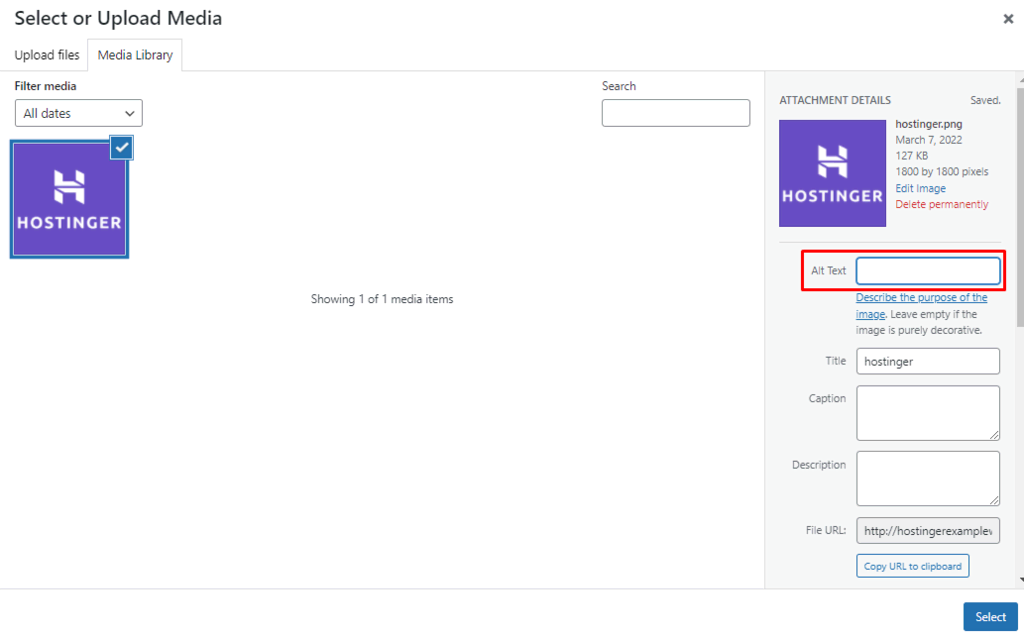
Here are some WordPress SEO best practices for alt text:
- Describe the image accurately. Write a description that could help the visually impaired understand its content.
- Keep it concise. The ideal alt text is between 80-125 characters long.
- Include keywords when necessary. However, avoid keyword stuffing. Ensure that the keywords are relevant to the image.
- Maintain sentence structure. Write alt text with proper grammar, spelling, and structure.
Use Readable File Names for Images
File names can also help search engines understand visual content. In fact, search engines are more likely to recommend images with readable file names. For that reason, it’s best to use custom file names instead of ID-based labels like IMG_0001.jpg.
Consider these factors when writing your image file names:
- Short and descriptive. Keep your image names under five words. The file URL should look orderly and readable.
- Structure. Google recommends writing file names in lowercase and replacing spaces with hyphens. Avoid using numbers and special characters.
- Include keywords. Use keywords in image names if they accurately describe the file.
12. Include Video Content
Video content is an effective marketing tool to engage your audience.
The trend has been rising in recent years. Thanks to platforms like YouTube, TikTok, and Instagram, video content has become one of internet users’ primary sources of information. Experts predict that video content will make up 82% of the internet traffic in 2024.
You can embed video content from video hosting platforms such as YouTube, Vimeo, or other social media. It’s also possible to upload the video directly to the WordPress site, but we don’t recommend it as it can quickly take up resources.
Having video content for your business can increase conversion rates. A study suggests that having videos on your landing pages can boost the conversion rate by up to 86%.
Here are some tips for creating successful video content:
- Create the video version of the written content. Whether it’s a blog post or a landing page, chances are some people want to consume it in a video format.
- Embed the video on the corresponding page. Upload the video to YouTube and embed it into the WordPress site to avoid excessive server resource usage.
- Publish search engine-friendly videos. Search engine-optimized videos can appear on the Videos tab of Google search results. To achieve this, include more video details, such as the title, description, and thumbnail, using the VideoObject schema markup.
13. Include an RSS Feed Subscription Box
Really Simple Syndication (RSS) is a web feed that lets subscribers receive updates from your website in an easy-to-read format. Although RSS feeds don’t directly impact SEO, they help increase organic traffic and session time on your website, which can help you rank better.
RSS is enabled on WordPress sites by default – you can access it through yourdomain.com/feed. With most RSS feed reader apps, users will use this link to add the website to their feed.
To let users know that you have an RSS feed on your website, embed an RSS social icon block and link it to the RSS feed URL.
If you use a WordPress block theme, click the (+) icon, search for the Social Icons block, and insert one for RSS Feed. Enter your RSS feed URL and save the changes.
Now, the RSS icon will appear on your site. If users click it, they will load the RSS feed URL, which they can use to add your site to their RSS feed.
14. Implement Local SEO
Local SEO improves your site’s visibility in local business searches. For example, people may search for “restaurants near me”. The search engine will then use businesses’ IP addresses to detect their locations and provide search results in that area.
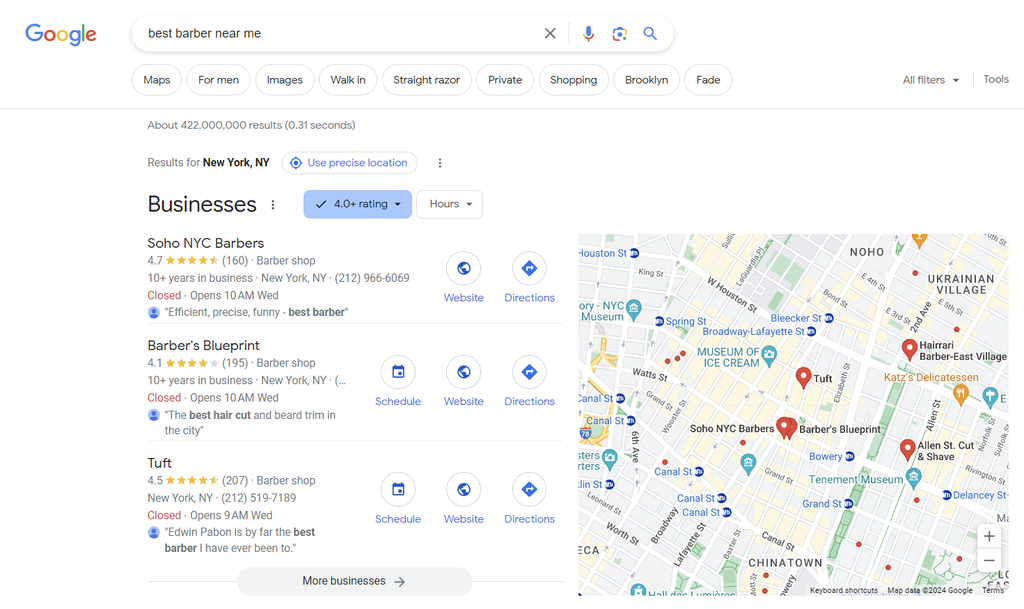
Creating a Google Business Profile is one way to improve your local SEO. This way, you can appear on the map shown in a Google local search result. Also, add your business information, including your business name, address, location, and phone number.
Your business data is a ranking factor in local searches. Google also measures the distance and relevance of your business to the search query.
Another local SEO method is doing local keyword research and optimizing your pages.
For example, your page may rank well for vegan restaurants. You can optimize it for local searches by adding keyword modifiers like “London vegan restaurants”. Research the volume and difficulty of such keywords using SEO tools like Ahrefs.
Technical SEO Best Practices
Technical SEO is still considered a part of an overall on-page SEO strategy. However, it focuses specifically on the aspects of your website that are designed to improve search engine crawling and indexing.
From maintaining load speed times to utilizing schema markup, this section will pinpoint six technical website optimization strategies that you need to implement for the best results.
1. Maintain the Performance of Your Website
Page speed can be the determining factor that keeps visitors around longer. That’s because 40% of users abandon a website if it takes more than three seconds to load.
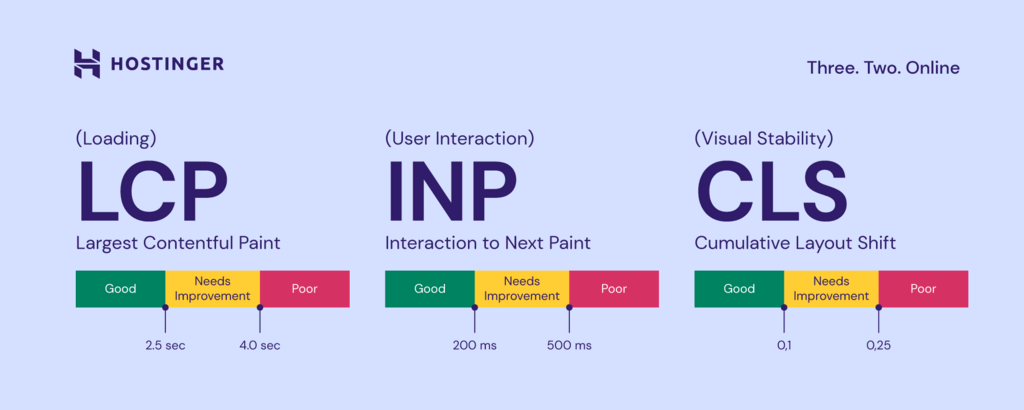
Website performance is also an essential ranking factor, as Google uses it as an indicator of a good user experience. Google analyzes website performance based on the following Core Web Vital metrics:
- Largest Contentful Paint (LCP). The time it takes for a page to load its largest elements, including images and text blocks.
- Interaction to Next Paint (INP). The period in which a page updates after some user interaction, like clicking on a button or pressing a link.
- Cumulative Layout Shifts (CLS). The number of times a web page experiences unexpected layout shifts. These occur when visible elements on the page change position or size suddenly, leading to a poor user experience.
Use tools like GTMetrix or Google PageSpeed Insights to perform website speed tests, check your Core Web Vitals, and learn which areas to improve.
If you found out that your site isn’t performing well, consider switching to a tried-and-true Managed WordPress Hosting provider that provides a speed-optimized infrastructure and a 99.9% uptime guarantee.

Hostinger’s Business plan and above also come with a Content Delivery Network (CDN). It’s a network of global remote servers that stores copies of your website content, improving loading speed.
With Hostinger data centers located across four continents, you can easily choose the nearest server location to your audience for faster content delivery.
After making sure you use quality WordPress hosting, implement these tips to speed up your WordPress site further:
- Use a fast WordPress theme. A lightweight and optimally coded WordPress theme helps speed up your site’s loading time. It’s also worth choosing a theme that supports Accelerated Mobile Pages (AMP) for mobile optimization.
- Update your site’s WordPress core software, plugins, and themes. Get the latest performance and security improvements to keep your website running smoothly.
- Remove unused WordPress plugins and themes. They can take up server resources and slow down your website.
2. Add Your Website Sitemap to Search Engines
Although search engines index websites automatically, submitting a sitemap will help them understand your site’s structure better and faster.
A WordPress sitemap should contain a list of all public URLs on your website. There are two types of WordPress sitemaps – XML and HTML.
An XML sitemap is the one you should submit to search engines. It shows all the pages within your site, along with their importance and relationships with each other. Thanks to this structured site hierarchy, crawlers can find specific content more easily.
Here’s how to generate an XML sitemap using AIOSEO:
- Head to All in One SEO → Sitemap from your WordPress dashboard.
- Open the General Sitemap tab and click the Open Sitemap button.
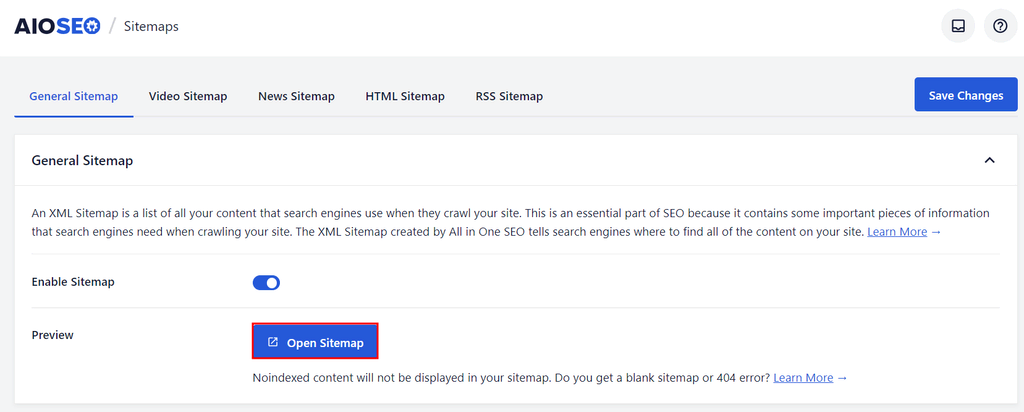
- Once your browser opens the XML sitemap in a new tab, copy the URL and submit it to search engines via Google Search Console or Bing Webmaster Tools. There’s no need to submit the sitemap to other search engines like Yahoo! and DuckDuckGo since they use indexing data from Bing Webmaster Tools.
For more detailed steps, read our complete guide on how to submit a website to search engines.
3. Utilize Structured Data
Structured data makes it easier for search engines like Google to understand your content. It uses a special code called schema markup to help describe what’s on your pages, like articles, product listings, or event details.
Search engines then read this code and display rich results that appear above the regular results. These rich snippets can boost your site’s exposure, increasing your click-through rates in the process.
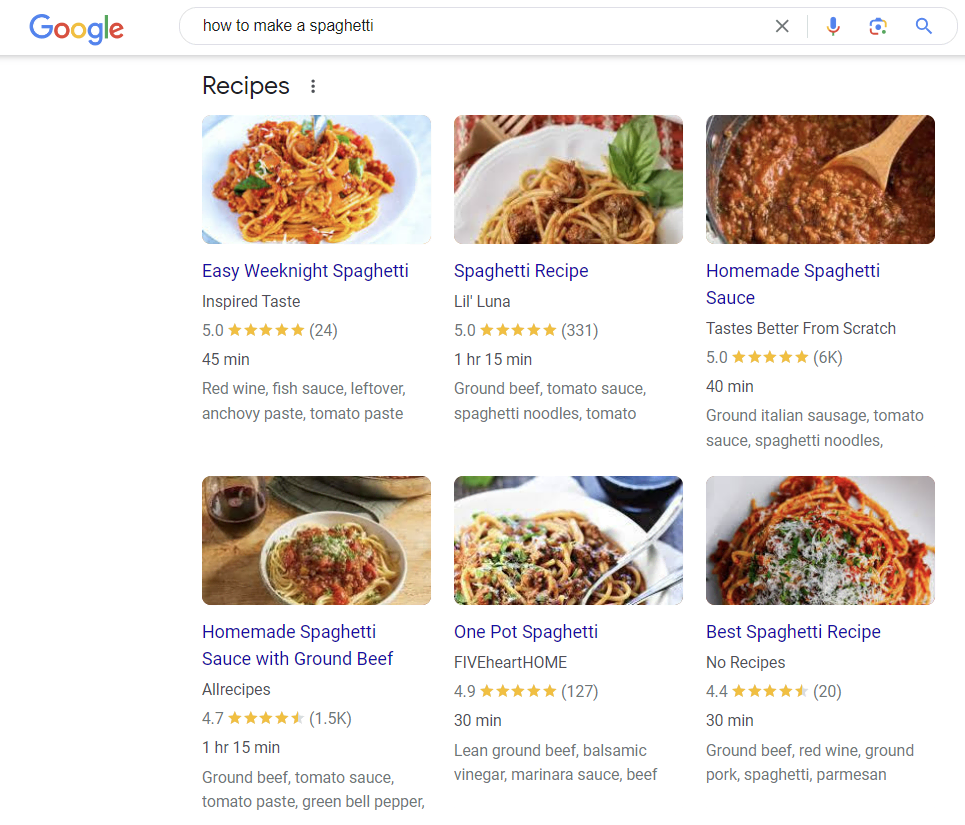
An example of rich results is the Recipes snippets. By applying structured data, a recipe page can appear more engaging in search results, showing the meal’s photo, rating, ingredients, and prep time.
Other common rich result types include Books, Reviews, Movies, Top Stories, and Products.
To increase the chances of your pages appearing as rich results on SERPs, you need to follow the structured data guidelines. However, note that Google does not always create a rich result section for a query, even with structured data.
There are two methods to add WordPress schema markups: using a WordPress schema plugin or manually adding it with JSON-LD. Note that the manual method is more geared toward advanced users, as even the smallest of mistakes can lead to site errors.
For beginners, using a WordPress SEO plugin like AIOSEO to add schema markups is much easier. With it, you can create site-wide schema markup or add it to each page and post separately.
Adding Site-Wide Schema Markup
By performing these steps, the schema markup will be applied to all posts and pages by default:
- Go to All in One SEO → Search Appearance from your WordPress dashboard and select Content Types.
- Open the Schema Markup tab under both Posts and Pages sections.
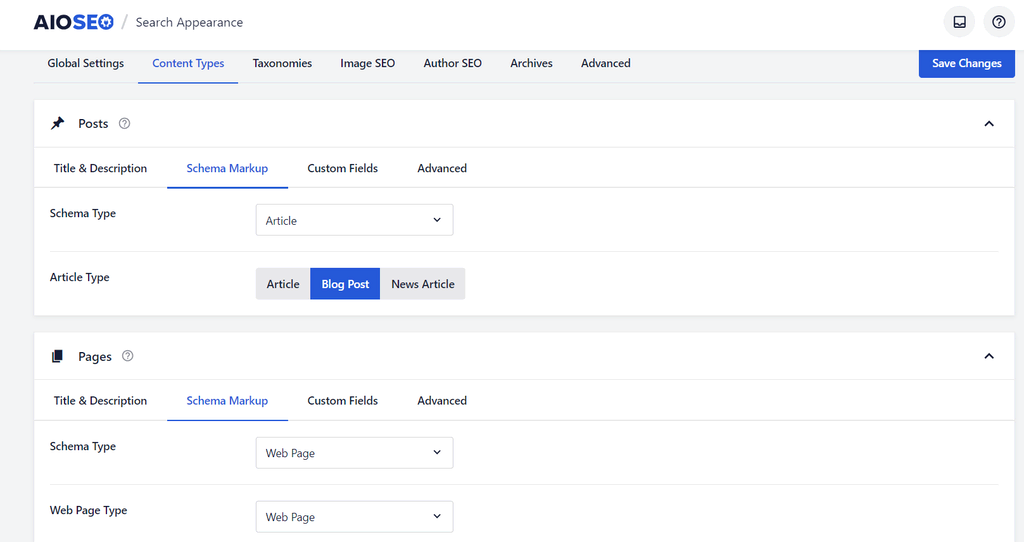
- For Posts, choose your default Schema Type from the drop-down menu. If you choose Article, you have to specify its type – Article, Blog Post, or News Article.
- Do the same for the Pages section, and save your changes once done.
Adding Schema Markup for Individual Pages and Posts
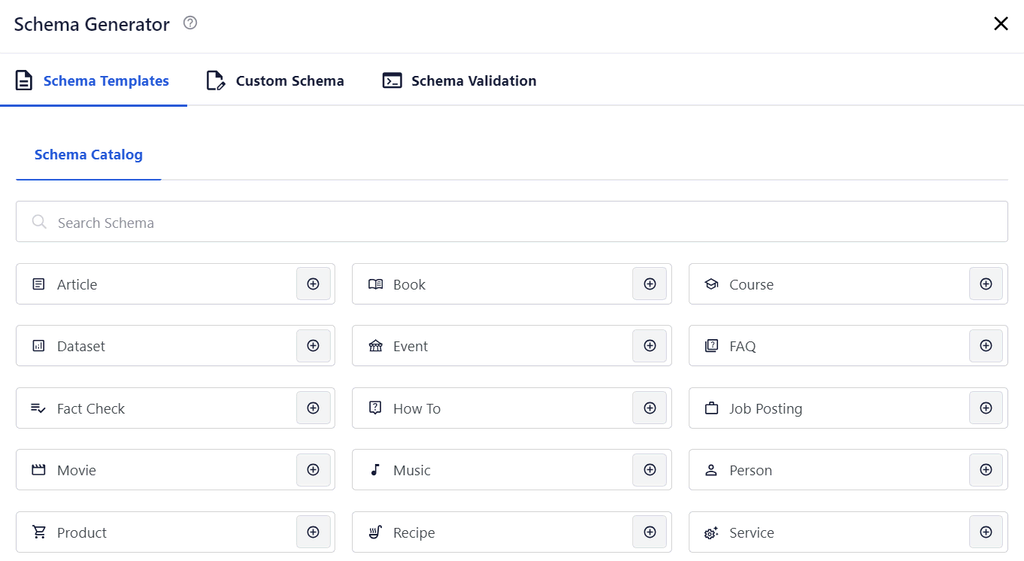
The AIOSEO plugin also lets you add specific schema markup for individual pages and posts:
- Open the page or post you want to edit.
- Scroll down to the AIOSEO Settings and select the Schema tab.
- Click Generate Schema and choose a schema template based on your content type. You can also add your own JSON schema by selecting the Custom Schema tab.
Do not use an incorrect schema markup. For instance, don’t choose the Article schema type for a recipe page.
Finally, use Google’s Schema Markup Testing Tool to see what rich results search engines can generate for your page and validate your schema markups.
4. Avoid Cannibalization
Keyword cannibalization happens when two or more pages rank for the same keyword.
It can damage your overall SEO effort since the traffic will be split across multiple pages instead of one. Even worse, the page with better conversion chances might be ranked lower, hurting your conversion rate in the process.
Here’s how to identify keyword cannibalization using Google Search Console:
- On the left menu bar, go to Performance → Search results.
- Click the (+) plus icon and select Query to add a query filter. This is the keyword that you want to check for cannibalization.
- Scroll down to the Pages tab, and you’ll find all the URLs that get clicks and impressions from the keyword.
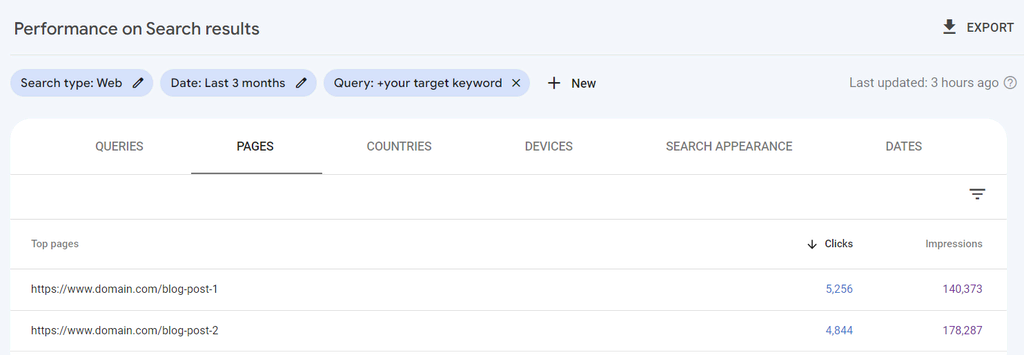
If there are multiple URLs that get significant clicks and impressions for the same keyword, it’s an indication of cannibalization.
To fix it, take a step back and re-adjust your SEO strategy for these pages so they target different aspects of a topic or different keywords altogether. Here’s how:
- Understand the primary focus and user intent behind each page. Determine if they are indeed serving the same purpose or if there’s a slight variation in the angle or information provided.
- Find a new focus keyword for the page you decide to repurpose. Look for long-tail keywords or variations that reflect a different aspect or niche within the same topic.
- Revise the content of the page targeting the new focus keyword. This involves rewriting sections, headings, and metadata so the new keyword is naturally integrated throughout the text.
- Use internal linking strategically. Link from relevant pages on your site to the updated page using anchor text that includes the new focus keyword.
- After making these changes, monitor the performance of the updated page and the original page in search engine rankings, clicks, and impressions for their respective keywords. Use tools like Google Search Console to track progress.
Be prepared to make further adjustments based on performance data. SEO is an iterative process, and it may take several tweaks to find the optimal strategy for each page.
5. Configure Canonical Tags to Avoid Duplicate Content
When multiple URLs lead to the same content, search engines choose one as the canonical version and crawl the duplicates less often.
Duplicate content occurs when multiple pages point to the same page, including its www and non-www versions. Content is also duplicated when there are separate URLs for mobile and desktop.
The same page in a different language may also be deemed as a duplicate. Be sure to check for duplicates if you have a translation feature on your website that doesn’t apply to all content.
There are a number of ways to set up canonical tags, but using a plugin is the easiest one:
- Use online tools like Siteliner to identify duplicate content. Enter your domain name and click Go to start analyzing.
- Once the report is ready, scroll down to Your Duplicate Content and click Duplicate Content.
- After identifying the duplicated pages, decide which version of the content you want search engines to index and rank. This version will be the canonical page.
- From the WordPress dashboard, open the page or post you want to set as the canonical version.
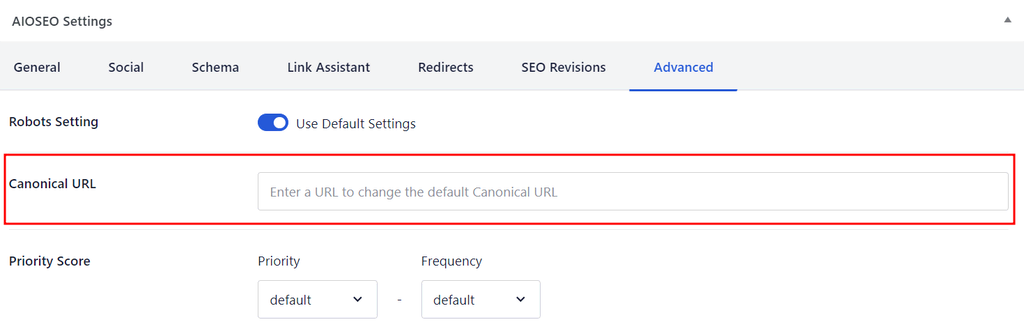
- Scroll down to AIOSEO Settings → Advanced, and enter the URL in the field next to Canonical URL.
- Update or publish the page to save your changes.
This will ensure the correct page is crawled rather than the duplicates.
Another method is by adding the rel=”canonical” attribute to the HTML section of all duplicated pages, each pointing to the canonical version. It’s a bit trickier, but you can check out Google Search Central for the complete steps.
6. Redirect Your WWW to non-WWW URL or Vice Versa
A redirect is a way to send both users and search engines to a different URL from the one they originally requested.
It’s commonly used to guide visitors from old or deleted pages to new content, ensuring a smooth user experience. Redirects can also help you avoid duplicate content, especially for www and non-www URLs.
First, decide whether you want to use the www or non-www URL, as Google considers them separate URLs. From an SEO perspective, there isn’t a significant difference between www and non-www URLs – it’s more about personal preference.
The key is to use one format consistently to avoid content duplication issues. Whichever URL type you prefer, specify it in your WordPress site’s settings:
- Head to your WordPress Dashboard → Settings → General.
- Enter the preferred version in the WordPress Address (URL) and Site Address (URL) fields.
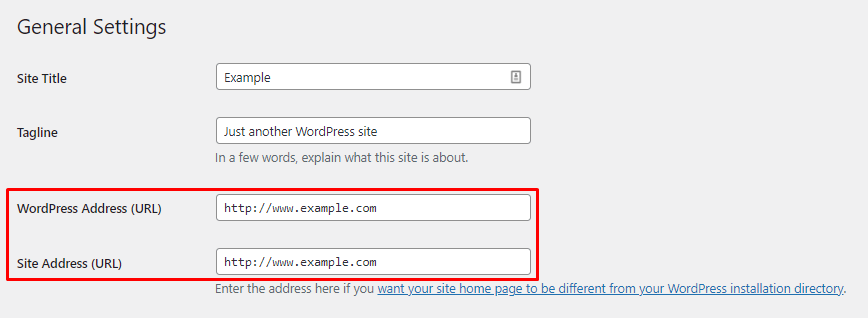
- Click Save Changes.
After that, make sure to redirect your non-www URLs to www ones or the other way around. This practice prevents search engines from indexing your site’s content under multiple URLs, which can dilute page rankings and split link equity.
Having a consistent URL ensures that all the link authority is directed to a single version of your site, improving its search engine visibility and rankings.
7. Noindex Low-Value Content
Low-value content consists of pages and posts that search engines and visitors do not consider valuable. To maintain your site’s authority, it’s best to discourage search engines from indexing this type of content.
Content is low-value when it does not provide a direct answer to a query. The following posts and pages are some common examples of low-value content:
- Archive pages
- Category pages
- Low-quality blog posts
- Marketing content
- User-generated content
You can perform an SEO audit process using tools like Ahrefs to find low-value content on your site. If you find pages targeting low-priority keywords with poor rankings and traffic, add the noindex tag.
Adding a noindex meta tag prevents specific WordPress posts and pages from showing up on SERPs. In other words, users won’t be able to find the page with a search query. Visitors can still access the page using its exact URL, but it will not negatively impact your site authority.
Remember to add noindex tags to low-value content only. Adding a noindex tag to canonical or duplicate pages may confuse WordPress and search engines.
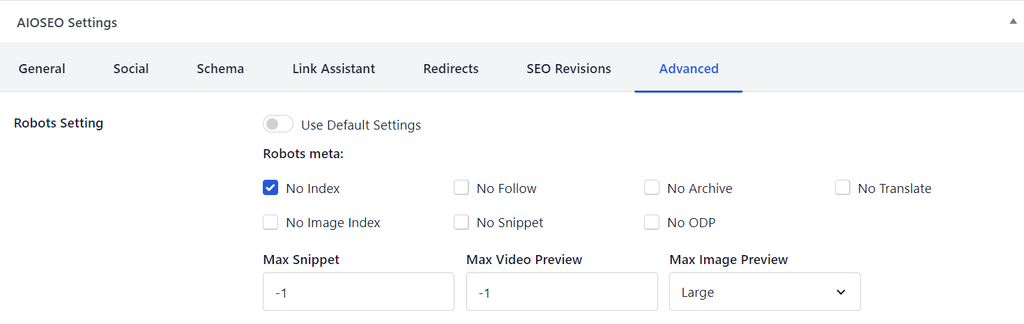
Most WordPress SEO plugins include features to noindex low-value content. Here’s how to do it with AIOSEO:
- Open the low-value page or post and scroll down to AIOSEO Settings.
- Open the Advanced tab and disable the Use Default Settings option for the Robots Setting.
- The robots meta options will appear, and you can check the No Index option.
- Click Update to save your changes.
8. Measure and Track Results
Now that you’ve implemented both on-page and technical SEO best practices, it’s time to measure your site performance using Google Analytics and Google Search Console.
Google Analytics
Google Analytics offers real-time website performance and audience data, including acquisition, engagement, and retention rates.
Here are some ways Google Analytics can improve WordPress SEO:
- Provide audience insights. Learn your audience’s interests and demographics to help create new content and audit existing ones.
- Improve marketing strategies. Measure the performance of your marketing efforts to identify areas of improvement and achieve better conversion rates.
- Analyze the most active time of day. Identify the website’s busiest time and publish posts accordingly.
- Highlight the most popular content. Find out what types of content attract the most visitors.
The free version of Google Analytics offers enough information for most websites. However, enterprises with a lot of traffic can benefit from Analytics 360, the premium version that provides advanced analytics, support, and data freshness.
Check out our guide on how to add Google Analytics to WordPress and start recording your website’s performance data.
Google Search Console
Google Search Console monitors a website’s performance on the Google search engine. This free tool shares insights on a page’s search engine visibility, average SERP position, and Core Web Vitals score.
Here are some benefits of using a Google Search Console account to help your WordPress SEO efforts:
- Easier keyword research. Quickly learn which keywords bring the most traffic.
- Improve link building. Find out the websites that link to your pages and ensure their trustworthiness.
- Submit XML sitemaps. Use Google Search Console to enter your website’s XML sitemaps.
- Get SEO suggestions. Highlight areas to focus on when optimizing your website performance.
Read our comprehensive Google Search Console tutorial to set up your account, add your website to Google Search Console, monitor keyword performance, diagnose issues with your site, and much more.
WordPress SEO Best Practices for Off-Page
WordPress SEO effort doesn’t only apply to your website. There are actions you can take outside your site to improve its rankings. This strategy is called off-page SEO, and it helps you gain more traffic to your website and build valuable links.
1. Make the Most of Your Social Media Presence
Even though social media is not a direct WordPress SEO ranking factor, it can improve your strategy in several ways:
- Increased content distribution. Sharing your content on social media platforms increases its reach and visibility. The more your content is seen and shared, the more traffic it will get.
- Improved brand recognition and authority. An active and engaging presence on social media helps build your brand’s recognition and perceived authority in your field. This can lead to more branded searches on search engines, which is a positive signal to search algorithms.
- Enhanced user engagement. Social media platforms provide a space for users to engage with your content through likes, shares, and comments. This presents the perfect opportunity to build a lasting relationship with your audience.
It’s also worth noting that Google indexes major social media platforms. Therefore, optimizing your social media profiles can help them rank on SERPs along with your website.
That said, using social media for SEO requires consideration and proper planning. Here are some recommended social media strategies to get you started:
- Optimize your profile. Include valuable details about your website. Feature some industry-relevant keywords to increase your social media profile page’s ranking.
- Share content regularly. Use compelling copy and visuals to attract users to your blog posts.
- Install a WordPress social media plugin. Plugins make it easy for readers to share your posts on their social media profiles. Some social media plugins also display the share count of a post to show its popularity.
- Engage your followers. Encourage interaction with polls, surveys, question-and-answer sessions, and custom hashtags.
You should choose an appropriate platform to build your social media presence. Depending on your website’s niche, the following social media platforms are particularly effective for boosting your site’s SEO:
- LinkedIn. Particularly effective for B2B companies, LinkedIn helps establish authority and credibility in your industry. Sharing insightful posts and participating in discussions can drive targeted traffic and professional engagement.
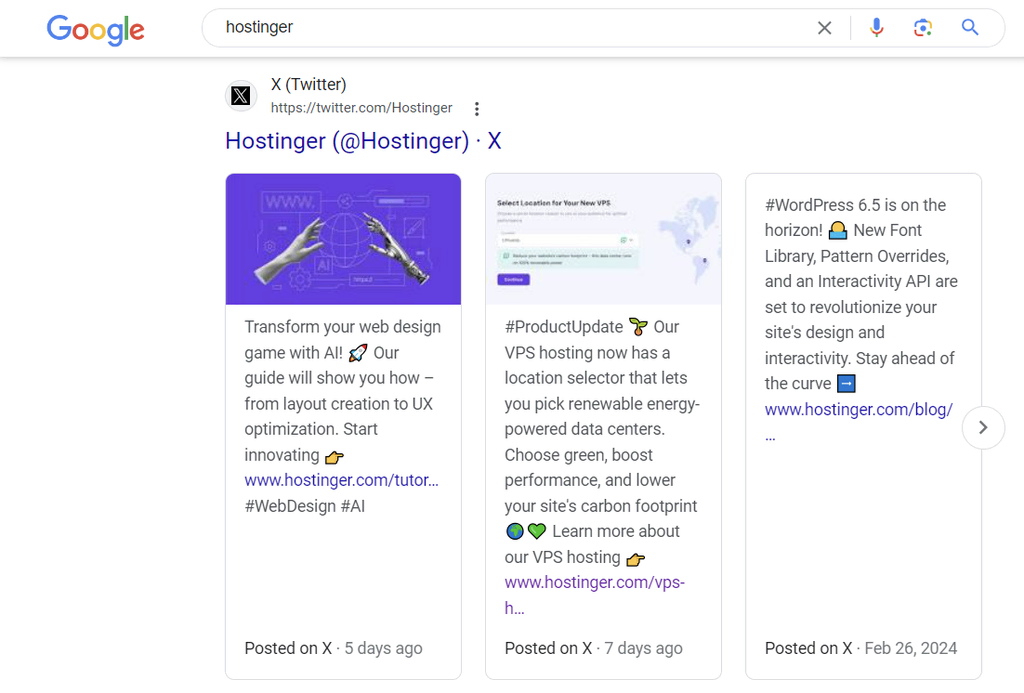
- X (formerly Twitter). The platform’s fast-paced environment is ideal for sharing company updates and articles and engaging in conversations with hashtags related to your niche. Plus, when users search for your brand on Google, your X posts usually appear as one of the results.
- Facebook. With billions of active users, Facebook offers immense reach. Joining relevant groups, engaging with your audience, and running targeted ads can drive traffic to your site and increase content visibility.
- Medium. Articles from this blogging platform often rank on SERPs. That’s why, if you’re just starting, writing on Medium helps you increase exposure and establish yourself as an industry expert
2. Build Dofollow Links
Link-building is still one of the most effective off-page SEO strategies. It involves getting backlinks from other websites to yours.
When you earn backlinks from multiple reputable sources, some of their readers will visit your site. It also signals to Google that your content is valuable and credible, which will positively affect your site rankings.
That said, backlinks aren’t created equal – some links carry more weight than others.
Dofollow links let Google crawlers follow the links leading to your website, creating link juice. In contrast, nofollow links include a special HTML attribute that tells search engine crawlers not to follow the links or pass along link equity.
While nofollow links can still direct traffic to your website, they do not contribute directly to your site’s search engine rankings in the way dofollow links can.
Here are some ways to obtain dofollow links from other websites:
- Publish link-worthy content. In-depth guides, statistical pieces, expert opinions, and case studies usually attract a lot of organic backlinks. This is mostly because other sites can use the data to support their claims and arguments.
- Recover broken links. If you find a broken link on other websites, it’s an excellent opportunity to offer your website as a replacement. Contact the website owner and alert them about the broken link. Then, explain why replacing the broken link with one of your pages is better.
- Email outreach. Find high-authority websites and contact the owners. Ask them to link to relevant and valuable high-quality content on your website. However, they’ll most likely ask for something in return.
- Become a source for journalists. Platforms like Help a Reporter Out (HARO) enable you to connect with news outlets that need sources. When journalists use your expert insights in their content, they’ll link back to your site.
3. Find Unlinked Mentions
Some websites may mention your brand but don’t link to your website. These are called unlinked mentions.
Unlike nofollow external links that prevent search engines from crawling, unlinked mentions have no hyperlinks. This makes it impossible for search engines to detect them.
Luckily, transforming unlinked mentions into backlinks is easier than you might think.
You can find unlinked mentions on other websites via Google search’s advanced modifiers. However, this method may take more time. A much easier way to find unlinked mentions is by using Ahrefs:
- Log in to Ahrefs → Content Explorer.
- Search your brand and add the modifier to exclude your website. For example, “hostinger” -site:hostinger.com.
- Use the filter to narrow down the results. To get a list of quality pages, we recommend filtering pages whose Domain Rating (DR) is higher than 70 and has 50+ organic traffic per month.
- Export the results to a CSV file.
Once you get a list of URLs that mention your brand, use tools like Screaming Frog and ScrapeBox Free Link Checker to verify the results.
Finally, visit each relevant site, reach out to the author or administrator, and ask them to include links to your website.
4. Write for External Publications
Guest posting involves creating high-quality content for other websites that contain links to yours.
There are a couple of ways guest blogging can benefit your WordPress site:
- Link building. Guest blogging for high-authority websites lets you pass link juice to your site, improving its authority for a certain topic.
- Brand awareness. As a guest blogger, you may be able to mention your brand several times in the content. Even if the mentions are not linked to your site, more readers will be familiar with your business.
There are best practices you should follow to successfully build links from guest posts:
- Write high-quality content. Write about a topic that the website hasn’t covered, and offer unique perspectives from your own experience. Avoid overselling your product or service. Instead, subtly explain how your business can help solve the audience’s problems.
- Monitor your posts. Use Google Analytics to see how the guest posts perform over time and if they attract more traffic to your WordPress site.
- Use your author bio to generate leads. Some websites allow contributors to add a link to their website in the author byline. To generate leads, use this opportunity to link to your email newsletter form.
5. Engage in Email Marketing
Creating email newsletters can drive traffic to your website by notifying subscribers when new content is published.
Since the subscribers are already interested in your brand, they will likely be good-quality traffic with a higher session time and lower bounce rate. Newsletters also increase your content awareness, increasing the chances of getting backlinks.
You will need two plugins for successful email campaigns – a subscription form plugin like WPForms to gather subscribers and a newsletter plugin like Mailchimp to manage and send emails.
WordPress SEO Video Tutorial
Prefer watching a video? This video provides a step-by-step tutorial on how to install the Yoast SEO plugin and optimize your WordPress site for search engines.

Should You Hire a WordPress SEO Professional?
WordPress SEO is a long-term process that requires persistence. If you’re a busy entrepreneur, hiring a professional can be a viable option.
A WordPress SEO expert will help analyze your website and implement the necessary changes. They can assist you with traffic, social media, and marketing optimization.
Here are a couple of reasons why you may want to hire an SEO professional:
- More time for other tasks. Hiring someone will free up your time to focus on other responsibilities, such as content production and branding.
- Get updates and new ideas. SEO and ranking factors are constantly changing. WordPress SEO professionals keep up with the latest developments and can bring new ideas.
The cost of hiring a WordPress SEO professional varies. Website owners may pay hourly, monthly, or per project, depending on the agreement. The average rate of an SEO service is between $10-$250/hour, depending on the scope of work and the provider’s location.
Before hiring a professional to work on your WordPress SEO, consider the following:
- Experience. Check their previous SEO work by reviewing their portfolio and success stories.
- Skills. Make sure that the SEO professional knows how to optimize a WordPress website for search engines. In addition to understanding SEO and WordPress features, they should be familiar with useful WordPress plugins.
- Testimonials. Check comments and reviews from previous clients.
- Duration. Decide how long you want to hire the WordPress SEO professional. Start with a short-term contract and extend it if you are happy with the results.
An SEO professional should be honest about their process and what they can achieve. Avoid candidates who guarantee unrealistically quick success. Remember that quality SEO takes time to build.
Moreover, before hiring an SEO expert, ask them to give you a cost rundown to avoid incurring additional charges.
We recommend looking for an SEO specialist on freelance marketplaces like Upwork or Fiverr. These platforms provide detailed information about each candidate, their hourly price, and client reviews.
Alternatively, check out social media platforms, such as LinkedIn and Facebook. This way, you might be able to hire a professional with a more flexible rate. However, it will be harder to get proper testimonials from previous clients.
You can also purchase the services of a professional agency, like WordPress SEO Experts. With an experienced team, you will be able to accomplish a lot more SEO work.
Conclusion
Search engine optimization helps improve your website’s search rankings, drive more organic traffic, and, eventually, boost your conversion rate.
However, yielding good results from your WordPress SEO strategy will require time and continuous effort. It involves on-page optimization, like enhancing the user experience and creating quality content, and off-page optimization, like link building and guest posting.
If you don’t have the time, hiring an SEO professional is a good alternative. The expert will give you insights into the latest Google updates and come up with a proper SEO strategy, allowing you to focus on other important business tasks.
WordPress SEO Frequently Asked Questions
In this WordPress SEO tutorial, we’ve discussed all you need to know about WordPress SEO. Now, it’s time to answer some of the most common questions regarding the topic.
Is It Worth It to Pay For SEO?
Yes, especially if you want more time to focus on other important tasks. SEO is a continuous process that takes time and energy to maintain and optimize, especially if you don’t have a team of experts dedicated to SEO.
Is Affiliate Marketing Good for Site SEO?
Affiliate marketing doesn’t directly impact a WordPress site’s SEO. Affiliate marketing links usually use sponsored or nofollow attributes, signaling the search engine that the link is a paid placement and won’t pass on the link juice. That said, an affiliate marketing program can attract traffic to your site and increase brand awareness.
Do WordPress Websites Rank Higher Than Other CMS Sites?
Using WordPress doesn’t guarantee a higher rank than other content management systems, as Google treats all websites equally. However, WordPress has several features and advantages that help SEO, such as native permalink and alt text configuration. Thousands of plugins are also available to perform various search engine optimization tasks.

Maisha is a proponent of high-quality, actionable content. When she's not writing for Hostinger Tutorials and Blog, she immerses herself in the English thesaurus. Her love for personal development essays drives her to help her fellow writers succeed in the world of content marketing.

Brian is a Content Writer who knows the ins and outs of digital marketing and eCommerce. Driven by passion and a dose of caffeine, he constantly looks for better ways to tell complex stories in a simple manner. Follow him on LinkedIn.


Comments
July 08 2018
I am a new blogger and running a blog on Health niche. I read so many articles on internet about how to rank a blog, how to increase search engine ranking, and many more but today I read your article. It is totally different and informative as compared to other blog articles. I am highly impressed by the way you describe each and every SEO tip in a descriptive manner. I liked your writing style too. According to me, you read so many articles before writing this and there is no doubt that you are an experienced blogger. These days, no one wants to share their knowledge with everyone but you are a different guy. You are truly an inspiration for other bloggers. I will surely apply all the SEO tips you shared in this article and will hope for the best. Thanks for sharing these SEO tips with us.
July 15 2018
Thank you for the feedback! I hope our WordPress SEO tips will increase your traffic 100x ;)
July 14 2018
I read the whole article and learned a lot of things. I didn't know about the 'Fetch as Google' thing. Thanks anyway!
July 15 2018
Awesome, I'm glad to hear you found the guide useful!
August 06 2018
Thanks for this amazing write-up! Your article alone gave me a lot of insights and information. Keep on sharing amazing stuffs like this one! Great post!
October 25 2019
I am a new blogger and running a blog on Government Jobs niche. I read so many articles on internet about how to rank a blog, how to increase search engine ranking, and many more but today I read your article. It is totally different and informative as compared to other blog articles. I am highly impressed by the way you describe each and every SEO tip in a descriptive manner. I liked your writing style tomuch
October 25 2019
This article is an excellent example of a SEO post itself. Despite that all of the techniques are well know to the average blogger, all of those are true. Even though this article is almost perfect, it don't appear on the first page of "Seo tips" and holds a seventh place on longer keyword - "wordpress seo tips". This pattern shows that even with the perfect article you can not always be first in the Google results. But don't be discouraged by that - maintain best practices for SEO, put in the work, exploit long tail keywords and results will come to.
February 27 2020
Thanks for sharing with us, really a very help full post for us.
April 10 2020
This is very best seo tips used this seo tips and got best results.
September 07 2020
Very nice blog for beginners it is to know about that its really very usefull to make this content of post i really thank you for sharing this post.
November 11 2020
You are very very welcome, Jeffery.
October 20 2020
Your blog is very nice… I got more information From your blog page… Thanks for sharing is this great information. Also, please help me with some SEO suggestions for my website: https://www.tech-act.com/
February 02 2021
Hi, Sampada! Feel free to check out out piece on best WordPress SEO plugins ;)
December 23 2020
Most informative content I have ever read on Internet. Thank you so much for spending my time pretty efficiency :)
February 09 2021
Happy you liked it!
December 24 2020
I really like your writing style, great information, thank you for posting. I completely admitted myself with this post. Once again I just would like to say that keep it up like this.
April 27 2021
Google’s AdWords Keyword Planner is helpful for prioritizing keywords and discovering new queries. The Keyword Planner provides monthly search volume trends and competition scores for paid advertisers.
June 06 2021
I'm new blogger i have seen a lot of videos on YouTube and read a lot of articles but the knowledge i get from this article is incredible. You're such a amazing guy Bro.
July 20 2021
Very nice tutorial. That's why I bought Hostingers hosting, as the support system is awesome.
July 26 2021
Heya Deepak! Happy to hear that the customer support is awesome :)
September 06 2021
Very useful information!! You have provided really valuable and in-depth knowledge, which has proven to be quite beneficial to me. Thank you for giving such useful information.
September 20 2021
Happy to hear you found it useful!
September 24 2021
Only this post proved that any body is not equal you and your level
December 20 2021
aweosme
December 28 2021
Pretty! This has been a really wonderful post. Many thanks for providing this info.
January 17 2022
Thanks
April 15 2022
I wanted to post you a tiny note so as to thank you so much the moment again just for the gorgeous ideas you've shown at this time. It is quite remarkably generous of you to supply unreservedly exactly what many people would've distributed for an e-book in making some dough for their own end, most importantly given that you might well have done it if you wanted. The tips in addition served to become a great way to realize that the rest have a similar dreams much like my very own to know the truth a great deal more in respect of this matter. I'm sure there are many more enjoyable moments up front for individuals who look over your blog.
April 19 2022
Happy to hear you're enjoying our tutorials; the team always appreciates any feedback ;)
April 15 2022
you are truly a excellent webmaster. The website loading velocity is amazing. It seems that you are doing any unique trick. Moreover, The contents are masterwork. you've done a great process in this subject!
April 22 2022
With havin so much content do you ever run into any issues of plagorism or copyright violation? My site has a lot of completely unique content I've either written myself or outsourced but it looks like a lot of it is popping it up all over the internet without my authorization. Do you know any solutions to help prevent content from being stolen? I'd definitely appreciate it.
April 25 2022
Hi Darren! As long as your content is unique, you can always file a complaint with DMCA. Once DMCA approves your complaint, they will contact the host of the website and demand to remove the copied content in question. Good luck!
March 25 2024
Thank you for highlighting the significance of Search Engine Optimization in such a clear and informative way! Your post not only tackles its importance but also offers actionable tips. Looking forward to implementing these strategies!
March 26 2024
You're welcome! Wishing you success in implementing these strategies ?