How to Create a Counter-Strike 2 Server in 2024 (With Game Server and Manually)

Counter-Strike 2 (CS2) is a multiplayer tactical first-person shooter game developed by Valve. Released in September 2023, this game is set to replace its predecessor, Counter-Strike: Global Offensive (CS:GO).
If you’re looking to transition from CS:GO to CS2 or want an alternative to one of the official servers, you’ve come to the right place.
In this article, we’ll guide you on creating your own Counter-Strike 2 server, whether using an automated game server or a manual CS2 server setup. This tutorial is also suitable for both seasoned gamers and newcomers entering the server arena. Let’s get started.
Download Ultimate SSH Commands Cheat Sheet
How to Create a Counter-Strike 2 Server
Hostinger’s CS2 server hosting provides a seamless experience due to its optimized server environment. Here are the steps to do so:
1. Purchase a VPS for the CS2 Server
While Counter-Strike 2 doesn’t require a lot of resources, using dedicated servers tailored for gaming is essential. Hostinger’s gaming hosting provides a seamless experience due to its optimized server environment.
This service offers four plans starting at $5.99/month. These plans provide multiple advantages, including:
- Sufficient server resources – up to 32GB RAM and 8 vCPU, exceeding recommended specifications.
- Game Panel – a graphical user interface (GUI) control panel that simplifies CS2 server administration.
- Full root access – configure the game server to your preferences.
- DDoS protection – safeguard your server from DDoS attacks affecting performance and uptime.
- Automatic off-site backups – regular backups ensure easy file restoration in case of accidents or cyber attacks.

To sign up for Hostinger’s CS2 VPS, follow these steps:
- Select the VPS plan that suits your needs and click Add to Cart.
- Complete the checkout process.
- Navigate to VPS and click Setup next to your new plan.
- Enter your server name, set the Game Panel password, and choose your data center location. We recommend selecting the location closest to your players for the best gaming experience.
2. Generate a Game Server Login Token
To proceed with your Counter-Strike 2 server setup, you’ll need a Game Server Login Token (GSLT) associated with your Steam account. This token is mandatory for your server to go live, ensuring compliance with Steam’s service agreement.
Before generating the token, ensure you meet the following requirements:
- Your Steam account is not community-banned, locked, or limited.
- You have registered a phone number.
- Your Steam account owns the game for which you are creating a server.
- You comply with the limit of up to 1,000 game server accounts.
Once you meet the above requirements, follow these steps to generate your token:
- Log in to your Steam account and navigate to the Game Server Account Management page.
- Scroll down to the Create a new game server account section.
- Enter the App ID for Counter-Strike 2, which is 730.
- Add a Memo or name for your server.
- Click the Create button.

Your new token will appear. Store this token securely, as you’ll need it later when configuring your Counter-Strike 2 server.
Pro Tip
You can find all the App IDs on the Steam Database.
3. Create a CS2 Instance
With your dedicated server and GSLT ready, it’s time to launch a new Counter-Strike 2 instance. Hostinger’s Game Panel simplifies this part of the setup. Here’s a quick guide on how to do it:
- From your VPS account, navigate to the Panel access tab and click on the login URL.
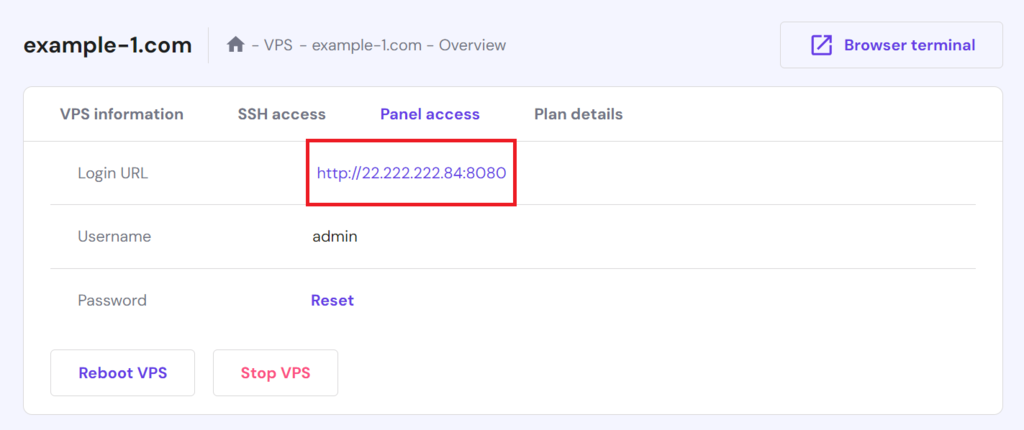
- Enter your login credentials to access the Game Panel.
- Once logged in, click Create Instance and choose Counter-Strike 2 from the Select Application dropdown list.
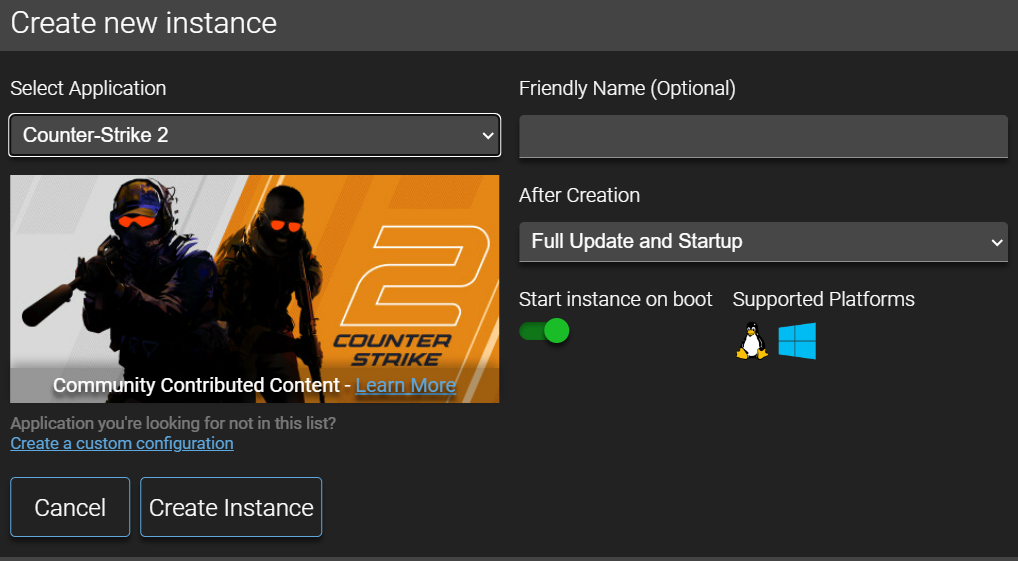
- Click Create to initialize your new CS2 instance to store your dedicated server files and configurations.
This step is similar for all games supported in Game Panel. For example, you can also create a dedicated server in Palworld by setting up a new instance.
4. Configure Your Counter-Strike 2 Server
Once your Counter-Strike 2 instance is up and running, it’s time to tweak your server settings to your preferences. The Game Panel is your go-to tool whether you want to set game modes or give your server a name. Here’s a quick roadmap:
- Click on your instance and select Manage from the right-side menu.
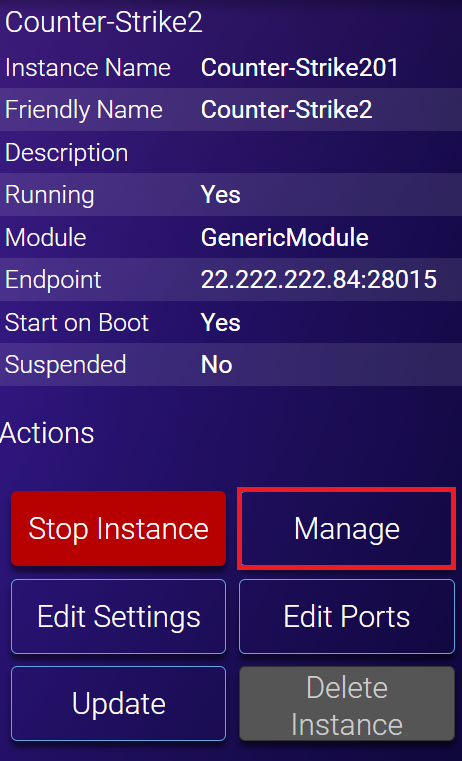
- This takes you to the Counter-Strike 2 server management page. Navigate to Configuration → CS2 Server Settings.
- Insert your generated GSLT in the provided field.
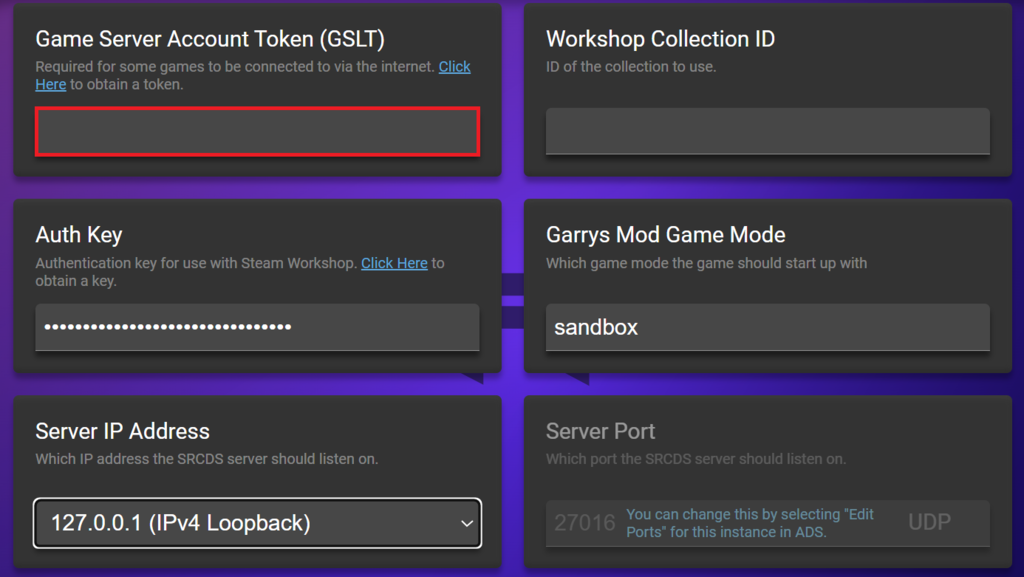
- Customize the game settings based on your needs, including the map name, maximum players, server name, Valve Anti-Cheat (VAC), and game mode preset.
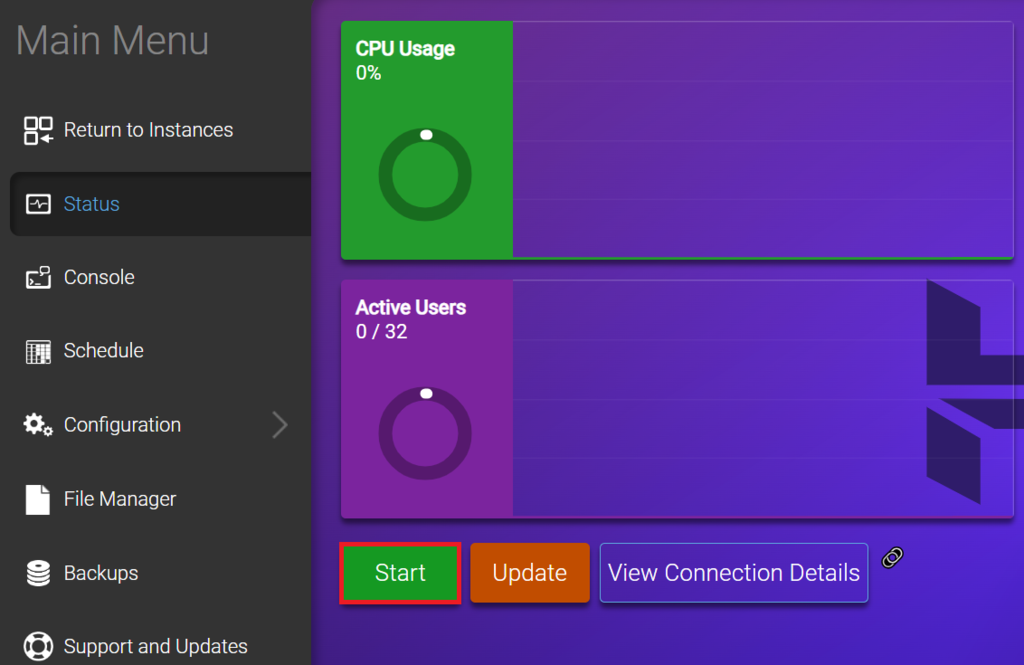
- Once you finish the initial server configuration, navigate to Status → Start.
- You’ll encounter a “Could not complete action” error. Don’t worry, as this is expected since the dedicated server files still need to be installed.
- Click OK, and the Game Panel will start downloading the necessary files. Monitor the Console menu for the download progress. This can take up to 15 minutes.

- Upon completion, you’ll see the following message in the Console:
"Success! App '730' fully installed."
5. Host the CS2 Game
Now that your server is set up, it’s time to host your first Counter-Strike 2 game. Follow these steps to start and manage your CS2 server using the Game Panel:
- Navigate to the Status menu and click the Start button once again.
- Wait for the server to reboot, then click Return to Instances.

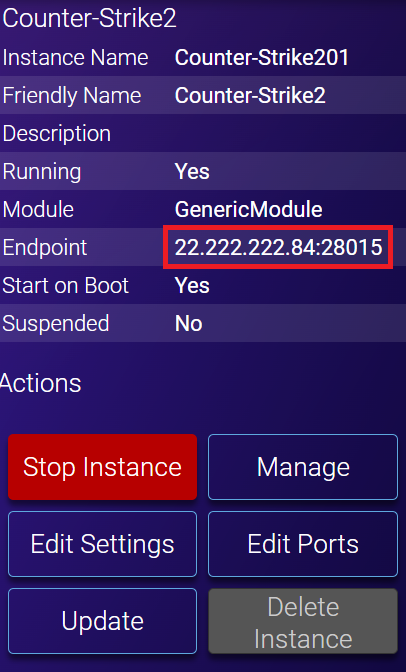
- On the right-side menu, locate the Endpoint containing your server IP, which the port players will use to join your game server.
To invite your friends to play, use the community server browser, employ the Steam client, or use the game’s console. Follow these steps for the console method:
- Start Counter-Strike 2 on your computer.
- Open Settings → Game.
- Change the Enable Developer Console option to YES.
- Return to the main menu and press the ~ key to open the console window.
- In the console window, enter the following command, replacing [Server IP]:[Port] with your actual credentials:
connect [Server IP]:[Port]
Lastly, the Game Panel offers various management options, like shutting down the server, updating the dedicated server files, and managing users and roles. Ensure to familiarize yourself with these features for effective Counter-Strike 2 game management.
How to Set Up a CS2 Server Manually
Manually setting up a Counter-Strike 2 server is an excellent option if you want more control and have technical expertise. You can do this on various Linux environments. In this example, we’ll use Hostinger’s VPS hosting on an Ubuntu 22.04 64-bit operating system.

Please note that commands might differ for other Linux distributions.
1. Access Your VPS
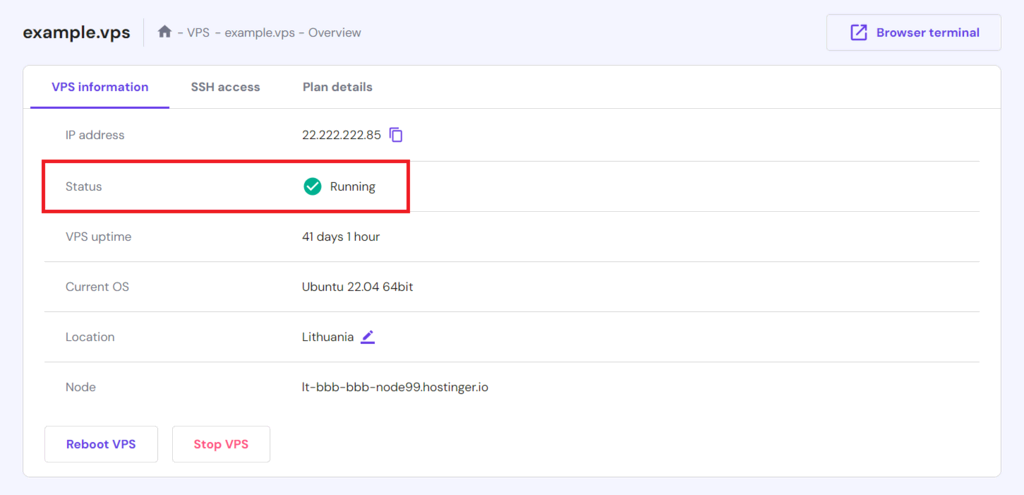
Log in to your Hostinger account and navigate to the VPS dashboard. In the VPS information tab, ensure your Hostinger VPS for CS2 server status is set to Running. If it’s not, click the Start button to initiate it.
Next, navigate to the SSH access tab. Here, you’ll find the details needed to access your server via SSH commands.

2. Install Required Dependencies
Before setting up your Counter-Strike 2 server, it’s crucial to update your package list. This gives you the latest software information, enhancing both performance and CS2 server security measures. Here’s how to proceed:
- Open an SSH client like PuTTY and log in to your VPS. Then, update the package list by running:
sudo apt update
- Install the essential dependencies needed for your CS2 server by executing the following Linux command:
sudo apt-get install lib32gcc1
3. Download and Install CS2 Server Files
To install any Counter-Strike 2 dedicated server files, you must download and install SteamCMD. It is the official command-line tool for the Steam client. Here are the steps to follow:
- As the root user, create a new user to execute SteamCMD safely:
sudo useradd -m steam
- Then, log in as the Steam user with this command:
su - steam
- Create a directory for SteamCMD and switch to it by running:
mkdir ~/Steam && cd ~/Steam
- Download and extract SteamCMD for Linux using:
curl -sqL "https://steamcdn-a.akamaihd.net/client/installer/steamcmd_linux.tar.gz" | tar zxvf -
- Install tmux and screen for easier CS2 server management with the command below:
sudo apt-get install tmux screen -y;
- Run SteamCMD using the following command:
./steamcmd.sh
If you see the Steam> prompt, you can start downloading the Counter-Strike 2 server files. Here are the instructions:
- Set your CS2 dedicated server install directory:
force_install_dir /full/path/to/cs2-ds/
- Log in with your Steam account:
login <username> <password>
- Install the Counter-Strike 2 dedicated server files and verify their integrity:
app_update 730 validate
- Once finished, type quit to log off the Steam servers properly.
4. Configure the Server
After successfully downloading and installing the dedicated server files, the next step is customizing your server settings. Navigate to the Counter-Strike 2 directory and edit the server.cfg file to configure the server according to your preferences.
- Ensure you’re in the game server’s directory by running the following command:
cd /full/path/to/cs2-ds/
- Open the server.cfg file with the nano text editor:
nano server.cfg
- Within the server.cfg file, you’ll find various settings, such as the server name, game type, and other gameplay rules. Take this opportunity to tailor the settings to your liking. For example, adjust the server name and game type, like this:
hostname "Your Server Name"
mp_gametype "Your Game Type"
- Once you are done with the manual CS2 server configuration, save the file and exit the text editor.
5. Start the CS2 Server
Now that you’ve completed the CS2 server customization, you can launch your Counter-Strike 2 server. To do this, navigate to the main server directory and start the server. Here’s how:
- Make sure you’re in the server directory using this command:
cd /full/path/to/cs2-ds/
- To start your CS2 server, execute the following command:
./cs2 -dedicated +map de_dust2
If you want to customize your CS2 server’s game mode and type when starting, refer to the cheat sheet below:
Competitive
./cs2 -dedicated +map de_dust2 +game_mode 1 +game_type 0
Wingman
./cs2 -dedicated +map de_dust2 +game_mode 2 +game_type 0
Casual
./cs2 -dedicated +map de_dust2 +game_mode 0 +game_type 0
Deathmatch
./cs2 -dedicated +map de_dust2 +game_mode 2 +game_type 1
Custom
./cs2 -dedicated +map de_dust2 +game_mode 0 +game_type 3
Choosing the right custom CS2 server settings is crucial for delivering your ideal gaming experience.
6. Monitor and Manage Your Server
After successfully starting your Counter-Strike 2 server, monitoring and managing its performance is crucial. The command-line interface provides an easy way to do this. Here are some common commands to keep in mind:
Restart Server
sm_restart
This command instantly reboots the server.
Change Map
changelevel de_newmap
This command switches the server to a new map specified by de_newmap.
Kick a Player
kick [username]
Use this command to remove a specific player from your game server.
Ban a Player
banid [SteamID]
This CS2 server player management command bans a player from joining your server.
List Connected Players
status
This command lists all players connected to the server and their information.
Log Server Activity
log on
This command enables the logging of server activities for review.
Set Max Players
maxplayers [number]
This command sets the maximum number of players that can connect to your server.
7. Connect to Your CS2 Server
Once your Counter-Strike 2 server is up and running, the last step is connecting to it from your gaming machine. This is straightforward if you know the server IP and port. Here’s how to do it:
- Ensure you’ve set up CS2 server port forwarding on your router to direct traffic to the server. Typically, CS2 uses ports 27015-27030 for this purpose.
- Launch Counter-Strike 2 and open the game console. This is usually accessible by pressing the ~ key.
- In the console window, type the following command, replacing [Server IP]:[Port] with your specific details:
connect [Server IP]:[Port]
- Press Enter, and you’ll establish your CS2 server connection. You’ll be prompted to enter a password if the server requires one.
Switching from CS:GO to CS2
If you’re familiar with managing a Counter-Strike: Global Offensive (CS:GO) server, transitioning to a Counter-Strike 2 server should be relatively smooth. However, there are vital adjustments and considerations to be aware of.
- Settings – while both games belong to the Counter-Strike series, their server settings can differ. Thoroughly review the configuration options when setting up a Counter-Strike 2 server hosting.
- Gameplay mechanics – the gameplay rules may have changed, even if only slightly. Adjust your settings accordingly to ensure an optimal gaming experience.
- Server resources – Counter-Strike 2 may have different server resource requirements. Be mindful of this when transitioning, as it can affect the server performance.
- Community and mods – the community content and mods compatible with CS:GO may not work with CS2. Keep this in mind before switching, primarily if your game server relies heavily on mods.
Conclusion
Setting up and managing a Counter-Strike 2 server might seem daunting, but with this CS2 server installation guide, you’re well-equipped to tackle the task.
From initial setup to customization, we’ve outlined the essential steps to get you up and running. Aside from properly configuring your new Counter-Strike 2 server, it’s also crucial to carefully choose the right provider to host your VPS.
By following the steps and tips in this article, you can create a stable and customizable gaming environment and make any necessary adjustments easily. That way, you’re all set to enjoy your Counter-Strike 2 gaming experience fully.
Discover Other Types of Servers You Can Set Up With VPS Hosting
How to Make a TeamSpeak Server
How to Set Up a Palworld Server
How to Host an Unturned Server
How to Create a Minecraft Server
How to Set Up a Linux VPN Server
How to Create a Rust Server
How to Create a Counter-Strike 2 Server FAQ
This section will answer the most common questions about how to create a Counter-Strike 2 server.
What Are the System Requirements for Running a CS2 Server?
The system requirements for running a Counter-Strike 2 server depend on hardware. You’ll need at least a dual-core processor, 2 GB of RAM, and sufficient storage space – typically around 20 GB. These are the minimum hardware requirements – consider more robust hardware solutions for optimal performance.
Can I Install CS2 Server Files on Any Linux Server, or Do I Need a Hostinger CS2 VPS?
While you can install the Counter-Strike 2 dedicated server files on various Linux servers, opting for a Hostinger CS2 VPS for CS2 server hosting comes with the added benefit of the Game Panel. This specialized control panel provides users with a GUI, making the installation and setup process easier and more efficient.
How Do I Keep My CS2 Server Up to Date with the Latest Game Patches?
You can keep your CS2 server updated with the latest game patches by checking for game updates regularly. Manually update your dedicated server files or create an automated process to fetch and install the newest versions. Doing so ensures optimal gameplay and server performance.
Can I Install Custom Mods or Maps on My CS2 Server?
Yes, you can install custom mods or maps on your Counter-Strike 2 server. This can significantly enhance gameplay and the user experience. However, ensure that the CS2 mods and add-ons are compatible with the current server version to avoid potential issues. Always test new mods and maps before making them live.

Ariffud is a Technical Content Writer with an educational background in Informatics. He has extensive expertise in Linux and VPS, authoring over 200 articles on server management and web development. Follow him on LinkedIn.

Comments
December 07 2017
2GB of space? You mean like 30GB! I first tried with a 20GB VM and it gave me an error that it was full! The cs:go server files are 16GB by themselves, and that's without extras.
April 16 2020
Got the resolution: lib32stdc++6 is needed, install it with: apt-get install lib32stdc++6
May 21 2022
i have this error metamod/bin/linux64/server.so: wrong ELF class: ELFCLASS64
May 24 2022
Hi there! I'd suggest to try running this command in the first step; it seems like you might be missing lib32stdc++6:
apt-get install lib32gcc1 lib32stdc++6Let me know how it goes ?