How to Make a Minecraft Server: Setting Up a Server on Linux, Windows, and macOS

Running a private Minecraft server lets you create a custom world and play with friends online. Although setting up a Minecraft server may seem difficult, it only takes minutes with the right tools.
Using a virtual private server is the easiest way to set up a Minecraft server. This article will cover how to make a Minecraft server with Hostinger. We will specifically focus on Minecraft: Java Edition.
Additionally, we will explain how to make your own local Minecraft server on different operating systems and avoid common errors during the configuration process.

Video Tutorial on How to Make a Minecraft Server
Too busy to read? Watch this video to learn how to create your own Minecraft server.

How to Make a Minecraft Server on a VPS
In this section, we will show you how to make a Minecraft server on Hostinger’s VPS using Game Panel. We recommend this method for beginners since it requires no coding.
1. Choose a Minecraft Hosting Plan
Purchasing Minecraft server hosting helps save money and effort. The hosting provider will set up your server, manage its back end, and ensure optimal uptime. This allows you to focus on the in-game configuration.
When choosing a provider, make sure it offers various features and suits your budget. Hostinger offers four Minecraft server hosting plans with these features starting at $6.99/month:
- Ample server resources – provides up to 32 GB RAM and 8 vCPU, more than enough for over 20 players.
- Distributed denial of service (DDoS) protection – protects your Minecraft server from cyber attacks to ensure optimal performance and uptime.
- Automatic off-site backup – regularly backs up your Minecraft server files for easy recovery in case of an accident or cyber attack.
- Mod support – lets users easily install mods and texture packs on the server to customize their gameplay.
- Custom Game Panel – offers various tools and a graphical user interface (GUI) to help simplify Minecraft server management tasks.
Pro Tip
Hostinger’s Game Panel simplifies the process of setting-up a dedicated server for dozens of online-based games, including the latest hit, Palworld. If you’re also passionate about this game, check Palworld VPS plans available.

2. Set Up Your Minecraft Hosting
After purchasing a plan from Hostinger, set up your virtual private server by accessing hPanel → VPS and selecting your new Minecraft server hosting plan.
Enter information including the server name, Game Panel password, and preferred server location. We recommend choosing the server location closest to the players.
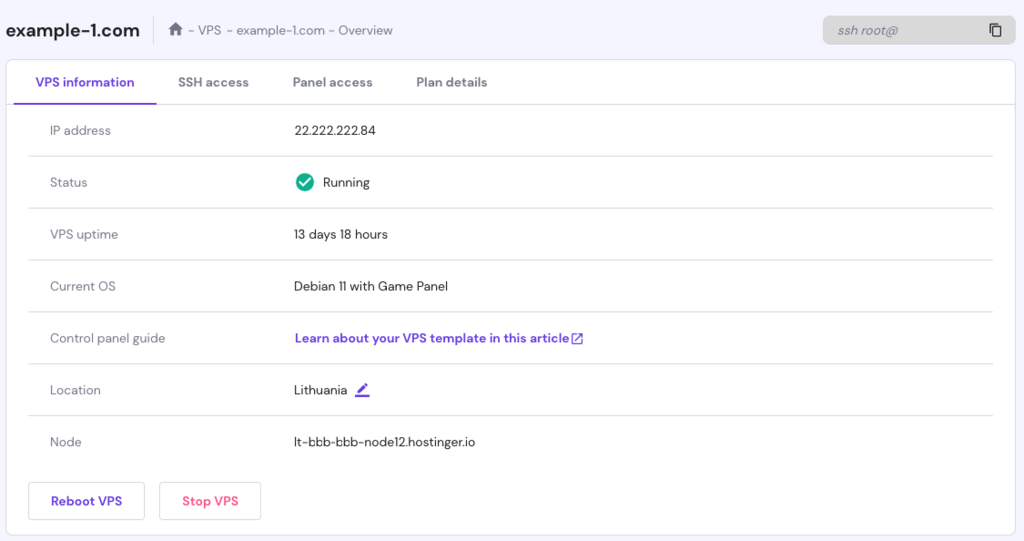
Then, access your server via the VPS menu. You can view information like server resource usage, operating system, panel access, IP address, and SSH login credentials.
3. Configure Your Minecraft Game Panel
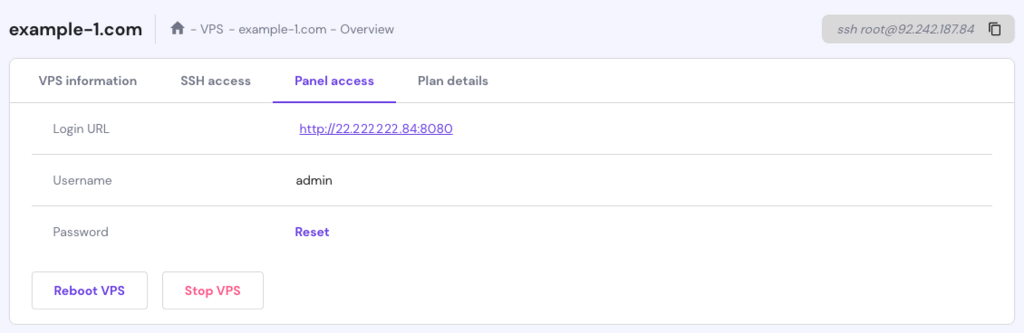
To configure the Minecraft server in Game Panel, navigate to hPanel’s VPS management screen → Panel access. Click Login URL and enter the login credentials.
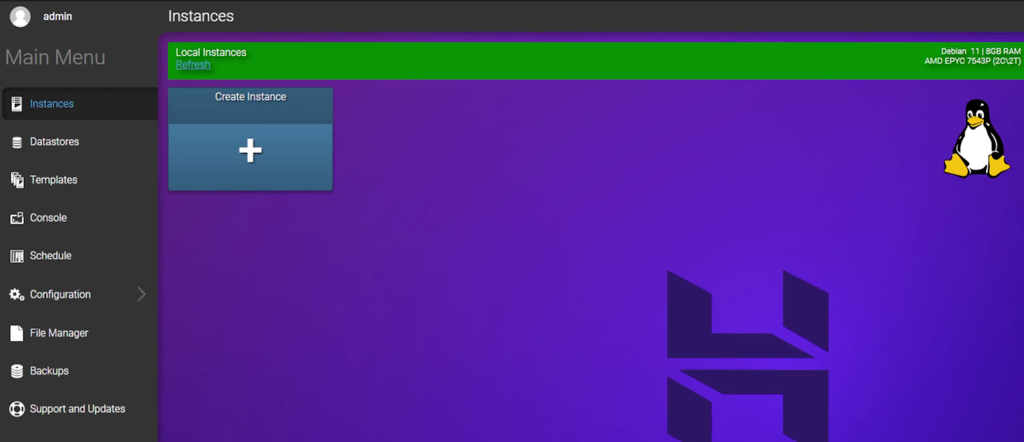
On the main menu, follow these steps:
- Click Create instance.
- From the Select Application drop-down menu, select Minecraft Java Edition.
- Select the instance behavior from the After Creation menu.
- Click Start instance.
Wait until the new instance shows up on the main menu. Then, follow these steps to configure it:
- Click your new instance and select Manage.
- Press Start and accept the Minecraft server end-user license agreement (EULA).
- Click Return to Instances and copy the endpoint from the sidebar to connect to your server.
This method to set up a private host applies to other games with dedicated server compatibility that Game Panel supports. However, there might be additional adjustments depending on the host and environment settings.
For example, you can also create a Palworld dedicated server by making a new instance.
Interested in Palworld?
Learn about why Hostinger is one of the best Palworld server hosting providers.
4. Enhance Your Minecraft Server
Before playing Minecraft, consider taking additional steps to enhance your server.
For example, enable port forwarding to allow users outside your network to join the game using the public IP address. However, we recommend disabling it if you are playing on a local network since it exposes your server to security risks.
Another tip is installing Minecraft mods to improve gameplay. Many Minecraft mods are available for different purposes, including boosting performance, adding new mobs, and modifying game mechanics.
How to Make a Minecraft Server on Linux
This section will show you how to create a Minecraft multiplayer server manually on Ubuntu or CentOS. We recommend using the latest version of each software to avoid compatibility issues.
1. Install Java, Screen, and wget
Java, Linux Screen, and wget are essential software for your Minecraft server installation. Here are their functions:
- Java – runs Minecraft and JAR files.
- Screen – lets users use a remote terminal from multiple locations and maintain sessions in case of connectivity issues.
- wget – allows users to retrieve files from a remote server via Terminal.
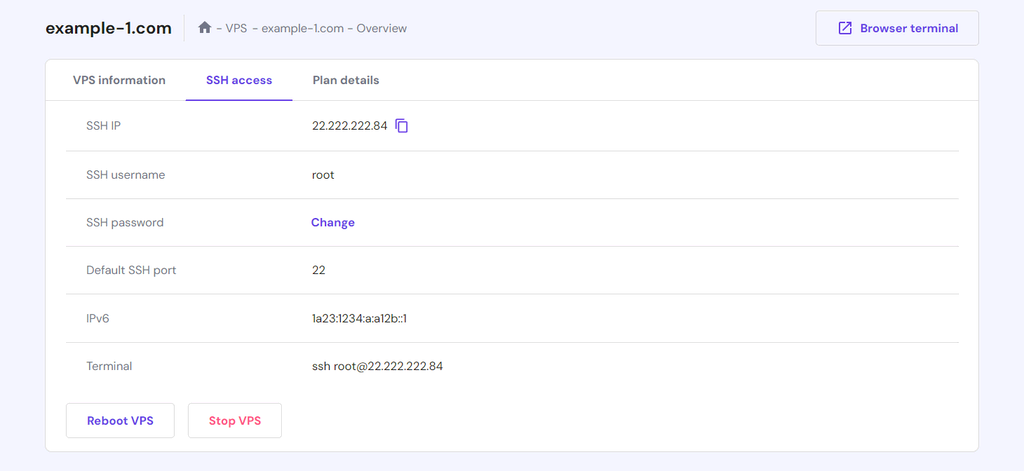
If you use Hostinger’s VPS, obtain the server IP address and SSH login credentials via hPanel. Then, connect to your remote server via SSH using PuTTY or Terminal. Otherwise, proceed with the installation:
Ubuntu and Debian:
Download and install the newest version of Java, Screen, and wget using the following commands. While you can use different Java runtime environments, we will use OpenJDK since it’s the simplest to install:
apt-get update
apt-get install software-properties-common screen wget apt-transport-https gnupg curl
apt-get update
apt install openjdk-19-jre-headless
CentOS:
Run the following commands to install all the required software packages:
sudo yum update
sudo yum install java -y
sudo yum install epel-release java-latest-openjdk wget screen -y
2. Configure the Minecraft Server
After installing the packages, follow these steps to set up the game server:
- Run this command to create a new folder for your Minecraft server configuration files:
mkdir minecraft
- Enter this command to move to the Minecraft server folder:
cd minecraft
- Use wget to download the server setup file from the Minecraft website:
wget https://launcher.mojang.com/v1/objects/a16d67e5807f57fc4e550299cf20226194497dc2/server.jar
- Use this command to run the Minecraft server software setup file. Omit nogui if you want a GUI. If the command doesn’t work, change the file name to server.jar:
java -Xmx1024M -Xms1024M -jar minecraft_server.1.19.jar nogui
- The server will create a EULA file. To accept it, run this command to open the eula.txt file with the Nano text editor:
sudo nano eula.txt
- Modify the eula value from false to true and save the changes.
- Activate Screen to allow the server to run in the background.
screen -S "Minecraft server 1"
Important! Make sure your Minecraft installation matches the server version. In our case, it is 1.19.
3. Run Your Minecraft Server
Enter this command to run the Minecraft: Java Edition server. Remember to change the Minecraft version number accordingly.
java -Xmx1024M -Xms1024M -jar minecraft_server.1.19.jar nogui
We entered 1024M since the server requires at least 1024 MB or 1 GB of RAM. Feel free to change the number according to your server resource.
The server window will remain open in the background. Press CTRL + A, then D to leave Screen. Enter the following in the server command line to reopen it:
screen -r
We recommend using the default server configuration to prevent issues. If you want to modify it, run the following to open the server properties file with Nano:
nano ~/minecraft/server.properties
Minecraft players can join the server via Multiplayer → Add server. Then, enter the server name and public IP address.
Suggested Reading
Learn how to host a Discord bot on your VPS.
How to Make a Minecraft Server on a Personal Computer
If you want to get more involved, you can set up a Minecraft server on your own computer. Although more complicated than hosting on a VPS, this process is rewarding.
Whether you’re using a Mac or a Windows system, the steps for setting up your server are very similar, allowing for a more personalized gaming experience across platforms.
How to Set up a Minecraft Server on Windows
You can create a private local server for Minecraft if your computer meets the hardware and system requirements. The process will depend on your operating system.
For example, here’s how to set up a basic server on Windows:
- Press Win + R and enter cmd to open Windows Command Prompt. Then, run this command to check the currently installed version of Java:
java -version- Minecraft and its servers require Java SE Development Kit 17 or higher. If you have an older release, download the latest version from the official Java website.
- Download the Minecraft: Java Edition JAR server software.
- Create a new Minecraft server folder and move the JAR file there.
- Double-click the file to generate a EULA in the server folder.
- Open eula.txt using a text editor like Notepad and change the eula value from false to true. You must accept the Minecraft EULA to start the game.
- In the same folder, create a new text document.
- Open the new text file and paste this script to run Minecraft. -Xms256M and -Xmx1G are the server’s minimum and maximum RAM for the game.
@echo off
start "My Server" /min java -Xms256M -Xmx1G -jar server.jar nogui
- Choose Save As. Rename the file to run.bat and select All types.
- Double-click the batch file to start the server. If the firewall permission window pops up, click Allow.
You can run the server manually instead of using the BAT file. To do so, open Command Prompt and navigate to the Minecraft folder. For example:
cd Documents/Minecraft
Then, run the command manually to execute the server JAR file:
java -Xmx256M -Xms1024M -jar server.jar nogui
Pro Tip
Edit the server.properties file in the same folder to adjust your server settings, such as the default Minecraft port, game mode, and maximum players.
To connect to the server, open Minecraft and click Multiplayer → Direct Connection. Enter localhost or your server’s local IP address in the Server Address field and click Join Server.
How to Make a Minecraft Server on macOS
Setting up a Minecraft server in macOS involves similar steps to Windows. Here’s how to do it:
- The newer macOS version should have Java installed by default. To check if it’s already installed, run this command in Terminal:
java -version- Skip this step if the command outputs the version number. Otherwise, download and install a legacy version of Java.
- Create a folder for your Minecraft server files.
- Download and move the Minecraft server setup file to that directory.
- Open TextEdit and click Format → Make Plain Text. Copy and paste the following lines:
!/bin/bash
cd "$(dirname "$0")"
exec java -Xms1024M -Xmx1024M -jar minecraft_server.1.19.jar nogui- Save this file as startmc.command in the same directory as the server file.
- Open Terminal and navigate to your Minecraft folder. For example:
cd Documents/MinecraftServer- Change the file permissions using the chmod command to make startmc.command executable:
chmod a+x startmc.command- Double-click the COMMAND file to start the server in a new terminal window.
Pro Tip
A missing file or directory warning might appear when you run a Minecraft server for the first time.
Minecraft Server Troubleshooting
Configuration and internet connection issues may cause Minecraft server errors. Here are some of the most common issues and their solutions.
How to Fix “This Server Responded With An Invalid Server Key” Error
This Server Responded With An Invalid Server Key indicates that the server or the Minecraft launcher might be outdated. If it’s your server, try accessing the server’s localhost and restarting the client.
Since this error commonly occurs when starting the server using the EXE file, try the JAR file instead.
How to Fix “You Are Not Whitelisted On This Server” Error
A whitelist includes the list of players with access to the server. The You Are Not Whitelisted On This Server error means that the server operator hasn’t included the player in the whitelist.
To solve it, run the following command to enable the Minecraft server whitelist management.
whitelist on
Then, add the player to the whitelist. Replace playername with their username.
whitelist add playername
Here’s the command to see the list of players on the whitelist:
whitelist list
Pro Tip
If you want to use these server commands in-game, precede them with a slash symbol. For example, /whitelist add playername.
How to Fix “Connection Refused: Connect” Error
The Connection Refused: Connect error message appears when Minecraft servers drop or cancel users’ connection requests. Here are several solutions for this error:
- Join the server via a different internet connection. Your internet issue may prevent you from connecting. If the issue persists after reconnecting, it’s likely a server error.
- Add Minecraft and the game launcher to the firewall exception list. The system firewall may block your connection. Configure your Linux firewall to allow the Java binary or javaw.exe.
- Reinstall your client and restart the server. Check if you can connect to other Minecraft servers. If there are no issues, your own client and server may be misconfigured and must be reinstalled.
Conclusion
Hosting your own server lets you create a custom Minecraft world and play online with friends. The easiest way to create one is by purchasing a VPS from a hosting provider like Hostinger. Here are the steps to set up a server on Hostinger Game Panel:
- Choose a Minecraft server hosting plan.
- Enter your server name, set a password, and select the closest server location.
- Open Game Panel and create a new instance.
- Configure the instance and copy the endpoint to connect to the server.
Alternatively, create the server on the VPS manually via SSH. However, this option takes longer and requires some technical knowledge.
You can also make your own server on a local Linux, Windows, or macOS system. To do so, install Java and the Minecraft server file using Command Prompt or Terminal. Then, create an executable file to start the server.
To improve the gameplay, enable your Minecraft server port forwarding and install mods. You may need to reconfigure the server to troubleshoot issues like invalid keys, whitelisting errors, and refused connections.
Discover Other Types of Servers You Can Set Up With VPS Hosting
How to Set Up a Counter-Strike 2 Server
How to Make a TeamSpeak Server
How to Make a Palworld Server
How to Create an Unturned Server
How to Set Up a Linux VPN Server
How to Host a Rust Server
How to Make a Minecraft Server FAQ
This section will answer some of the most common questions about Minecraft server hosting and maintenance.
How Can I Limit Access to My Server to Only My Friends?
You can set up a whitelist that includes only your friends. Alternatively, disable port forwarding and keep the server’s IP address private among your friends.
How Do I Protect My Minecraft Server Against DDoS Attacks?
Choose a web host with built-in DDoS protection in their server, such as Hostinger. Alternatively, get a DDoS protection service from a third-party company like Cloudflare.
Can I Run a Minecraft Server for Free?
Yes. However, free Minecraft hosting plans tend to have limited server hardware resources and features, resulting in a poor gameplay experience. Self-hosting your own Minecraft server costs less than using a third-party service, but it requires some technical knowledge.

Aris is a Content Writer specializing in Linux and WordPress development. He has a passion for networking, front-end web development, and server administration. By combining his IT and writing experience, Aris creates content that helps people easily understand complex technical topics to start their online journey. Follow him on LinkedIn.

Comments
September 23 2017
I ran minecraft and its working, but once i edited the properties of the server to change game mode and max players, it doesnt update. I figure i need to end the server program then run it again, but i am unsure how to end the program?
January 21 2018
I get that this is old and all, but you need to set the properties then hit [CTRL] [X] then it will prompt you to hit [y] for yes or [n] for no type [y] and hit enter
November 19 2017
I have to run the command as sudo otherwise it gives errors... sudo java -Xmx1024M -Xms1024M -jar minecraft_server.1.12.2.jar nogui [19:12:37] [Server thread/INFO]: Starting minecraft server version 1.12.2 [19:12:37] [Server thread/INFO]: Loading properties [19:12:37] [Server thread/INFO]: Default game type: SURVIVAL [19:12:37] [Server thread/INFO]: Generating keypair [19:12:37] [Server thread/INFO]: Starting Minecraft server on *:19132 [19:12:37] [Server thread/INFO]: Using epoll channel type [19:12:37] [Server thread/INFO]: Preparing level "world" [19:12:37] [Server thread/INFO]: Loaded 488 advancements [19:12:37] [Server thread/INFO]: Preparing start region for level 0 [19:12:38] [Server thread/INFO]: Done (0.888s)! For help, type "help" or "?" But when I add the server to minecraft, it just shows as "Locating server" and if I select the server it says "Unable to connector to world". I have tried disabling the Ubuntu firewall (ufw) and added the port forwarding on my router but it makes no difference. I am trying to get this working on an internal network (LAN) and have tried different ports with no luck.
December 14 2017
Hey, Are you adding minecraft server IP address?
January 27 2018
but how do you add a the server ip under the config file and if so is there a format we need to use?
February 01 2018
Hey Domantas, I think you should have a tutorial on how to set up a Spigot Minecraft server. It's a lot more user friendly :)
February 15 2018
Hello, Justin! Thank you for the suggestion. We'll make sure to keep it in mind when publishing future tutorials! ;)
February 25 2018
I'm having the same problem as John. I have the server running (I can tell because I removed the "nogui" option so I can see the window of what it is doing). When I go to the iPad or Android apps and try to connect to the server I get an error that it can't connect. I am on the same network and entering the server's IP and the port number that the server is reporting (25565). Does server name matter? The name I gave the server is Step 2-6 is too long to fit in the name field in the app.
January 18 2018
Just my two cents. First you may need to add the openjdk repository to ubuntu. sudo add-apt-repository ppa:openjdk-r/ppa sudo apt-get update sudo apt-get install openjdk-7-jdk Cheers --VC
June 12 2019
On minecraft.net/download it only shows the latest minecraft server version. Most people like to use 1.8 for their servers, maybe you should include how to get that minecraft server to.
September 18 2019
how do you find the ip in the server terminal?
September 24 2019
Hey Miles, It's the IP address you used to connect to the server.
October 30 2019
Nice, this tutorial helped me a lot.
February 26 2020
how can i let my server stay on?
March 12 2020
Hi DanielDark, What OS are you using? If you are using a Debian try the
screencommand:sudo apt-get install screen screen ./run-minecraft-server.sh:)March 29 2020
Hey Domantas, This was the best tutorial, hands down!!! Just spun up a vm ubuntu server in Azure then ssh into the server. I followed your directions exactlly and I got it up and running. I updated to the newer minecraft version 1.15.2 which you even thought of placing the link right there. Superb! Man I can't thank you enough!! P.S. The Step 3 has a slight might have a slight mistake it shows the command [ java -Xmx1024M -Xms1024M -jar minecraft_server.jar nogui ] i think you meant [ java -Xmx1024M -Xms1024M -jar minecraft_server.1.14.4.jar nogui ] Thank you1
April 24 2020
hey Eric, Glad this tutorial helped you. thanks for pointing out the mistake. It has been fixed.
April 12 2020
Is this for setting up a Minecraft server that'll support the Windows 10 client and cross platform play or will it only work for the Java edition? Cheers, Ben
April 13 2020
Hey Ben, this setup will support cross-platform play.
May 07 2020
Hi, I stream chess on twitch and are thinking about making a small minecraft server where me and my views can just relax and have some fun inbetween long hours playing chess. I have done this in the past and used a bukkit server on my mac. I was all fun untill we got hacked/greafed. Can i use bukkit plugins if I use hostinger and make the server how I want it. And how does the support work? I was thinking to try it for a month but I will use you guys longer if I like it.
May 08 2020
Hey Ivar, awesome! I love chess, whats your Elo rating? You will receive 24/7 live chat support when buying any web hosting plan, and by following this tutorial, you will have your Minecraft server up and running in no time. Let me know if you have more questions.
July 03 2021
Hi, I tried to press contact in the help section of your site but the link doesn't work. I've just purchased minecraft hosting, but have no game control panel that I can see in my server settings. I don't know where to login and how to direct my minecraft to the server etc. Please help. Also I need the domains to direct my domain to, as in, ns1.xxx.com and ns2.xxx.com. I hope to hear from you soon as we are waiting to set all up as we speak.
September 16 2021
Hi Emanuel, You can check out our starting guide for Minecraft here and if you're looking to point your domain name to your VPS, here's a step-by-step tutorial!
October 18 2021
can i put ANY mod i want? like literally ANY ONE in the world?
October 19 2021
Hey, yes - you can add any mod you like, as long as you have enough resources to run it :)